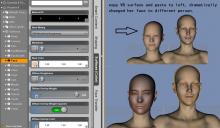
How to copy V8 skin(color) to another G8F?
Use face transfer to make a G8F, but don't like her skin, so want to use V8 skin on this new G8F. But no matter using V8 skin preset, or just simply copy and paste the skin, it always changes the face of new G8F, which delete the eyebrow and modified eyeball, looks like different person than the original photo of face transfer.
How to just apply the face skin texture or color without change eye parts and lips?


copy and paste.jpg
1530 x 890 - 258K


Comments
A lot of the resembalnce in face Transfer is in the maps. Try doing the texture swap in Smooth Shaded mpreview mode and I think you will see no change.
Before you need to use it, apply the desired materials to a figure then save out a Material Preset AND carefully UNselect everything that is not to be changed ;-)
Not yet, the above picture, I used normal 'texture shaded' view.
Attached is the Nvidia Iray view, you can see they are totally two person.
Sorry, you idea seems doesn't work, even carefully unselected those eye parts, lips, mouth, face geometry and ear geometry, etc., after merged the new preset, the eyebrow still gone, and nose, mouth shape changed. I don't want any shape changing, just want a new skin color.
Material presets do not change the shape of anything.
Shape presets change shapes.
Another way to change skin colour is to change the colour applied to the skin on the Surface Tab.
From Face Transfer the eyebrow is the eyebrow from your photograph. Of course when you change the texture image on the face that will be lost. Other skins either have painted on brows {or photos of brows} or are bare so one can apply fibre brows {more realistic appearance}.
I believe that Richard gave the definitive answer. What you are seeing is not a change in the characters shape. That is an illusion. As Richard said, utilities like Face Transfer essentially use 2D photographs to create a 3D representation of that photograph. The underlying shape is only adjusted enough to allow the texture maps created from the photographs to more or less fit the facial features. So such utilities are more texture creation utilities than they are shaping or morphing utilities. Some people take the minor morphs produced by the utilities and further enhance or modify them using morph packages or modelling programs so that the shapes as well as the textures more closely resemble the subject. Using other textures on characters created using utilities such as Face Transfer merely reveals how little the face shapes are actually modified and how much of the illusion is dependent upon the texture maps. Remove those maps = remove the illusion.
You might be able to do something like: