Four Quadrant Rendering for Large Bryce files for Printing
 pbudarick_4a3d2ac478
Posts: 0
Horo promted me to investigate this after our responses to a member post [ http://www.daz3d.com/forums/discussion/3962/ ].
The problem was:
(1) We wanted to render very large images for printing using only Bryce. The subject matter may be such that an image would take many days or even weeks to render. If the render time could be reduced to 50% or even to 70% then days of render time may be saved.
(2) We wanted to have curved perspective, which corresponds with reality and which moreover could be adjusted to any amount of curvature to suit a specific scene composition. In this way we would get good looking compositions and eliminate much of the distortion inherent in the straight line perspective of Bryce which is particularly noticeable when very wide angles of view are used.
(3) We did not want to have to stitch images together using special applications [because of the straight line perspective]. Although this method, quoted by Horo [ http://www.horo.ch/raytracing/tuts/online/tut21/minitut21_en.html ], is suitable for many applications, we wanted to find a simpler one which would be practical for most applications [but perhaps not for all].
At first i considered the problem unsolveable, but some instinct would not allow me to give up. So i spent all night thinking and dreaming about it!. Then i remembered the work of M.C. Escher. If we could produce curved perspective lines which naturally follow the spacial volume and lens geometry, then by using a 4-Quadrant subdivision and rendering method we might come close to our goal. I had already used the 4-Quadrant method for Bryce-ONLY modelling with good results so maybe it will work here.
What we needed was some kind of Bryce Lens to produce the virtual curved perspective lines. But a more efficient method would be to use a curved mirror [we then only have one reflection to worry about]. Refractive lenses would be render intensive but the single reflective surface might be practical.
So i began building an experimental setup. Please see Picture_01. It consists of a 2D grid of fine lines [made from cylinders], a camera facing backwards and a large sphere which is perfectly reflective [this could be squashed or stretched a little bit to get various curved perspectives]. These 3 objects are all in line and both the grid and the camera are linked to the sphere [which allows the setup to be moved and rotated as a set].
Then an object was made and placed on the other side of the grid but also very close to the grid. We then made a nice composition which rendered quickly. The intention was to remove the grid and change the materials before the main concurrent render with 4 instances of Bryce all running at once.
We still have to determine if the setup will work more universally. At present it works for a square scene with the camera level and horizontal. Please see Picture_02. Here you can see the 4 Quadrants and you can see there probably will be no distortion when we join the 4 pictures again later [ because of curve tangency were they cross the vertical and horizontal centre lines].
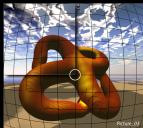
The procedure is as follows: First a Master File is made which can be loaded again and again. I used a test size of 800 x 800 pixels. Then we make the first Quadrant using a Plop-Render Marquee. This is rather tricky to do and requires good hand and eye coordination. Please see Picture_03. Then we click on the little triangle at the bottom of the attribute stack and select "Zoom to Selection" Then we save the transform as a new file called "Section_01".
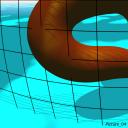
We repeat the above for the other 3 Quadrants ["Section_02", "Section_03" and "Section_04"] always starting again from the centre point after having reloaded the Master File. Please see Picture_04 for Section_03 before proper materials were applied.
Later when we have loaded them again and applied Materials etc., we can render them very large by selecting a "Render Resolution" of 1 : 4.00 in "Document Setup". When the 4 quadrants are assembled again in Photoshop we could thus have a very large Image.
For our render test we did something more modest. If it works on a small scale it will work on a large scale. Most likely it will work with other aspect ratios than the square. Will try that out later.
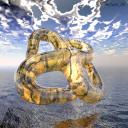
When we have all our Segment Files we delete the grid in each of them. In this experiment we applied materials that would take some time to render but not too much. We only wanted to test the principle. I made the sky in the deep texture editor and it is applied to the Cumulus Clouds in the Sky Lab. The material for the MetaBall Object and for the Water Plane are by David Brinnen as provided with Bryce 7.1 Pro. The lighting is kept simple.
The complete scene [800 x 800] was rendered with "Aggressive Optimization" and antialiasing set at normal. The CPU was running at 50%. It took 52 minutes 30 seconds to render. Then the 4 Sections were loaded and the size set to 50% [400 x 400] and "Report Render Time" turned on. The four renders were then started quickly one after the other. We had 4 concurrent renders going and the CPU was running at 100%.
The results were as follows:
Section_01: 19 min 29 seconds
Section_02: 13 min 18 seconds
Section_03: 18 min 29 seconds
Section_04: 29 min 56 seconds
Comparing the full render time with the render time required by the most demanding of the 4 sections, we gained 22 minutes and 30 seconds. If it had been a very large image with volumetric effects and other high cost effects, we could have saved ourselves many days using this method. In addition we got a beautiful perspective unlike the usual ugly Bryce one. And of course this perspective is adjustable to anything we want for aesthetic purposes.
Next we assembled the 4 sections in Bryce using an array of 4 Composit Plates [Picture Objects]. This would normally be done in Photoshop, especially if we need to work on a very large image [or don't have much time] and perhaps also have a few imperfections to fix up. But for a small experiment like this we can do it in Bryce as well. The good news was that everything lined up perfectly! We got what we expected. Please see Picture_05.
Our conclusion [for now] is that the method is practical for very large files, but requires some skill marking out the Plop-Renders. It is perhaps to complicated to use for anything that renders overnight.
Next we need to try other aspect ratios and camera angles.
Kind regards
Peter






Comments
This is very interesting Peter, in particular about the curving perspective lines, very interesting indeed, thanks for posting this!
Thanks David,
After i have completed the ARDL [IL] Tutorial Parts as promised, i will revisit this perspective idea and complete my report on it. It will probably work OK but it is not very practical [consider a scene with reflective objects which might show the mirror]. But i think it worth persuing to the end. But as you know Bryce has no end because every "end" we persue opens up more possibilities we feel we need to explore.
Kind regards
Peter
Hi Peter,
It might make life a bit fiddly, but maybe making the mirror very small indeed and coupling that with a very narrow field of view might overcome the risk of the mirror being seen in a reflection. This is the approach I took in the Scene Converter which employs two mirrors to transform Bryce's perspective camera into an angular mapper. The mirror elements are as tiny as Bryce will allow and as a result do not occupy as much as one pixel in the final render. The FOV is of course, ridiculously narrow. So it was very difficult to set everything up. But once done and put in a scene, it all works a treat. Just an idea...
Cheers,
David.
Good idea David,
I will follow up on your suggestion later when i have some time. I will then keep you informed of the results.
I like it that you are not only a "Great Bryce Artist" but also a master of the "technical stuff". That combo IS true artistry as it used to be recognized in former times before people became programmed and blinded by the "modern" division between technology and art. This division is completely ficticious.
Thanks David, for all the hard work you have done to help make Bryce the great application it is. I mean not not only the fantastic Pro Materials of Bryce 7.1, but also your tutorials and your many posts answering so many questions and proposing so many possibilities.
Kind regards from Australia
Peter
PS
Here is a landscape idea inspired by you and using one of your materials - It still has a long way to go and needs vegetation and many other things.
Thank you Peter,
Well I have no objection to philosophy or speculation. Indeed, I indulge in it enough myself. I reckon, for what it is worth, that in the main, you average Bryce user is probably not a formally trained artist, but someone who like gadgets and is generally interested in technology. This being the case, they are more interested in getting to grips with the technical side of things - and seeing what this software can do - than sitting down and pondering what they want their picture to say. Which is one of the reasons I find Pam's images so interesting - because their bias is more towards the subject than the process. Another artist who's work I keep an eye out for is Michael Frank, his images seem to reside somewhere on the borderland between fractal pattern and picture - also very interesting.
So while the average Brycer, might concern themselves that they don't know the software that well, I suspect they would really benefit most from a bit of artistic training. As to if there is any appetite for that... hard to say... If you offer too many pointers in this direction, people think you are being a bit funny about their pictures, where as, if you offer technical advice it is by and large, accepted without question. So it is a tricky subject. Many images can be improved just by changing the light and moving the camera - technically simple exercises in themselves, but these mechanical changes are governed by abstractions such as the overall balance of the image, the position of the subject in the scene, the distribution of contrast colour within the image, negative spaces and so on... comprehensible, but at the same time, not quite the hard and fast rules which appeal to the technophile in us. So perhaps not so easy to explain as setting DOF.
Cheers,
David.
PS, excellent, always a pleasure to do a bit of inspiring. Nice tilted horizon! Tip: don't try to render any volumetric clouds with a tilted camera in the z direction - will cause a crash. Known bug.
Hi Peter,
OK, I've been pondering this topic, in particular the bit which requires pixel perfect positioning of the plop render and I think maybe I have a solution to that aspect. Bryce 'Nuts and Bolts' - using Pan V and Pan H - a video tutorial by David Brinnen
Maybe that helps?
Cheers,
David.