SOLVED! Carrara fur/hair problems-AM's wolf in scene troubles
 SileneUK
Posts: 1,975
I am having fur/hair problem that is a new one to me.
I put hair on everything working with paleo people...clothes, heads, furs they use, the animals. Never had a problem.
Now I have a file with a woman in it and, with elements that is 430 mb
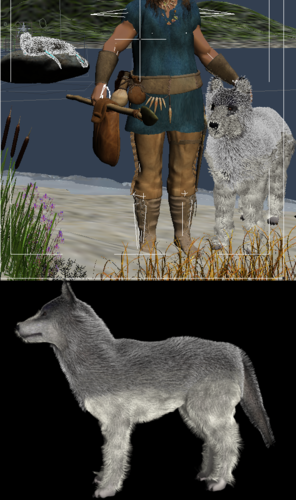
I took AM's wolf and furred him with Carrara Hair in various layers in his own file. His legs and tail need touching up but when he's seated, I'll do that.
He's lovely on his own. I can pose him on his own in his own file. I save him in original position and in seated position into browser. Oddly, I cannot open him in original position as shown in a new blank scene, and I cannot open him seated on his own in a new scene. He shows up in the tree list, but he ain't there! I did have him with a simple background image and THAT will open as a new file. Odd. But that isn't the worst problem.
I "can" import him all furry into my scene in that original position shown in image below then apply AM's seating/howling position or not. Either way, once he's in the scene I cannot save the scene or render it. In rendering when the squares get down to the top of his head, it stops and says the old "An error has occurred while saving" or just "An error has occurred" when rendering.
I have tried to save him with texture files (he has a skin, nails, teeth, tongue) internally and externally. Internally makes the file big, like 20mb or locally or externally he's 3.5mb
I can import him from his own file in browser folder either or move from browser to woman scene OR import him from the file where I've saved him with the woman and the rest of the scene. Scene trouble comes with saving or rendering.
Help????? Is he too hairy or what? I have had him in the scene without any hair but my person wants the fur.....of course she does. I tried to make him an obj to see if that helped, but Car hair won't save on object unless I am missing something I should know.
Any ideas much appreciated.....please! xx :roll: Silene
ETA Holly if I missed something in your tut...please let me know! Reduced hair count by 30% didn't help


Comments
Deleted double post...sorry.
Carrara can 'export' OBJ, but you won't find any help in doing that - not help with the fur, at least.
I have found that in my own dynamic hair experiences the hair doesn't seem to like having a whole lot of polygons around it. Try this once:
Go into the scene that you want to bring the wolf into, and save it as a new scene first, just so you don't forget.
Now go to every separate model or figure in the scene and, under the Effects tab, turn off "Collides with Hair"
This includes any sort of ground, buildings, terrain, flag poles, campfires, sticks, everything, everything, everything. Turn off hair collision on everything.
Save again. Now, instead of bring your wolf in this scene, bring this scene into the file that your wolf is in. Before doing so, get him all posed and his hair combed how you want it to be, and save it as a new file. Bring in the other saved scene, and put him where he needs to go and try saving that as a new file. If all succeeds, try rendering.
Note: Not sure if it made a difference because I'm still having issues with my hair. But I even went as far as to turn off hair collision on all of my lights too.
Ack, no problem turning off all the collisions with hair, but I don't know if I can import the scene in properly, it's a LARGE scale scene, but will try! Thanks, Dart, this will take a while so give me some time and will get back to you.
Cheers! xx :) Silene
Okay then, instead of that, bring the wolf into that scene after you've saved it with hair collisions off.
I hope you mean LARGE in that it has a lot of stuff in it, not that it is a Carrara Large scale, as opposed to a Medium scene. That might be part of your problem. If you like working in Large scale (which is really only meant for viewing from large distances away, like fly overs and such), try bringing your wolf into a Large scale scene and working the hair in there, so that you don't run into any issues with that.
No luck.... Not a hair collision in sight.... will have to start over and rebuild scene which is a shame as I really liked it the way it was! Nevemind, I have my husband's school reunion to work on which is the following weekend from this one, so have to leave it for now. And it was looking so good till she wanted fur!!! I wil make medium next time, although with the far isle, it looked better, but will try medium scale.
:( Silene
What do you mean? You've changed them all and it still doesn't work?
Here's an example: The Ocean or water plane... select it. Go to the Effects tab. Look under "Physical Properties" and deselect collide with hairs. Do this for everything. Everything by default begins with collision with hairs turned on.
Perhaps I'm not understanding what's going on with the wolf.
Turned of hair collision just like you said in everything! I wonder if it's something abut this wolf I missed...as the render will go below the woman's waist. It's not till it hits the top of furred wolf's head that it stops.
The scene also won't save. Here is the scene without wolf and with hairless/furless wolf.
Just had a thought. It is an AM wolf, he the LAMH guy...but I am not using his haired wolf, using just the UV texture map and then hairing him myself. He was OK without any hair in the scene. But he wasn't that bad to put hair on. I might just try him again with less fur. Maybe it's too much for the scent.
I even turned the hair collsion off on the furred seal on the rock? He never caused any trouble before. It's the furry wolf....gotta be.
Oh well.... thank you so much for staying with it. I'm the the best modeller being a newbie so have to make mistakes to learn.
;) Silene
oh. wait.....something might be working ok.....have to wait, it's SAVING!!! Be back with result! (I had made a wee bit of hair growth on her hairline as Udane hair was too sparse.)
Wait! Don't give up!
Okay, let's try something altogether different. Okay?
Go into the main scene - the big one. Save your character separately to your browser, and either remove her from the scene, or make her invisible.
If you are making a still scene, go ahead and render this now through the same camera at the same resolution as the final image.
If you are doing an animation, skip down past the ===== below.
Now go ahead and open the wolf file by himself.
Bring in your character from the other scene. Make sure that she, and all of her clothes and hair and such do not collide with hairs.
Now go Import > Plane (not infinite plane, just plane) and position it to how the ground should intersect the feet of the two figures. Then edit the shader as follows:
In the top-most shader setting, where it says "Multi channel", change that to: Lighting models > Shadow Catcher
Change all of the below channels to None.
Add the render from the other scene to your backdrop. To get the camera in the exact spot, you could copy the camera from that scene and paste it into this one. Or you could save the camera along with your character if you don't want both scenes open at the same time.
====================================================
If you are making an animation, go Import > Spherical.
Now go to the director's camera in your view and back off so that you can see both cameras in your scene. If you've made the render camera invisible to 3d view, that's okay, we really don't need to see it.
Select the render camera first, then the spherical camera. Now type Cntrl K to align the spherical to the render camera. In the dialog, select all axis in the little tri-arrow thingy, and leave the rest at default - click OK. Now deselect the render camera so that only the spherical camera is selected. Hold shift and rotate the camera so that it's facing straight out at 90 degrees, instead of facing the ground. Now select the render camera. Open the Motion tab and look at the Z rotation, and apply that to the spherical camera. We want to get the spherical camera facing the same way as the render camera, so it may need to be rotated around if it's not right.
Now set the render room to use the spherical camera and set the resolution to a 2:1 ratio like 8,000 x 4,000 at the minimum. This setting will end up being pixelated if it has to pick up the nearby terrain and ground. So if those items are small enough to bring into te other scene, I'd do that and leave them out of this render. Otherwise, you could set it to more like 16,000 x 8000, but this can cause the render to quite in the middle if you don't have enough memory. Spherical images are a real give and take kind of thing. So it's best to have a small bit of terrain that you use with a spherical background that provides the closer surroundings, so that the surrounding map doesn't have to have ridiculous sizes.
These large spherical renders take a lot of time. I often set them up and wait till I'm done with my computer for the day, and render during my nighttime ritual of hanging out with my beautiful Wife, watching the tube and then falling asleep. But if you have a few hours to kill, render it and come back later.
If you don't use a small terrain for your character to stand on, just go to the still image advice, and make a shadow catcher.
Load the resulting spherical image into the background as an image map.
It's OK....I got it!!! It was a pesky hairline on her head I had made with hair. I had to remove hair collision from hair, just like I have to remember to remove shadows from hair when I don't want them.
And I removed the hair collision on Wolf just to be safe...and it works. I have to regroom his legs, and will do that then re-import him when I have some time.
Thank you so much for sticking with me... I'd never have thought about hair collision because it's never been a problem before. Always something new with this software. I wish there was a macro to turn it off, though.
Here tiz... have to go and work on school reunion stuff now, so will get back to this when I can over the next few days if possible.
Thank you thank you thank you thank you!!! You're the best!
xx :) Hugs, SileneUK
ETA There will be PW on here on the waves, sky and adding the titling, etc....so it's will a WIP
Excellent job, Silene! Glad for you! ;)