Re-align hot spot after .obj export/import
Hi,
Apologies for asking so many questions today. I have a day off and am taking the opportunity to try and make some assets for a game I am working on.
I find the UV tools in Carrara quite limiting so I tend to use Ultimate Unwrap to UV map my models. To do this I export the objects for mapping to .obj format.
Once mapped I then re-import back to Carrara where I encounter a problem as the hot-spot locations for all of the models components have been reset to the centre of their components.
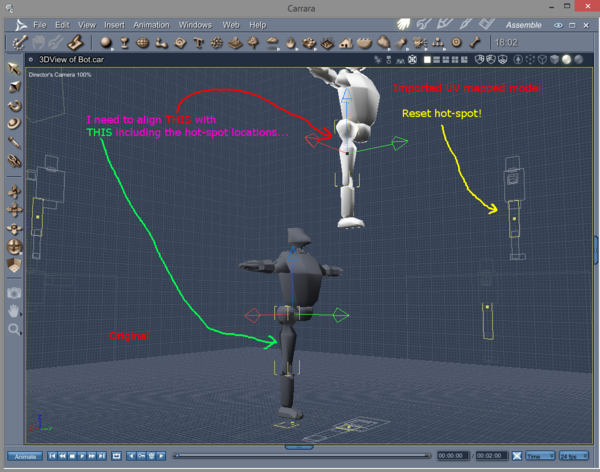
Does anybody have any ideas for a quick way to align the imported components with their original counterparts including lining up the hot-spots?
Alternativly, if anybody knows a way that I can take the UV layout of an imported component (say a robot grabber) and apply it to the original pre-import version that would also solve the problem but I don't think this is possible.
I have attached a screenshot that I hope shows what I am trying to achieve.
Any suggestions gratefully recieved.
EvilNoodle
Edit: By the way I already know I can achieve this manually by entering the coordinates of the original hotspot for the imported component to align them and then unlock the hot-spot and do the same for the object but this is very time consuming so I am looking for a more automated way.
Edit2: Typical, post a question and then find an answer :)
If anybody else needs it my answer is:
1) Select the component you want to align to (in my case the original).
2) Select the component you want to align (in my case the UV mapped version).
3) Select Edit==Align from the menu bar.
4) Click to activate all three axis, set the reference mode to centre and click OK.
This will align the objects but the hot-spot will still be off so that can be re-keyed manually into the hot-spot position widget with the hot-spot uinlocked or you can use SparrowHawke's most excellent "The Transforms Package" plugin here and do...
5) Select the object you want to align (in my case the UV mapped version).
6) Select "Edit==>Sparrowhawke3d==>Jump hot point to" from the menu bar.
7) Use the select button on the pop-up dialog to select the target object (in my case the original).
8) Make sure "Move the hot point" is selected and "Jump to target centre" is de-selected.
9) Click "OK" and your objects should now be perfectly alligned in both volume and hot-point.
A little click heavy but nowhere near as labor intensive as manually having to reset the object and hot-spot locations for every comonent that needs to be aligned.
This assumes that the size of the two objects has not been affected by the export/import or has been corrected (I notice a scale error when I do it but it is easily fixes by returning the "Overall Scale" for the imported version back to 100).


Comments
HI
There's an option on the Import OBJ Panel,. "disable auto scaling"
that will bring the OBject in at it's original 100% scale.
Auto scaling should handle imports from Daz Studio, Poser, Bryce etc,
Thanks for the tip! It seems that if you disable both auto-scale and auto-position the objects line up perfectly so it is just the hot-spots that need correcting.
On another point, importing a .obj like this does seem to modify the vertices in the vertex modelling room. I have included some pictures below. Any ideas how to prevent/fix this?
The first image is the original pre-export.
The second is the post-import version.
The third is where I have copied the vertex mesh from the imported version and pasted it into the original one so the difference is clear.
The imported version seems to be massive in comparison to the pre-export version and its centre is way off the working box at 0,0,0.
Thinking practically this probably isnt that much of a problem as I can't really see me wanting to alter geometry after UV mapping. As long as the objects and hot-spots line up it should be ok for animation and texture baking etc but it would be nice to get the import to match the original as much as possible.
I have tried the same with fbx and dae files and they all have their issues with an expoert/re-import combo so I have decided that if I can get obj to work I will stick with that.
Cheers
EvilNoodle.
It seems the way to avoid this is to enable "Export objects in local coordinates" which makes total sense when I think about it.
Doing this will cause them all to bunch up in Ultimate Unwrap, 3D coat etc at the origin but that isn’t that much of a problem for UV mapping as long as the sub-objects can be treated as such (like a character and their sword etc). When re-imported they will have retained their original positioning and scale in the vertex modeller. The down side is that the objects positioning and hot spots in the assembly room will be off again so the process outlined in my first post would be necessary to reconstruct the original layout.
Thanks for this tip ;) I have always been slaving over this manually... kind of keeping a bit of an experimental exploration and search of a better way... never thought to ask... nor did I know of this Sparrowhawke 3d function...
Now I do... Thank you!
Hey,
Glad it is useful. Thats why I always post the answers when I come accross them. Never know who else might be suffering from the same thing.
I just noticed that the link I gave was messed up so have edited the original post to point to the right place.
EvilNoodle
Very cool! Thanks again!
So I just updated the link in my quote too ;)
Sparrowhawke truly rocks! So much dedication and work without asking hardly anything in return. Makes it fun to send him gift certificates when I can :)