Need help putting an emblem on top of a bodysuit
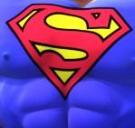
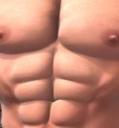
I'm fairly new to Daz Studio so it's been a frustrating but fun experience searching google with the right keywords and finding workarounds when tutorials steps don't exactly line up with my experience. I've been working a superhero character and has decided to recreate a character like Superman as practice and experimenting using Michael 4 and The Freak 4. I've figured out how to use geometry shells when the bodysuits won't give me the results I want. I've searched up on Rigid Follow Nodes, watched tutorials on how to rig Props, how to attach props to bones, DForce, DFormer, etc, essentially everything I could think of. I want to put the S emblem as a separate piece and thought of using a primitive plane and using opacity and diffuse maps to make the plane appear like a flat emblem (I plan to add displacement map later). It needs to be attached onto the geometry shell or the model. Using Layered Image Editor and Diffuse, Opacity, Displacement, Bump,... Maps can only take me so far. With the morphs I have on the character, not even using a tshirt fitted on there with different morphs to make it appear baggy gives me the desired results. Putting Maps on surfaces and Layered Image Editor made the emblem look distorted and follow the body morph. Meanwhile, I want it to look like it's an actual piece of clothing that smooths out in between the gaps. I've attached the images of the results I want to achieve for reference.
Any suggestions or advices would be greatly appreciated! Thanks a lot!


Comments
A Smoothing Modifier may help to fill in the dips on a fitted item, if you set it's mode to Generic rather than Base Shape Matching.
Thanks for the quick reply! I tried it for a bodysuit and it doesn't help much unless I turn it up to above 12 or so, which makes the preview process really slow, I'll try again when I'm home later this afternoon but do you have any other suggestions? I'm thinking of a rigged plane with opacity and diffuse maps somehow glued onto specific points (vertices or polygons of the body or another bodysuit invisible in the render).
Another option would be to apply a Rigidity group to the area of the outfit you want to keep smooth (using the Geometry Editor in Vertex mode), but then you may well need to tweak the outfit to work with the morphs at all.
I don't think I can apply Riggidity group to Michael 4 or its clothing even if I try to because the figure itself isn't weightmapped. I tried converting it into TriAx weightmapping but the results were less than ok, all the auto-fitting that normally works on clothes are malfunctioning. I've tried morphing a symbol made into a rigged figure that I got from the freebies Wiki but to no avail, adding smoothing modifiers also doesn't help. The first three images are my progress so far and the last two will further explain the result that I want to get to. Maybe I should morph the geometry shell itself after I apply an image layer on it? Can geometry shells be morphed? Or should I create a morph for the T shirt to straighten out the creases and make it look like it's an attached symbol?
A Geoemtry Shell will have the same shape as the item it is shelled from - the only modification it will take is a push modifier, plus the standard transforms.