It hurts when you buy a difficult-to-use product and found there's no tutorial for it
 iSeeThis
Posts: 552
iSeeThis
Posts: 552
Today I buy Depth Shaders immediately after learning what it can do. On promo page it says "Simple instructions to help you get the full use of this product are included in the ReadMe." but no, no readme file for that at all. I wonder if I am the only one who buy it because no one complain about this. It will be great if DAZ force every vendor to give his customers a step-by-step tutorial as a link in promo page. Why it's so hard not possible to happen till now.
Daz 3D is part of 
Connect
DAZ Productions, Inc.
7533 S Center View Ct #4664
West Jordan, UT 84084
Licensing Agreement | Terms of Service | Privacy Policy | EULA
© 2025 Daz Productions Inc. All Rights Reserved.
Comments
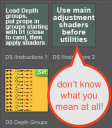
Looking at the file list, there are a number of adjustment shaders, and a number of utility shaders. Seems pretty self-explanatory to me.
There's a little blurb in the documentation ReadMe, maybe that's what was meant. In the Content Library there are subfolders called Render Settings, Shaders and Utilities. The "main adjustment shaders" would be in the shaders folder, and the "utilities" would be in the utilities folder. If you are looking in the categories (Smart Content) there are four categories under the main category Shaders:Iray:Utilities:Depth Shaders (as indicated in the ReadMe) called Color, Density, Gloss and Main. The individual files are clearly marked UTILITY or Main Adj. Shaders.
First some official instructions:
Use the depth groups to organize your props by depth in relation to your camera. Larger scenes may use all 12, smaller scenes may only use two or three. Start with props or surfaces closest to the camera, put those props into the 01 depth group and so on. Keep track by turning the group off once youve put props into it. Leave a few objects in the foreground with no Depth Shaders applied. Once your props have been organized you can apply the shader that matches the depth group name.
Now, my instructions
Create your scene with some depth i.e. things in front, things in the middle, and things in back.
Next, drag the "set" from the Environment portion of Depth Shader into your scene. Look in the Scene tab and you will see a series of groups now available for you.
Next, leaving the things alone that are closest to the camera, in the Scene tab, drag stuff that is kind of close to the camera into group 1, things that are further out into group 2, things even further out into group 3, etc... You can delete the empty groups.
Next, select the group one by one in the Scene tab, select all of the contents of that group in the Surface tab, apply the appropriate main group shader and a density shader from the shaders in Depth Shader, and repeat for all the groups.
Apply your HDRI and lighting, adjust your camera, and render.
In short, group your scene elements by distance to the camera, apply main utility and density shaders to the contents of each group, do all the other stuff to make a scene and render. I did a quick test study of some things that aren't too far apart so that there is the dark foreground building and three groups behind it. Please note that the Depth shader makes the further buildings less saturated, less distinct, and fainter.
The OP has a good point. There should have been some kind of PDF with examples. PAs hurt their sales by not taking to time to ensure that their products can be effectively used by the largest number of customers.
This may not seem like rocket science to a lot of people, but this product in particular presupposes a great deal of knowledge about depth of field, shaders, etc plus, it requires organizing a lot of scene assets in a way that will be intimidating to a novice.
I would tend to use camera depth of field along with an Iray depth canvas for this sort of thing, but that's not an obvious path for beginners, either. Still, I would suggest to the OP to return this product for a refund, if still available, and learn how to use camera depth of field, Iray matte fog and eventually how to use depth canvases in post work.
First some official instructions:
Use the depth groups to organize your props by depth in relation to your camera. Larger scenes may use all 12, smaller scenes may only use two or three. Start with props or surfaces closest to the camera, put those props into the 01 depth group and so on. Keep track by turning the group off once youve put props into it. Leave a few objects in the foreground with no Depth Shaders applied. Once your props have been organized you can apply the shader that matches the depth group name.
Now, my instructions
Create your scene with some depth i.e. things in front, things in the middle, and things in back.
Next, drag the "set" from the Environment portion of Depth Shader into your scene. Look in the Scene tab and you will see a series of groups now available for you.
Next, leaving the things alone that are closest to the camera, in the Scene tab, drag stuff that is kind of close to the camera into group 1, things that are further out into group 2, things even further out into group 3, etc... You can delete the empty groups.
Next, select the group one by one in the Scene tab, select all of the contents of that group in the Surface tab, apply the appropriate group shader and a density shader from the shaders in Depth Shader, and repeat for all the groups.
Apply your HDRI and lighting, adjust your camera, and render.
In short, group your scene elements by distance to the camera, apply utility and density shaders to the contents of each group, do all the other stuff to make a scene and render. I did a quick test study of some things that aren't too far apart so that there is the dark foreground building and three groups behind it. Please note that the Depth shader makes the further buildings less saturated, less distinct, and lighter.
Thank you very much. Now it's crystal clear even if I'm not in front of my comp. Don't understand why it's so hard for vendor to simply explain something like this in his promo page.
Tutorial writing is a specialized skill set, and I think probably it's very intimidating to some people. I've seen at least one PA say they were holding a completed product due to not knowing how to approach the documentation for it, and others have been treated pretty harshly for providing instructions that people found difficult to understand.
What @nemesis10 is doing is how I try to approach documentation I find confusing, because sometimes I just end up having to fiddle with stuff until I'm able to translate the provided instructions into an explanation that works better for my brain. (And I learned something new about how to use these shaders, too!) I really think that no matter how well a tutorial is written, it still helps to have multiple explanations so people can find one that clicks.
Speaking as a technical writer by trade, all I can say is This! ^
I never fault a PA for trying to provide instructions. And I have returned multiple products for the lack of instructions.
I clicked on a preset as help step preset like you usually do on a product (i13 Moving Day) and it removed the lighting & cameras from my scene!
After playing with it for a while, I think the product itself is very good. Save time a lot comparing to manually set depth of coloring. If the tutorial is good, the package will be perfect. DAZ should have someone to edit verdors' documentation.
Agree. Not including any documentation increases a PA's chances of having the item returned greatly. I've come across this before myself, as I'm a learn-as-I-go type and will latch onto a product as a way to learn about concepts I don't already know.
Totally agree! I have asked for a refund on products strictly because they were not intuitive and did not include any documentation.
LOL, I can't disagree - I have DForce utilities I don't know how to use - thought it would be self-explanatory but trial and error required
Then from view points of us, if DAZ hire just 2 or 3 editors, less than $5,000 a month, the return will decrease dramatically. And that means DAZ will gain may be more than $100,000 a month. How can we send this fact to thos marketeers in charge?
Here's your problem... Documentation Writing is an overhead task that isn't easily tied to revenue, but is easily tied to costs. Then there is the misunderstanding that the writing should be done by the author / artist / technician; which is wrong on so many levels. That's compounded by the other side of the spectrum that thinks "we'll just get a couple of interns in to do it." That is further compounded by the concept of customer customer support, where companies take it for granted that customers will teach other customers how to use things.
Writing is a somewhat specialized task in that the person writing needs to both know how the software works, is artistic enough to be able to think like a user would, and then be able to quantify the concepts into easy to follow text.You have to think about when to use images and when not to, how to make sure that non-native English speakers will not get confused, using simplified English, etc.
All of this combined usually means that the Technical / Documentation Writers are the first to be let go and the last to be re-engaged.
A lot of companies also fall into the trap of out sourcing this sort of work. The company usually doesn't get the quality they are looking for, the price tag is always higher than expected, and the number of internal headaches it causes just makes the whole endevour a nightmare.End result: "It's just easier to not do any documentation."
Yes, I might be a little bit jaded. :)