This is why I keep using the hair room in Poser
 believable3D
Posts: 0
believable3D
Posts: 0
Yeah, it's unintuitive and frustrating, but if you stick at it, you can get far better (i.e. more realistic/believable) results than with transmapped hair.
This is part of a hair set I'm working on. Still have a bit to fix here—as you can see, there's a bit of unwanted hair intersection going on toward the back by the part—but I think we're getting there.
If you'd had success in the hair room, feel free to post your renders!
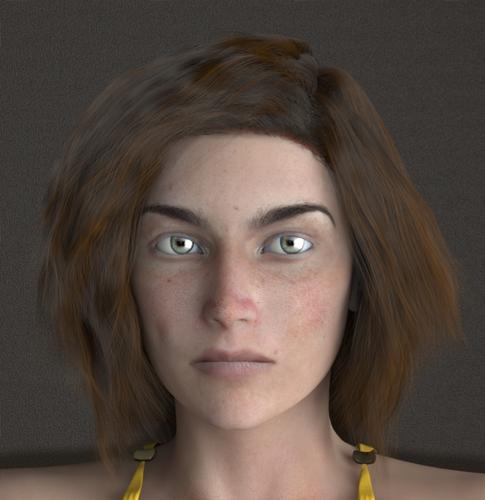
Bob_style_140813_front_improved06_ReddishBrown_HiQ.jpg
583 x 601 - 207K
Daz 3D is part of 
Connect
DAZ Productions, Inc.
7533 S Center View Ct #4664
West Jordan, UT 84084
Licensing Agreement | Terms of Service | Privacy Policy | EULA
© 2024 Daz Productions Inc. All Rights Reserved.
Comments
A bit more work on fixing the style as well as curing the artifacts.
Looks good, so far.
Slightly more dramatic lighting, with a wall behind her.
I agree, this is looking very good.
Great looking hairstyle!
Due to some early grouping issues, I ended up having to redo the right side. But that's okay. I'm pretty happy with how things are progressing. The style will have a straight but slightly messy base version and a wavy version, as well as possibly a curly version. Here's the wavy version with my light brown materials. This is one of my fave hair shaders so far.
Looking good. Nice work. :)
This looks wonderful!
Nice. Glad to see someone taking the fight to the Hair Room.
I've been fighting with it since it was an Easter Egg in Poser 3 (type "hair" and it would pop up). When it became "official", it wasn't much better. I don't even think the devs knew what to do with it Ever see the printed manual section on it? Neither did anyone else :lol:
But, I've recently attacked it again, and am having much better luck. Nothing to post right now, except a few experiments that have had what I would call "meh" results, but have also given me new ideas to explore.
I looked for tutorials years ago, and only recently found a couple of YT vids that tell no more than what you can discover after 5 minutes in the Room (if you survive that long). Finally figured out that using smaller groups in certain areas is one key element to getting good results. As well, cranking the Density up to the millions will get you closer to the strips that trans-mapped hairs are made of. Setting the VertsPerHair to 100 helped as well.
I'm determined to use Collisions without the whole thing exploding, though.
Once I've got something that doesn't look like It Came From The '80s, I'll get to work on some tutorial vids.
Either way, even with a step-by-step video, it's labor-intensive. If you know haw to slap something together in a modeler and trans-map it in an hour, you're better off with that. If you're like me and are still trying to figure out how to do that, then the Hair Room could get faster results. Been at it for over 24 hours now and got "some idea" of it. Had Truespace for 15 years and all I ever made with it was a hole in my wallet :lol:
Bryce
Poser
Truespace
Carrara (when it was a freebie)
Shade (when it was a freebie)
Infini-D 4.5 (when it was around)
Hexagon (where'd I put that?)
and God only knows what else I've had over the years... Never been able to do anything with any of 'em except Poser and Bryce. Though I did make a Jeannie Bottle once in Infini-D. In glorious Low Res! I swear, it's like 80 polygons total.
But as for the Hair Room, for those still looking for info (like "WTF does this do!?"), the Clumpiness determines how/if the hairs are divided into "clumps". I made a "hair cap" with the Guide Hairs Length set to .0020, and the Pull Back and Pull Down to 0. This gives a nice Peach Fuzz, especially with 26,152 Hairs (set the Density dial to 3 million). With the Clumpiness set to the default of 0.2, you see the hair arranged in a grid. Set it to 0 and you lose the grid and get total coverage. Hence, Clumpiness affects how the hairs will clump together.
STILL have no clue as to what the Hair Density actually means. Default band/strip selection usually shows 12-17 - but no one knows if that's per face when populated/rendered or what - it's certainly not how many are in the selection. Might be related to Clump? Hmmm.
At any rate, I do know you don't want to mess too much with the Widths. Unless you like MineCraft Hair.
But then if we had a Direct X renderer we could use tessellation and get joygasmic dynamic hair like this - http://www.youtube.com/watch?v=LyB1mtKxj24
The biggest problem I have with the Hair Room is the limited amount of direct control you have on the hair itself. The move tool does allow for single-hair selection, which is certainly as tight as you can get, but it's not exactly mouse-friendly. There's no selection indicator (lasso, etc) and the cursor doesn't change to let you know you've got one under it. You're just button-mashing in the general vicinity until you see the yellow marker.
Even dropping the Density down to 1 hair (2000), you still get a minimum cluster of about 30 strands.
This is a more powerful tool than it leads one to believe at first glance. It could be a worthwhile tool if it were expanded. Perhaps even if you could only apply Dynamics to selected hairs, set a geometric Selection radius brush (square, round, etc), or "freeze" certain parts in place. I could see auto-generation of a bed/base/"skull cap" and you expand on that; various shape presets (tight ponytail with placement - topknot, classic pony, base-of-skull, pigtails, etc), as well as being able to auto-generate braids of various types (dreads, French braids, puffs). As it is, I don't even know if you can save a hair you've made! Haven't made anything worth keeping :lol:
Ok, well, I was mistooken about a few things, it seems. If you have the rectangle selection tool active during a Group Edit, it will remain active when editing Hair. Likewise, if you closed the Group Editor while the Pen tool was active (as I did), you get that to select Hair strands with.
Once I got that part figured out, I was able to actually use the Styling tools effectively. Those are fairly tricky, but once you understand the interplay between the tools and the Falloff slider, you can get more interesting results.
I also found that the standard Poser Deformers (Wave and Magnet) can be used on the hair groups, and provided you have multiple Groups, you can get more control over how organic your Hair looks.
I wrote a tutorial as I worked, and made several revisions to it as needed. In the end, I had to go back to a previous iteration of my test file - the top of the head is a beast!
I, too, have been playing with the Hair room- yesterday took up most of my time in there.
I'll have to thank you for the clumping and density tips- I was trying to figure out why the hairs were not getting out of that neat grid on the guy's skull for an hour...lol
I have a zone for the bangs, a zone for the top, a zone for the back, one each on the sides, and a final zone at the edge of the skull cap for fine hairs- I'm actually going to break it up more. I'm thinking ten zones total to help keep the math of the hair count in check. Right now, there are about 150,000 hairs on there. So not finished, but it's progress.
I've been playing with the Density a bit more, and I'm thinking that it's divided by each face, so if you have 10 faces in a Growth Group and 1000 hairs, that's 100 per face. If you have only one face selected, then there will be 1000 hairs in that face. I'm getting acceptable visuals with an average of 180 hairs per face.
I'm also looking into multiple zones (one test had 80 separate Growth Groups), as I'm not getting the control of detail that I want with just splitting the head into quadrants.
However, that makes for a very long Props list, so I'm thinking that the way to go would be the Major zones (as you said, bangs, back, sides, top, etc) but with about a dozen sub-groups in each zone. Luckily you can have multi-grouped faces in a Growth Group without incident (seems to only be a problem with skin texturing), and since you can select each Hair group as a Prop, you can hide them in the Properties tab. This way you can have one hair prop that has several different styles, using the same faces in different groupings - one group for plain straight "blanket coverage" hair, another group for more detailed/stylized hair, etc.
The only issue there is parenting all those Hair props to the head.