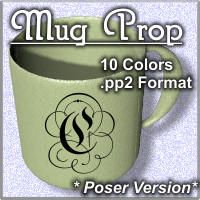
Coffee Cup/Mug Prop (Poser Version)
 Seliah (Childe of Fyre)
Posts: 336
Seliah (Childe of Fyre)
Posts: 336
This is just a very basic, very simple coffee cup/mug type of prop for Poser. It was produced in Hexagon this time, instead of Wings, with the help of Kathaera's tutorials over on DeviantArt. I wound up UVMapping the object in Steve Cox's UVMapper, though, as Hexagon's uvmapping function does not yet make sense to me. (I'll get there... LOL)
The mug comes in 10 .pp2 files for Poser, each with it's own color. So you have ten colors, intended to somewhat mimic a stoneware type of mug. It's not perfect by any means, but it's the first object to come out of Hexagon with me and be functional, and not look too bad at all.
Please note :
There is ONE texture seam that is visible near the handle. I've gone over the texture map a zillion times, and can't seem to fix it. So you might not want to have that part of the mug visible if you are doing a close-up render. I've displayed the mugs with the seam showing on purpose, so that people are aware of what they're getting. I'm not shy about my mistakes, and would rather folks be well alerted to what they're getting than download it and find out later that there is still one texture seam that I was not able to correct.
I will be putting out a DS-specific version soon. I'm just still tweaking the DS materials on the mug.
It can be found in two places : my website, and over on ShareCG for those of you who do not like my website navigation.
Website Link :
http://www.childeoffyre.com
(Click splash page, click on PROPS in the LEFT hand side navigation menu. New items always appear at the bottom of my lists.)
ShareCG Link :
http://www.sharecg.com/v/77449/gallery/11/Poser/Coffee-Mug-Prop-Poser-Version

Daz 3D is part of 
Connect
DAZ Productions, Inc.
7533 S Center View Ct #4664
West Jordan, UT 84084
Licensing Agreement | Terms of Service | Privacy Policy | EULA
© 2025 Daz Productions Inc. All Rights Reserved.
Comments
Mmmmm, coffee...
Thanks! One can never have too many mugs.
Did you add like 5 pixels extra of texture outside of the template lines? That's what it looks like the problem is from what I can see on the little render.
You know what? I've done enough texturing that I absolutely know that... but when I went back in to look at the texture map, sure enough, I missed the seams on a couple of the edges. Rargh!
I've fixed it now, and updated the zip file. If you downloaded it before, just re-download it, and replace the Mug-Stoneware.jpg with the one in the correct zip.
Gah. *grabs dunce cap, and goes to sit in the corner* LOL
=) What I do is open the template, make a copy of it, gaussian blur the copy by 0.5 (so I don't get ugly edges on the next step), use the magic wand to select all the blank space, select -> modify and contract by 4 to 6 pixels depending on the size of the template, make a new layer, fill the selection with medium grey. Then I always keep that layer at the top.. perfect edge bleed guild. =)
Not sure about the modify/contract command... that sounds like it might be a Photoshop command? I'm using Photopaint (Corel's x7). But it sounds like the technique could be duplicated easily enough in Corel. Gaussian, magic wand, simple enough. And just adjust the size of the layer object.
I do normally make a copy layer of the raw template before doing the texturing. Never thought to just blur the damn template or stretch it when I make the copy... yeesh! LOL I've done so blasted many textures, just cloning/smoothing the texture to a little bit outside of the template's UV lines... LMAO
Thanks for the tip, Fisty. ^_^ New pairs of eyes... or maybe in this case, it's fingers on the keyboard... :D
yeah, just telling it to offset the selection by a certain amount to make it bigger or smaller
Yep. I will definitely try it that way on the next object! Thanks!