Making Genesis 2 UV maps work in other 3D softwares?
 Toyen
Posts: 1,903
Hey there everyone hope you are having a great day!
So, I never really needed to know this as so far I was only modeling clothes but today I was thinking, how do I make the Genesis 2 skin textures work in other 3D softwares?
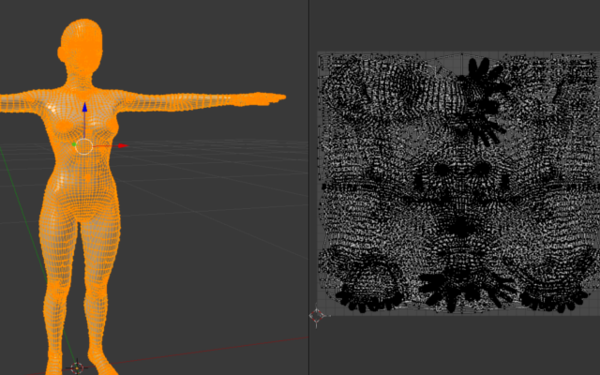
Because every time I import G2F figure as an .obj, load it into Blender for example and look at the UV mapping, it´s a COMPLETE mess.
Is there a way to fix this?
The goal here is to load genesis into another software and render her with all the textures which cant be done without proper UV mapping I guess.
And also, artists who create skin textures must have genesis properly unwrapped in their modeler dont they?
There must be a way to make this work.
See the picture so you know what I mean.
Picture - Genesis 2 Female (Base resolution) and her UV map in Blender. Not nice right?


Comments
The UVs are not bad, but with the whole mesh selected you are seeing several overlapping maps - the head, limbs, torso, mouth, eyes, lashes, and eye overlays are each set to use the full unit square, and to take a different set of maps from the other areas. If you select by material zones (and perhaps hide the non-selected mesh, if Blender doesn't do that for you) you should find the UVs clear up.
Hey there Richard! So, I shouldnt probably combine the mesh into one piece then I guess? Or does combining the mesh into one piece and deleting the vertex groups mess up the material groups as well?
The thing is, when I import the obj into blender and I select the face group, I can see a ncie UV map, but when I import the OBJ into Maya for example, I get more than 100 groups of geometry that dont make any sense and the textures are gone. Should I use the fbx file for maye even though I dont really need the rigging?
I've often made transfer to blender. There's one way I know, but there might be other ways.
You need to collect your maps when exporting as an obj (image1).
Then you need to reimport in blender with the following options (image2).
Once in blender, activate shading smooth and in the bottom, chose texture view, add a light this should be fine, but you'll have to readjust some of the materials
I have no clue now to automate the blender render to cycle render automatic material transfer, I wish I could find that.
Hey there Kadix! Making Daz Studio textures work in cycles can be done but you will have to do it yourself, its not automatic upon import.
You just gave me an idea so I started playing with sss shader in cycles trying to create good looking skin.
This is the very basic result. I was playing with this tpe of shader earlier in maya and I´m quite surprised that Blender can achieve some nice looking sss as well.
This render shows victoria 6 face texture rendered in cycless using the sss shader.
By the way, if anybody has any idea how to make things like eyelashes textures work, please do tell! I cant seem to figure that out.
The lashes use a transparency map to break up the planes - I can't recall where that goes in Blender - and usually use a solid diffuse colour to tint the surface.
Yep that was my first guess but I tried both transparent shader and transparent + diffuse shader but it didnt work properly. I will ask at the Blender forums maybe someone there will know. I´d like to know how to make the lashes work in Blender : )
Depending on the level of detail you need you could use this.
http://www.daz3d.com/texture-atlas-for-daz-studio
I used this for fbx export : )
I have not had a whole lot of time, so haven't checked into this, but this may help with what you're doing from my quick scans.
http://www.daz3d.com/forums/discussion/2877/
Hi
Long time reader, first time answerer
I know this post is a bit old, but after coming across this same problem I landed here. I didn't really want to use the plugins suggested so after a bit of tinkering I worked out the solution for the eyelashes
For the Image Texture I just used LashesO (Black background, white lashes). Texture Coords node in optional. Instead of selecting color directly in Diffuse node you could also use other nodes like ColorRamp (has cool results) and plug it into the Diffuse node. The Greater Than node is located Shift + A >> Converter >> Maths... then changing Add to Greater than.
Green Lashes are optional
See Screenshot for setup!