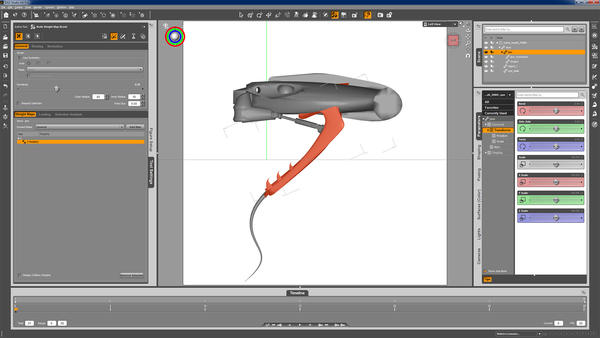
Rigging from scratch - Revised Workflow.
For anyone who wants to make two (or more) objects move in relationship to each other via rigging (like a skull and jaw bone)...
Here's what I got to work.
1. start at Figure setup - Add Geometry (I scaled mine 1000% - yours will vary).
2. Drag geometry from Geometry List to Relationships.
3. Drag bones into hierarchy order you want. (Mine was skull > jaw > teeth)
4. Set the xyz order and weight maps (I used zyx, and removed all maps).
5. Create (button at bottom)
6. In Scene tab expand your objects/bones.
7. Move through the hierarchy and adjust the bone endpoints to correspond to the object.
a. Use snap to center to connect endpoint of current object to the parent.
b. use align node to align bone between red and green dots.
8. Right Click memorize Figure Rigging
9. Scene tab, select top of the hierarchy, then select the "Geometry Editor" and open the "Tool Settings" tab.
10. Find the matching geometry in the list which matches the geometry you have selected in the scene.
11. From "Choose Group" menu, select the geometry.
12. Find the Group name from the "Face Groups" and click the "+" symbol. counter-intuitively the minus symbol appears.
if other items in the list have minus symbols you should de-select them by clicking the "-" symbol. Now only the specific item
you want is in the group and should only show one "-" symbol...confusing, but if you think about it, you can't remove something
that isn't selected.
13. Once all the items for that group are the way you want click "Assign to Target Group" button at the bottom of page.
14. do this for all the items in the scene list. (Repeat steps 10 - 13).
* if you group more than one face into a group, that face will not be available for other groups (and will show both "+" & "-" grey with "0" count.)
15. Click on the weight map icon open the tool settings tab.
16. In the scene tab start at the top of the hierarchy again selecting the first object.
17. then in the weight maps section if no map is available, select a map from the "Unused Maps" menu and add it.
(in my case, I only am rotating on the x-axis so that is the map I've selected). Then click on that map.
18. I the scene window right click and select Geometry Selection > Select By > Face Groups > Your Object.
the object should turn tan.
19. Right Click again, select Weight Editing > Fill Selected > 100% (for rigid stuff).
20. Repeat this for each object in the scene. (you may have to "clear selection" for each object if others are still tan).
Yeah...right. Confusing, frustrating, and vaguely like what the videos and instructions tell you to do. Mostly because they are using
one face group and multiple bones. I'm using multiple geometries, faces, and bones.
I hope this helps someone.
.


Comments
Could you post your screenshot unshrunk? The forum will shrink it down to fit in the post, but we will still be able to open it in another window to read the details. As far as I can see you have created a TriAx figure, so the next thing to do is edit the weight maps to tell the mesh which bits are affected by which bone. Since you appear to have groups in your mesh you can start by switching to the Node Weight Map brush from the Tools menu, then right-clicking in the viewport and selecting Weight Editing>Fill by Bone Selection Group(s).
I've got a WQHD monitor so sending a native screen shot is too big for daz3d upload filters (maybe you can update that to accommodate 2560x1920 ).
My next challenge is sliding the hydraulic ram in and out of the cylinder, while keeping them aligned and anchored to the parent object. I have no clue how this is going to be done or if it can be done.
It isn't the size of the image but how big the file size is in KB which it states when you post located under the word Attachments 9999kb. ;)
Yes but also 2000 on it widest axis. If I remember correctly
arr yes that could be true but since I don't render over 2000 I hadn't noticed. :P
On the screenshots, you could un-maximise the DS window and size it to be under 2,000 pixels wide, then use the Snipping Tool or the like to take the screenshot.
For hydraulics, the usual trick is to make each part a separate bone, attached at its end to whatever body part is logical, and to make sure that the twist axis is precisely aligned along the cylinder - then just set each cylinder's point-at target as the other.
Hmmm. So if each part has its own independent bone, how do they stay "Locked" with each other? For instance if the lever and the piston connect at a pivot point, and the lever and base connect at a pivot point, and the base and cylinder connect at a pivot point, Wouldn't a chain of bones work best? sorry, I'm just trying to wrap my head around this. So far I've only got the lever and piston on a two bone chain, and the base and cylinder on a two bone chain. In this set up the lever tends to drift away from the base during rotation (yes, center points of base and lever are in the same place).
In the past I've found that the parts will just stay where they are and the other will move around if they don't share a common bone...what am I missing?
Thanks for the "Point At" tip. That does keep those two parts (cylinder and piston) pointing at each other, however I get a lot inaccuracies due to the lever drifting away.
Is there a way to "snap" to object center? (Or other object features).
As far as the screen shot, how about those tutorial? I can hardly see the print...for the love of GOD, someone please update those. :)
If the pivot points for each cylinder are at their base and the end points are precisely aligned (this will be easiest to do if you model them with the ends formed by a cluster of triangles meeting at a point on the centre line - then you just need to line the origin up with one of those centre points and the endpoint with the other), then align the bone (that's the step I missed - it's in the right-click context menu with the Joint Editor active) then setting the Point At property for each cylinder in the Parameters pane should keep them in step. I know several items that use this technique and it does seem reliable.
NEVER scale the geometry!
Before you import geometry for rigging, you need to determine ahead of time what size you want it to be in DAZ Studio and then export it from the modeler so it matches. You may have to make several trial runs between the modeler and DS but it will be worth it.
Great advice. I'll give it a shot. Unfortunately, I'll have to abandon this project as I've got a deadline to meet and this has been painfully challenging. Maybe in a few weeks I can explore this in more detail. I really appreciate your responsiveness and knowledge.