Octane Render Hair problem
 babybuick2691
Posts: 93
babybuick2691
Posts: 93
Hello Everyone,
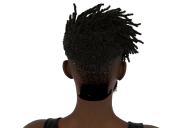
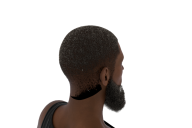
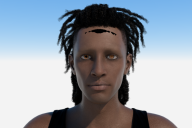
I have been using the Octane Render Plugin for Daz3D, and I prefer it over IRAY because it renders much faster and is easier to make changes in lighting. I have one issue, some of the hair I poke through the head. I have switched from 3D Delight materials and IRAY materials, and the problem still occurs. I was hoping someone could help with this problem. As you can see, there are black marks around the head and mouth areas. Note these are three different hairs.
Daz 3D is part of 
Connect
DAZ Productions, Inc.
7533 S Center View Ct #4664
West Jordan, UT 84084
Licensing Agreement | Terms of Service | Privacy Policy | EULA
© 2025 Daz Productions Inc. All Rights Reserved.
Comments
There is a setting, I think it's something epsilon? Keep reducing that by adding 0's until it goes away
Is the setting in Daz or Octane Render?
Did you apply a collision setting against your character ? Generally black marks are due to interpenetration between the hair and head
I do not believe so, I simply created the character and that is what showed when I applied the SideB hair. I noticed this happens with a lot of the hair in Daz3D. This is a character created using face transfer, however, the problem occurs with the basic Genesis 8 characters also. Do I need to apply a collision and if I do how would I apply the collision?
A question everyone because I was given this solution as a possible fix. How do I select the mesh/geometry in the forehead for me to attempt applying the same head/face material? This is suppose to fix the issue.
Select your hair, Edit/object/ geometry/Apply smoothing modifier
Then in the hair properties: colide against your character
same for the beard
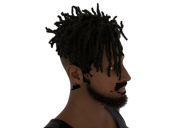
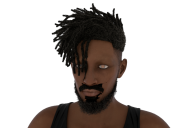
You can make a test: delete your hair and beard and see if the render is OK. Add you hair, if it's not OK : trouble is coming from the hair not the character. Here is an example in Octane same hair I think
Yes, it is the same hair. I did as you asked and the black marks are still on the head. I contacted the creator of the hair and was told they no longer deal with Daz and since the products are old he will not service or replace the hair. I was also told since the hair works in IRAY there is nothing wrong with the hair and would not provide assistance.
Another possibility (but I don't use the bridge : classic obj export).
If I remember well there was trouble with the transparency map and octane : a png with an alpha channel instead of a classic jpg one. It's happen sometimes. I can check this WE if you want.
Ray epsilon is the setting to look for. I don't have octane installed anymore, so can't point the position of it, but it's part of the octane control panel thingie. I remember that a lot of the time in my tests It would end up being set at like .00000001 etc and it would eventually go away when enough 0's were added. Also, I have no idea why my text got so huge, but oh well. Easier to read I guess lol
I confirm : you must reduce the ray epsilon: see my test with different value. It's in the kernel menu.
Don't refer my value as it depends of the size of the object in the scene
Tried that but still have a problem with it. I think the issue is the hair.
This is not in Daz and I tried it and still have the black spots.
Does it show a black mess in iray render too? That would mean haircap mesh would need to be moved from the head mesh for sure, the worse offenders will have artifacts even in iray. Usually hairs will have some move fix morphs for it, if not meshgrabber or GoZ can be used.
I don't have any idea as it works with the same hair for me without any trouble
Did you try to reinstall the hair ? May be try like me: a basic Genesis 8 female , the hair and test
Is it with the bridge or export/import ?
Ok, I think I have a solution; however not very sure. In the parameter tab, I used the expand all option to make the hair larger and black areas disappear. The problem now is that you can see on the sides where the hair does not contact the head. There's a gap showing. Not sure how to fix that.
One thing I could think to try, instead of moving the mesh out, maybe try moving it in until the black vanishes. Not sure if it will work, but worth a shot. You might have to unlock the dial to turn the expand all to negative numbers. In case anyone reading this don't know how, click on the gear icon at the top right of the slider, go into the propertyies, then uncheck use limits inn there. Hope I got all that right, I am running a houdini sim, so that is coming from memory lol.
Not sure how to do that.