Texture inconsistencies with SP, translucency, arghh
 SnowSultan
Posts: 3,643
SnowSultan
Posts: 3,643
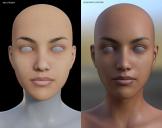
This is a problem I've had for a while, but here's a really good example of it in action. Can someone explain what is happening that causes a DAZ skin texture with no translucency to appear so much lighter than both the texture map itself and the same scene (same HDRI, texture, etc) in Substance Painter? This texture (Sahira) looks much closer to how it should in Substance Painter (which makes sense, because it's just loaded into a fill layer with no SSS or other adjustments), while the same texture in DAZ Studio completely changes as soon as you turn the translucency to 0.
I'm just not understanding how a texture looks LESS like it's normal self when advanced shader settings are NOT being used. It's frustrating because I still can't tell what a Substance Painter texture will really look like in Studio even though they both use Iray and PBR. Wish someone would write a definitive and updated guide to getting consistency between these two programs, it would probably help vendors too.
Also, any chance of a Substance Painter sub-forum?
Daz 3D is part of 
Connect
DAZ Productions, Inc.
7533 S Center View Ct #4664
West Jordan, UT 84084
Licensing Agreement | Terms of Service | Privacy Policy | EULA
© 2025 Daz Productions Inc. All Rights Reserved.
Comments
I think it's because Daz Iray is using a compressed color space, much like Blender before they switched to Filmic. If you enable Spectral Rendering and set it to "Natural" (and then crank your lights up by 1,000x) there's almost no fireflies whatsoever and the shadows and highlights are much, much better than Iray default. Of course, that also makes all the UV seams in the SSS maps extremely obvious, turning your model into a bizarre Frankenstein's monster creature.
I posted a question about how to fix the UV seams issue in Technical Help yesterday, when I discovered this, but I got zero replies so far. I don't think many people know about this.
https://www.daz3d.com/forums/discussion/484701/spectral-rendering-seams
Can you tell what kind of Spectral Rendering Substance is using? And if you do a render with Natural Spectral Rendering, is that closer to what you expect to see?
I did try Spectral Rendering at Natural and it made almost no difference. I also tested Darcy 8 under pure white lighting, and the second I turned the translucency off, her skin became much lighter - barely looked like the same texture map that I was looking at simultanously in Irfanview. I also tried turning Tone Mapping off (which required using an HDRI at 0.000007 or so and it was freakishly saturated) and as usual, I set the Crush and whatever it is to 0 as well. Even if you take Substance Painter out of the equation, I still have no idea why a texture is looking so much different than it really is with absolutely no shader settings to alter it.
I don't know how to or even if you can check what sort of spectral rendering Substance is using, sorry. All I know is that it does look more like what I would expect the texture to look like if I just applied it to a surface with no setting adjustments.
Someone mentioned the visible seams in Spectral rendering a while back and no one seemed to have any ideas for a solution (which is probably why very few DS users actually use it). Seems that never got fixed.
Why are you turning translucency off?
Because I want to be able to get the texture map to look the same in Substance Painter and in DAZ Studio so that I have some idea of how my edits will look back in Studio when rendered. If I use shader adjustments in Studio like translucency and SSS that I cannot accurately replicate in Substance Painter, I'll never really know how the edited textures will look.
The real question is 'why don't skin textures look anything like they actually do *without* having to use translucency in DAZ Studio'.
In Blender, if you want a flat texture, you have to turn down the Specular value in the Principled BSDF shader or else it'll put a light sheen over everything. Is it possible some specular value is lightning the skin?
In Daz Studio the image texture is blended with a color, which for skin most often is pure white, or close to.
Margrave: Yeah I did think of that, so I disabled everything except the Base Color. Didn't help. But...
Felis solved it! I should have realized this by now, but I always figured that setting the Base Color to white was like giving it a value of zero - that color would have no effect on the texture itself (I think that was how 3Delight worked). It wasn't until Felis said it was blended that I noticed that the color is added like a blend mode in Photoshop such as Multiply or Lighten. Setting the color value to RGB 128,128,128 (or roughly .22, .22, .22 in the box) is the equivalent of zeroing it, and gives a predictable result. Thank you!
Here's an example of Darcy 8 with the Face, Lips, and Ears surface colors changed to .22, .22, .22, the translucency maps removed, and the translucency color changed to a reddish brown and set to .5. Looks like a totally different character (a usable one now, woo) and isn't locked into the .80-.90 translucency settings that most textures are set to.
This may be the most important DAZ Studio tip I've learned since Iray came out. Thanks again Felis (and to everyone else who helped).
I made some tests with translucency to understand what's going on. Maybe that is of interest here:
Simple surface with no translucency:
With white translucency:
The white gets blended in (multiply maybe). The background receives white color now.
With green translucency (same color for surface and translucency):
The front surface does not change much but the background now gets green from the translucency.
With darker green translucency:
The front surface still does not change much but the background is now much darker. It receives only the dark green from the translucency.
With "scatter and transmit":
Here comes the interesting part. With scatter, the translucency affects only the inner volume of the object. But in reality not all light stays in the object. Some of the light scatters within the object and then leaves it. That is meant by tramitted. So, in this render the front surface and the background get darker because the dark translucency green now leaves the object and therefore influences the surfaces and surrounding geometry.
With "scatter and transmit" and a lighter green. Compared to the render with scatter only, now the translucency has a stronger effect. The background gets more color and the surface as well. This looks more like a real translucent material to me than the one with scatter only.
This can better be seen with different colors:
That is very interesting, Anim, thank you for those examples. The scatter and transmit example is good, like you said. Definitely have to experiment with this more. Do you happen to know why the background plane is slightly green in the first example when there's no transparency or translucency?
Yes, that's the indirect light bounced from the green backside of the cube onto the plane.
Thank you, wasn't sure if you were using a spotlight or if it was an optical illusion and I was seeing green where there wasn't any.
None of this helped at all with Substance Painter consistency though, I made a very good looking skin setup in SP that looks awful in Studio. Bump values are totally wrong, colors don't match up...it's just pointless and frustrating as hell that Unreal, a game engine, has almost exact visual consistency between programs and a real renderer doesn't. DAZ Studio may be the most popular program that doesn't have any sort of bridge or even 3rd party addon for utilizing Substance Painter, and it's very slowly tempting me to look into other rendering alternatives where I won't be creating textures blindly.
By watching your initial image in the first post it seems you are using different shading modes. It looks like:
Have you tried to create all channels used in DAZ also in Painter, set similar shader values and use rendered view?
The left one is actually DAZ Studio. ;) Yeah, I used the same HDRI and zeroed everything except the Base Color/Diffuse in Studio and the Color channel in Painter. I also disabled SSS in Painter to make sure that wouldn't contribute anything.
That comparison may have been explained by what Felis said; the white Diffuse color in DAZ Studio was adding to the base texture and that's why it's lighter than Painter's. The problem I'm having now is that there's just no consistency between values and such. I made a bump map in Painter that looked fine, but I had to raise the value to 30 in DAZ Studio for it to have any effect at all. There still doesn't seem to be a lot of consistency between most programs though, which I guess is why we still need bridges. :|
Ok, had some time to test on my side now.
According to this example the general texture appearence seems to be similar in both packages. Question now is how do your settings differ from mine?
Painter is version 2021.1.1
DS is 4.15 beta
Just like when you take a car to the mechanic and it won't act up in front of him. ;) Thank you very much for taking the time to test this. Can you tell me a few things about your settings? I will try to duplicate this now.
- Is your Environment Map value set to 1 or 2? 2 is the default, but it's really strong.
- Are your Burn Highlights and Crush Blacks both at default (0.25) and Exposure at the default of 13?
- Did you leave the Top Coat, Bump, and Glossy settings at default in Studio? My current Studio figure is looking like yours (I think) except for a strong bump map.
Thanks again for working with me on this, I appreciate it.
EDIT: I think I have similar results to yours now and it might have been that the Environment Map kept getting reset to 2 as I worked with saved presets. I don't have time right now to actually try editing the bumps or colors of these maps in Painter to compare, but one big problem may have been solved. Thank you once more!
Great that you could solve it.
I attached the settings you asked for. Keep an eye on the shadow settings. Those can have a relevant visual effect.
And, I am happy to help :-)
(don't know how much posts I made on numerous forums and was glad to get help there)
EDIT:
Topcoat and bump were off, glossy at 0.65 dual lobe off.
That's interesting, your Environment Intensity is set to 2 (which was my problem), but you've got your Exposure to almost 14 to compensate. Is there a reason why you use that Exposure value?
Not a specific reason for exposure 14. I am coming from a photography backgound. The exposure value is just the result of Shutter Speed, F/Stop, Film ISO and cm*2 factor.
Regarding the Env. Map and Env. Intensity. In case of Dome only they are just multiplying each other. Env. Map at 2 and Env. Intensity at 1 is equal to Env. Map at 0.5 and Env. Intensity at 4.
The intensity only has a real value when Sun Sky instead of dome is used. In that case it controls how strong the contribution of the Sun Sky light is.
Sorry to bump this thread and for not seeing your last reply. Thanks for that, interesting information.
Do you happen to know how you would make use of a typical DAZ roughness map in Substance Painter? They seem to do very little to tone down the specularity in Painter, and I've read that some may need to be inverted or adjusted, but I can't find any specific information. Thanks again.
I missed your post - sorry for late reply.
Roughness seems to work here. As an example I just set the torso roughness channel to 0 and compared to roughness filled with the default bump map of G8M. It does have the expected effect. Is it different on your side?
Ah, thank you for replying. Roughness maps do work, I shouldn't have made it sound like they don't, but I can't figure out how to replicate the combination of glossiness and roughness that we can get in Studio with the Glossiness set to .5 and a Roughness map set to 1.0. In SP, it seems like the Roughness map almost completely knocks out any specularity and we usually don't get a specularity map these days that might add it back in. Would you recommend adding in another channel with a high value to try and get it back in or is there a more simple way that I'm overlooking? Thanks again.
Sorry again for late reply. I am to busy to answer in detail right now but maybe the PBR-Guide written by the substance team can help:
https://academy.substance3d.com/courses/the-pbr-guide-part-1
You can download part 1 and 2 as a PDF from their website. It cleared a lot of questions I had about the general concepts behind PBR textureing.
In case you are still following this thread, the post below might be of interest.
https://www.daz3d.com/forums/discussion/495606/glossy-reflectivity-does-not-do-what-it-says
I am, thank you very much. That's interesting and it might explain why the specular maps give odd results in Substance Painter. When I get my system rebuilt, I want to test the specular maps on Jada 8.1 (the PBR skin shader ones) in SP and see if they make more sense. Thanks again.
I am not a Painter professional but in general it works like - well - a painting app
One quick example:
You can use all the alphas, change the paint color to less white etc. to control how strong the roughness map should be. Or you can use completely different maps and paint them in. Another way would be to use the height etc. channels of the smart materials and replace the DS maps with them.
I forgot to mention you can of course also reduce the overall strength of the roughness channel instead of painting the strength in with a mask.
I apologize for not responding sooner, I actually know how to do all of that in Substance Painter (but it should be very useful to others, thank you for the good tutorials), my problem is that I don't yet understand why SP interprets the DAZ glossiness maps so differently than Studio does. Not sure if I need to invert it, make it much darker with filters, or something else in order to get similar results.
Ok, it seems sometimes it takes me a bit to understand the question
And, I am not sure about my answer. While I am trying to understand the shader anyway I found out that the roughness is squared by itself in the uber shader. It is a hidden parameter and active by default. Furthermore I assume by my tests that DS converts the roughness maps (and maybe the other control maps as well) to linear RGB instead of sRGB. So, I disabled the square switch in the hidden surface parameters and set the gamma to linear in Substance. Masks etc. in SP are removed and glossy reflectivity is set to 0.5 in DS. This seems to do the trick. I am not sure if this is "correct" but I could not find another solution online.
Please ignore the difference in the environment in the render screenshot. I have not taken care of the OBJ's units during export/import so G8M's size is different. But the env. is rotated the same way to get similar lighting in both apps.
Where are you placing the roughness maps inside Daz Studio? If they are indeed roughness maps, should be placed in the Glossy Roughness, not in the Glossy Layered Weight slot. You should see similar results that way.