How can I do easy brightness in house?
 foxyfoxfurries
Posts: 350
foxyfoxfurries
Posts: 350
I have very dark house and I tryed some light but i dont get it how to use it well ... have some option for easy brightness?
Thanks xD
Daz 3D is part of 
Connect
DAZ Productions, Inc.
7533 S Center View Ct #4664
West Jordan, UT 84084
Licensing Agreement | Terms of Service | Privacy Policy | EULA
© 2025 Daz Productions Inc. All Rights Reserved.
Comments
While you've given us little more than the bare minimum here...
Create a point light in the middle of the room. Change the geometry to a sphere with a width of 100cm. Crank the lumens up to 250,000 or so.
If you need to make the light brighter, increase the lumens. If you need to make it more even/less contrasty, increase the size.
Duplicate the light and position the new one anywhere you need to get rid of shadows.
Rather than crank up the luminosity value yopu could adjust the Tone Mapping - Create>New Tonemapper Options Node and adjust the exposure and/or gamma as needed. If you are lighting the room from a single light you may find it takes a long time to render, as you ar relying on light bouncing into the corners - adding some ghost lights (planes with the emissive Shader preset applied and the oapcity close to but not quite 0) to fill in may help, though you will need to adjust tonemapping again.
There are tutorial videos on youtube that might help you.
Maybe search for "youtube daz studio indoor light tutorial" in google.
margrave said:
While you've given us little more than the bare minimum here...
Create a point light in the middle of the room. Change the geometry to a sphere with a width of 100cm. Crank the lumens up to 250,000 or so.
If you need to make the light brighter, increase the lumens. If you need to make it more even/less contrasty, increase the size.
Duplicate the light and position the new one anywhere you need to get rid of shadows.
Richard Haseltine said:
Rather than crank up the luminosity value yopu could adjust the Tone Mapping - Create>New Tonemapper Options Node and adjust the exposure and/or gamma as needed. If you are lighting the room from a single light you may find it takes a long time to render, as you ar relying on light bouncing into the corners - adding some ghost lights (planes with the emissive Shader preset applied and the oapcity close to but not quite 0) to fill in may help, though you will need to adjust tonemapping again.
Anim said:
There are tutorial videos on youtube that might help you.
Maybe search for "youtube daz studio indoor light tutorial" in google.
Well until today I use the environment map but on this stage its not do anything , I will try all your ideas now thanks ^-^
Environment maps radiate light from an infinite sphere around the environment. If there are walls in the way, they will block the light.
You can get an environment map to shine inside a room by creating a spotlight and enabling "Light Portal", so it acts as a gateway. I'd only recommend doing that if you're trying to mimic a window though, and if you give it rectangle geometry and size it up so it's close in size to an actual window.
Thank you so much!!! I saw the light options like you all say and i start to learn it! thanks! ^_^
Assuming you're making a 2D render, you can simple take off (make invisible) a side wall-or roof that is outside the view seen by the camera. This will let light through. You can then tone down the main lighting to room-strength, or use gels that appear to cast window-frame like shadows, such that the light seen by the camera appears to be coming through windows that are outside of the camera view. There is a video tutorial sold on the DAZ store which is all about lighting interiors, I think.
The next version of the free G'mic filter suite will also have 'room relighting' and 'window-lightfall' rendering - if you want to do more in postwork.
Lighting a room a night with bulbs and candles, is of course, a very different matter.
Yea but like CyberPunk night club I bought . I cant remove the roof or something like that and Im kinda new in this software , but I start to learn le light opstions and it goes very well for now :)
I can make windows?
Iray suposedly does a good job of working out where the light can get in, so portals are usually not needed. The issue, with or without a portal, is that your light is coming in through the window and all areas not in a more-or-less direct line from that will rely on light hitting a surface and bouncing off - where a bounced light path hits an object you will get a relatively bright spot, next to it areas that haven't been hit will be relatively dark; this is the source of the noise. As more passes occur the areas will be more evenly hit, and so the noise will smooth out, but ti takes a long time and you may have the render stop due to exceeding the max number of samples or (especially if it drops to CPU) max time - these can be adjusted in Render Settings, but the process is still going to be slow. Adding aghost light or so to fake the bounced light can help enormously (and it's what photographers do, with lights and reflectors).
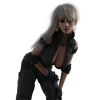
Oh ok its good to know , the light in this software very hard to understand (for me) , bleow is the ligh and without the light i make for training but its still not perfect , i pretty sure if i will try more i get what i want ^-^
@foxyfoxfurries
Your light (depending on what you want to accomplish) looks fine to me.
However, in your scene the character is posed in such a way that it looks rather jarring and distracting.
- Head is tilted too much to the left
- Person holding their hands behind their head would have their chest bent backwards (i.e. back straight, chest pushed out), not forwards
- Upper arms look twisted way too much
I found that I can make more natural poses if I try to take the pose I want myself, and then try to figure out how to pose each joint on the figure based on my own joints. Hope it helps.
Oh ok thanks for the ideas and feedback , and yea the light is kinda deep i want to make it more wide but I will work on this :"P
If this is supposed to be a nightclub during operating hours, I'd recommend lowering the lumens of your main lights to make the environment dimmer, then create spotlights with narrow angles and use them to give the character some very contrasting highlights on his face and body. Set the geometry to "disk" and fiddle with the size until it's sharp enough to look good.
Also, try giving the lights a slight tint since that's usually how nightclubs are lit.
I decided to throw something together as a visual guide.
Model: Trevon for 8.1
Environment: Post-Apocalyptic Living Room
Point Light
Color: 127, 191, 255
Light Geometry: Sphere
Height: 100
Lumens: 2,500,000
Temperature: 8,000K
Position: Behind the camera, to the right
Spot Light
Color: 255, 191, 223
Beam Exponent: 16
Light Geometry: Disc
Height: 50
Lumens: 250,000
Temperature: 4,500K
Position: To the left of Trevon, angled so the light that doesn't hit him lands on the wall outside the frame
Combined
OH WOWWWW!!!! VERY NICE! REALLY LIKE THAT!!! THANKS I WILL USE THAT FOR SURE XD
BTW You right about the night club so i do little bit of a light now ^-^ Thank you vey much and thanks for all I save this page if i need help or someone alse with the light. :D
Understanding lighting takes time, but it's easy once you get basics down: you (almost) always want to change the light geometry from "Point" to "Disc", "Sphere", or "Rectangle". The bigger a light is, the more the light rays spread out. That makes for dim, but very even lighting. And the smaller a light is, the more concentrated the light rays are. That makes for bright highlights with well-defined shadows. Use large point lights to fill the space with even lighting, and use small spot lights to emphasize the important things, such as a character's face. Once you get that down, adjust the lumens until you're happy with the results.
Ye for now i practice for fun and start to see how the light goes , im not so good with that yet but lets see how it goes ^-^ BTW better put the light in the wall and roof?
Or its dosent matter if its near the character?
Here some new light test i do xD
As Richard suggests, prefer changing the tone map exposure to cranking up the lumens. The default of 13 is really for outdoor scenes. I use 7 or 8 for indoor archviz, reducing light lumens right down to compensate especially if it's an evening/night set. Press CTRL-L to get default lighting in the scene if it's dark in the editor.
Lumens are the light rays that are generated inside Iray to light up a scene. If you don't have enough, your render gets distorted by noise.
The tonemapper is just a post-processing filter that makes your final render look a little nicer by tweaking the colors.
Using the tonemapper without having enough lumens is like screwing up the recipe for a cake and then "fixing it" by putting a nice cherry on top. Doesn't matter how good you can tonemap, your render's still going to look bad.
First, that shadow is really distracting. It's way too sharp. Shadows in real life are never sharp like that, because light doesn't come from an infinitely small point. I would definitely recommend making your spotlight bigger.
When you need to light a scene, think like both a set designer and a cinematographer. Set designers try and put lights where they're practical, such as over the bar so the bartender can see the drinks he's making or having a disco ball over the dance floor. But cinematographers complement that with bright studio lights behind the camera, highlighting the actors. You can cheat a bit, when it comes to the "studio" lights. People don't really mind, since it allows them to see the models' faces. You just need to make sure it fits the atmosphere.
Robinson said:
As Richard suggests, prefer changing the tone map exposure to cranking up the lumens. The default of 13 is really for outdoor scenes. I use 7 or 8 for indoor archviz, reducing light lumens right down to compensate especially if it's an evening/night set. Press CTRL-L to get default lighting in the scene if it's dark in the editor.
margrave said:
First, that shadow is really distracting. It's way too sharp. Shadows in real life are never sharp like that, because light doesn't come from an infinitely small point. I would definitely recommend making your spotlight bigger.
When you need to light a scene, think like both a set designer and a cinematographer. Set designers try and put lights where they're practical, such as over the bar so the bartender can see the drinks he's making or having a disco ball over the dance floor. But cinematographers complement that with bright studio lights behind the camera, highlighting the actors. You can cheat a bit, when it comes to the "studio" lights. People don't really mind, since it allows them to see the models' faces. You just need to make sure it fits the atmosphere.
Ye you right thanks for the amazing tips I will work on this more! THANKS ALL!!!! XD
No, lumens are - as far as I ama ware - a measure of the brightness of the rays. increasing their value does not add extra path trace operations, though it might allow each apth to bouince for a bit longer and so reach further into the inaccessible areas. Adding more lights, rather than more light, is the key to speeding convergence; tone mapping controls the final look (though it applies throughout, it isn't a separate step at the end).
I didn't mean the lumen value is literally the number of light rays. I meant exactly the same thing you said: the brighter the lights, the more color data Iray receives to process each pixel with, avoiding those black fireflies from insufficient light.
Correct me if I'm wrong, but doesn't the tonemapper appear in the render window, as an effect you can apply after you end the render? So doesn't that mean it's a post-processing effect?
Upping the luminosity value still isn't an efficient method of improving the speed of convergence, and doesn't help to get the desired lighting - adjusting tone mapping does not address the speed of convergence, as you say, but that wasn't what I was suggesting it for - I was suggesting using Tone Mapping and fill lighting to get the desired look from a speedier render.
It's way more complicated than that. The final result is high dynamic range. Tone mapping is how that gets normalised for final result 0..1. For indoor scenes where you tend to have spotlights/point lights, you want deeper shadows and to not overexpose objects close to the light. It's modelling adaptation from the range according to the exposure time. In dark scenes you would tend to have a higher exposure time.