Screwy Polygons
 JOdel
Posts: 6,288
JOdel
Posts: 6,288
Okay, I don't know what forum this really belongs in because it's probably a modeling problem.
I built this a couple of semesters ago at the tag end of a semester of Intro to 3D modeling. The program used was the student version of Maya 2013. (It no longer seems to launch, so it may have timed out or something.)
It isn't really complete, or UVMapped, or rigged, or anything else. Just a straight model exported as an .obj, imported into Studio, and various mat zones created with the polygon editor.
And when I started applying some shaders, bugs immediately became apparent. Quite a few polygons do not take the shaders in the same manner as the polys around them (see viewport screenshot). And these polys cannot be scaled to match the ones around them, either. They flatly refuse to match up.
Now in the model which was the classroom assignment, it turned out that some of the polys were reversed. Is this likely to be the problem here?
And is there any way to fix this? I do have Hexagon, although I have no idea of what to do with it.
Daz 3D is part of 
Connect
DAZ Productions, Inc.
7533 S Center View Ct #4664
West Jordan, UT 84084
Licensing Agreement | Terms of Service | Privacy Policy | EULA
© 2025 Daz Productions Inc. All Rights Reserved.
Comments
Do you use any other 3d program? You should easily be able to see it in one.
Blender is free.
Well I didn't *see* it until I tried applying the shader. Any idea what's causing it?
It looks like you have some uvs out of range or flipped or rotated. You can try to re-uv the model, either in Hexagon or in a uv editor like UVMapper, which has a free version.
Open it in Hexagon, if you haven't already. Lots of times it just fixed a mess when it opens the file. Sometimes it crashes if the file is too bad. Once it's opened, there is a little log shaped icon near the bottom right. Click that and it will show only the forward facing polys. So, you'll quickly see if any are reversed.
I don't think they are reversed. Or if they are, that is not why the uvs are messed up. Reversed faces can still have proper uvs
So the problem is likely to be reversed polygons? Thank you. I'll try that tomorrow and see how it takes the shader then.
Like I say, it's not UV Mapped *at all*, just has some material zones defined.
I don't think the problem is reversed polygons. It's messed up uvs. I know you said it is not uv-mapped, but it is. Maya assigns uvs automatically when you model, if that option is checked, which it usually is when you create a polygon primitive. That's why the head looks correct. When you added the eye socket and the ears, the uvs created were created "corrupt". The eyeball itself is clearly another polygon primitive added on, which is why it's uvs are good, too.
I don't know that it is likely the problem. It can cause odd results. I was just letting you know how to check your mesh. It is a part of doing it the right way. I do know that with standard textures, the backside of a poly has generally looked darker in my experience. I'm not sure what might happen with a shader.
And listen to Slosh! He is the UV expert around here. :) BTW, you can select a surface in the surfaces tab and switch to UV view to see what it's using.
Hi.
I'm not an expert in this stuff by any stretch of the imagination, but in reading your post and looking at the image, I would offer a couple of suggestions that might help others help you.
First, there seems to be a little mixing of metaphors. Specifically, when you refer to "shaders", are you talking about the texture maps? Shaders are a set of instructions for the render engine that tell it how light is supposed to react to the surface. That doesn't seem to be the problem here. It seems to be an issue with the UV maps.
Secondly, it is difficult to guess what the problem is since we do not know what the textures are supposed to look like. I am assuming that the areas surrounding the eyes and on the ears are what you are concerned with? Again, if so, then it seems to be an issue with the UV maps. If it were polygons being "reversed", which would usually imply that the surface normals of the polygons were reversed (that tells the render engine which side of the polygon is to have the map applied). If that were the case, the polygons would usually appear dark or black, which isn't the case here.
Can you show a screen cap without the texture applied, with just the default grey surface? That would more easily show any problems with the mesh itself I believe.
In any event, it is the UV maps that are the issue I am guessing.
(BTW, if you could post an image of your actual UV maps, that might go a long way towards identifying the problem. It could be a stretching or distortion problem, or it could be as simple as a texturing problem.)
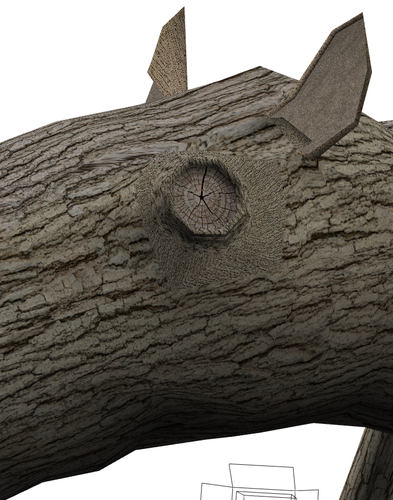
Yeah. I was seeing the problem all wrong. I thought the ears and eyes were supposed to be a more dense texture. I was focusing on the front base of the ears and seeing what appeared to be missing polys or bad distortion or something.
Well, the UVs are all labeled as 'Default UV' regardless of whether they take the texture maps correctly or not.
Here's a shot of the head unmapped, and another of the whole model with the known problem areas in red. A couple of the non problem aread don't seem to take the difuse color , but they accept the texture maps all right.
Can you post the UV Template the model has?
?????
You mean a version with the wireframe showing?
No, the actual UV layout on a flat plane - a template saved from UV Mapper Classic, or a screenshot of the DAZ Studio UV view for example.
So Studio does a UV? Where do I find it or ask Studio to do one?
I certainly did not do one. I just built the model, exported it as an .obj file, and imported the .obj file into Studio.
There is no UV template on a flat plane that I know of. Or at any rate, none that I know of.
JOdel,
Richard means post a screenshot of DAZ Studio's default UV "viewer".
It is located with the camera selection module (Perspective, Front, Right Side, etc.). You should find "UV View" at the bottom of the selections drop down menu; select it.
It will change your view-port from models view to UV view where you can check out all the UV islands embedded in the mesh.
At first it will be blank, but you have two options to show any UV's. There is a drop down menu that lets you either View by Node (selected mesh nodes), or View by Material (via selected material zones). I suggest you first select all your material zones, and select View by Material.
If absolutely nothing shows up in the square UV plane on your screen chances are the mesh has no UV's, but there is also a chance even though nothing shows up, you might have UV data embedded in the mesh, but they are out-of-bounds of the 0, 1 UV square (they are off in la la land).
The only way to confirm 100% if your mesh has UV data is to retrieve the original OBJ, or export as OBJ, and view in an application such as UV Mapper, or view the raw data in a text editor. In UV Mapper, it will let you know if there is data out of bounds, and will let you correct this. In a text editor, you just need to see if there is raw vertex data named "vt" (vertex texture/UV data). If there are no vt lines, then the mesh does not have any UV data.
I hope this will help you get to the bottom of your issue.
Thank you!
The version of the model in the saved scene with material zones does show something in most of the zones when viewed by material. Not all of them, however, and the four it shows nothing in are all trouble spots. However, two of the trouble spots do show at least something, even though it makes no sense to me.
For example. The UV for the rings around the eyes and the little patches on the head inside the ears which are all bad spots is a blank square with one line running diagonally from the upper right to the lower left corner. The View by Node layers all of the different material UVs on top of each other into a complete mess.
Opening the .obj in a text editor shows that there are plenty of lines that start with vt (or just v, or vn, or f, and a few that start with either s or g). Of course I have no idea of what any of it means.
An unmodified copy of the base model with no material zones designated imported into a new scene shows the mess of all the different mat zones piled on top of each other when viewed either by node or by material. It looks like this:
So in your original post you indicated that the project wasn't completed and the object wasn't uvmapped. While Maya seems to make UVs as you work, that doesn't necessarily mean they will be the best for final textures depending on how you modeled your piece. What concerns me, mostly, is the area around the eye which has a far different resolution than the rest of your model.
I would recommend that you reuvmap it in, say, Hex, since that seems to be a program you have. The images you show look like the uvs are stacked over each other, but I'm not sure what I'm looking at, so hard to say for sure.
Yes, it does seem to be indicated that a proper UV Map is what is called for. Re-selecting polys for matt zones isn't that big a deal. It isn't all that complex a model after all. Besides, I've done it before.
So. Hexagon, or UVMapper. Ive seen the demo for a commercial program too, but that may be overkill.
You shouldn't lose your material zones in remapping anyway - just export the OBJ with the new zones and work on that instead of the original.
Ah. Well I've separated the bad polys out into separate zones to isolate them and turn them red, but I'll reassign them before I re-export from studio. Most of the bad polys are in areas where the zone would have been a separate one anyway, but the rings around the eyes, the area inside the ears and the snout probably all ought to be a part of the main body.
Well, I've re-exported the .obj, this time from Studio, with the matt zones defined. Hexagon opens it up without argument. But I've no clue of what to do from that point. There is a tab about paint and UV, but none of the tools in the section mean zip to me. I can't even maneuver the viewport so I can see what I'm looking at.
Thanks all. But it looks like the whole project is likely to go on the back burner until I have a better idea of what I'm doing.
Would you be willing to put the OBJ up so people can have a look at it?
I don't know how, but sure.
If you have Dropbox installed on your system just put a copy of it in your Dropbox folder, then right-click on the file and select Share Dropbox Link and paste the contents of the clipboard into a reply to the thread. Well, it would be better to zip it up with a readme saying it is your work and not fro redistribution and share that.
I do have Dropbox. So just attach it as if it were an image?
Or, I suppose Just copy here:
https://www.dropbox.com/s/7fertqrkmk2980v/SawhorseObj.zip?dl=0
That okay?
That gives a 404 error I'm afraid. The link looks to be the right format, so I'm not sure what the issue might be.
Have fixed it. It took me to the download page this time. Try again.
The bad polygons are mapped to the whole uv square, that's why the textures get spread out and why you don't always see anything in the UV view in DS - the polygon edges are the edges of the square. If I hide the polygons that more or less cover the whole unit square, you can see that I am left with the bits of the model that take the texture well (though there's still a lot of overlap, hence the red on the UV map). The OBJ is also loading into modo with a few polygons with reversed normals in the problem areas, though that isn't a major issue.