Face Transfer Squash Faces
 wildbillnash
Posts: 757
wildbillnash
Posts: 757
Hi, I've been playing around with Face Transfer a lot and I've noticed a problem with some of the results. The nose, lips, cheeks, and chins don't come out right. They get pushed in some. The image below shows a regular G8 figure on the left and the results of a Face Transfer on the right. They look alright when you look at it from the front but when you turn the figure around you see the face got pushed in some. Any ideas what's going on here?
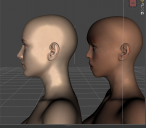
Screenshot (101).png
953 x 834 - 557K
Daz 3D is part of 
Connect
DAZ Productions, Inc.
7533 S Center View Ct #4664
West Jordan, UT 84084
Licensing Agreement | Terms of Service | Privacy Policy | EULA
© 2025 Daz Productions Inc. All Rights Reserved.
Comments
Displayed is the reason why the more expensive face modeling plugins can make use of profile images ;-)
This product was made to address the issues in Face Transfer: https://www.daz3d.com/face-transfer-shapes-for-genesis-8
All the plugins are really bad IMO, if you want something goofy, sure, but if you want it to look realistic you'll need to use other sources, combined with blender and then back to DAZ, and LOTS of work. The reason is the sampling is just too poor. You'll never get something like this:
Ok you wont' get this in Daz either..well maybe if you try hard enough. This was by a pro in Maya.
Actually Daz Studio artists have gotten some excellent results in their artwork - many using Zbrush for morphing and skin texturing. There is at least one product for those tiny face hairs, several for fiber eyelashes ... IMHO hair is the hardest item to get looking realistic although a few artists are getting close.
In the meantime, many are quite happy to make use of the D/S plugins {Face Transfer, Headshop, Facegen} to make a likeness or simply another character for the Genesis clans. Not everybody has hundreds or thousands of dollars to blow for one image render.
Like you said they are using the 3rd party tool Zbrush, not a photo transfer add on. I've been using FaceBuilder combined with Blender for great results.
Well unlike Blender, FaceBuilder is far from free ;-) For my hobby, the mighty 3 are fine for me :-)
Just trying to help, the personal version is only 149, about the same as all those others. And it actually works at a higher detail level you will not get from them. But it's not a couple of clicks and your done type of thing and automatically on your character in Daz, you have shrinkwrap it in Blender on a genesis export.
I know your good with goofy, but for the OP and anyone else reading this thread.
Oh I know and that's quite okay charles. But you might want to check your invoice or whatever, that's an annual subscription. The others are not.
Actually I do like realistic looking but not "too" ... not into deceiving people as to what they are looking at. For the money, I purchase ready-made from the pros ;-)
Okay, I liked what you linked to and bought the add-on. But like most things you buy on DS, it doesn't come with instructions (at least none that is easy to find). Any idea on how it works?
It is just a set of morphs which will adjust the full head to more realistic shapes. After you have used Face Transfer, then find the morphs on the Parameters Tab and dial in the ones that help the character's overall profile, etc. look more accurate.
When I first used Face Transfer I was finding that the saved Face Transfer subset would not keep changes. Haven't tried it again yet in 4.15 so if that is still the case, then after your character is looking as good as it gets, no eyelashes, base resolution, send the figure over the bridge to Hexagon. In D/S clear the scene and load in a fresh G8 figure, no eyelashes, base resolution, keep it selected. From Hexagon send the character figure back over the bridge to D/S and create a new morph. {new name} Dial in the morph, go to the geometry editor tool [bones will appear visible], do NOT move the bones, right-click on any bone and Edit - adjust bones to mesh. I select all 3 options at the bottom and accept. Then over on the Parameters Tab, go into Edit mode [right-click on dial] and select ERC. Do NOT touch anything on the pop-up. Again the 3 choices at the bottom should all have checkmarks in them. Click Accept. Now dial out the morph and Save the Morph. File > Save As > Support Asset > Morph. The added bonus for doing fresh morph saves this way is that they can now be used on any new G8 figures loaded into the scene too.
Rats, that means I will have to redo all of my face transfers. I was hoping just needing to choose a face configuration to correct it. As for what you mentioned, Catherine, I haven't used that bridge at all and only played around with Hexagon a little. Oh well, something else to learn. Thanks for the info.
No, if you have already used Face Transfer, just load the character you've already made. I suggest using Hexagon because "all" one is doing is sending the item over the bridge, to and fro. {n.b. in D/S under Edit Preferences, the bridge type is Advanced to get all the options}
.....................................
Or IF all of this is just for like, one image render, just make the character look nice and render out the image.
Catherine, you said, " It is just a set of morphs which will adjust the full head to more realistic shapes. After you have used Face Transfer, then find the morphs on the Parameters Tab and dial in the ones that help the character's overall profile, etc. look more accurate."
Okay, I loaded one that I did. I looked in the Parameters tab and don't see anything new. What am I missing?
Just had a thought (don't know why this is highlighting itself), do I find the controls in DS or Hexagon?
Where can I find the morphs? I don't see it them in the parameters tab.
Okay, I'll be back in a few minutes, have to load up D/S and get the images for you.
Updating: I will admit that these are not easy to find.
They are started with "FTS" which can be used as a search term.
Location is: Actor > Head > Real World > Face Transfer Shapes
I have loaded to the scene a saved Face Transfer Subset:
And the rest of the images:
And now it is safe to fiddle with, add some hair, eye mats, clothes, whatever, and render out images!
Added bonus: The morph made by Face Transfer can now be used on any G8 M or F figure :-)
Here is Private G:
Normal skin settings, etc.
Thanks for such detail, Catherine. I found the face morphs not long after my last post. It's where you mentioned. I found it by searching FTS. I just wish the designers of these programs include instructions. These are not video games for you to learn by trail-by-error. There is another location for other adjustements for the chin and nose. What we found only seems to work with the head configuration, not the nose or chin. I found where I can fix that to a degree. I found it under Products/Documents/Face Transfer Shapes for Genesis 8. I really don't understand the settings yet, but it corrects the chin and nose. Then I use 200 Plus I bought a couple of years ago to fine tune them.
I'm going to have to learn the Hexagon way of things you posted. Meanwhile, I have a lot of correcting to do.
Thanks again and have a great week.
You're quite welcome wildbillnash, and you as well :-)
Oh yes, if using the same Hexagon session for multiple tasks, everytime one pops back into Hexagon - click on the Accept button to validate/finish the previous action. Then the manipulator returns and the next activity can commence.