Newbie question: Iray renders are so dark and discolored - what am I doing wrong?
 paulawp (marahzen)
Posts: 1,445
paulawp (marahzen)
Posts: 1,445
Hi everyone! I am a total newbie - as in, I now have about a week and a half of experience working with Daz. I feel like I'm making good progress on some things but one important thing is driving me nuts, and I'm not getting any better at it after twiddling with settings and reviewing many videos and threads on the subject.
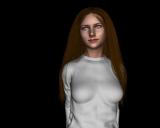
Please disregard all the other shortcomings in these examples, as I'm still learning (and making progress with fixing other things). My question is about the extremely dark and discolored Iray render. This is happening with all of my characters, who have varying hair color and skin tone, but the problem is really extreme in this character, which is based on a Facegen export from an Artbreeder image of a girl with a fair skin tone.
For these two examples, I have a basic 8.1 female figure, to which I have applied all of the Facegen surfaces. The hair is from a commercial product, in which I have selected a bright red color. Other than switching the render option, I have made no changes in the scene.
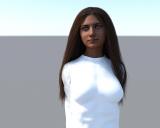
The 3Delight render - for everything else it leaves to be desired - does a better job of reflecting the correct skin and hair color.
The Iray render produces skin and hair color that bear no resemblance to the surface selections for these objects. This example has been done with the Sun-Sky Only environment setting, with a midafternoon time; any Dome or Scene-related options I have tried yet create renders that are just as wrong, if not worse. I have done some testing with Exposure value and ISO. There is tiny improvement if I back off Exposure from the default 13, but basically, anything that brightens the scene just washes out the figure instead of doing much to correct the coloration.
Meanwhile, the white shirt is unnaturally bright white in the Iray render compared to the 3Delight render (and the original purchased product).
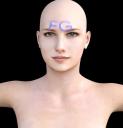
An additional detail: A year ago, I fired up Daz long enough to test Facegen and got the third image (with the watermark), which is - with 10 minutes of experience in Daz - exactly what I wanted. (It is a different export from Facegen, but when I compare the surface files exported by Facegen, the color difference is not that dramatic! I also have already tested with that exact set of exported surface files with no better results.) At the time, it was Daz 4.10 - I just upgraded to 4.15 before my recent return to this project. Unfortunately, I don't recall which figure I used. What on earth am I doing differently now? Help!
Daz 3D is part of 
Connect
DAZ Productions, Inc.
7533 S Center View Ct #4664
West Jordan, UT 84084
Licensing Agreement | Terms of Service | Privacy Policy | EULA
© 2025 Daz Productions Inc. All Rights Reserved.
Comments
I'm still figuring out the iRay settings. In the future I'll probably want to make better use of the Environment Options, but for those of us just starting out in iRay who have a desire to have the images come out with specific lighting, I usually go to the Environment Options (selectable in the Scene tab) and turn the Environment Map off (set to None). I create a camera named "sun" and in the Environment Options, I set that as my Sun node. Then you can switch you view to the "Sun" camera and point it where you want the light to come from.
The Environment map seems to create a 360 degree setting which automatically enhances backlioghting and reflections, so it's definitely something worth figuring out, but it's kind of difficult to figure out how to manipulate. Unless you know its secrets, when yu're determined to use it because of how cool it can look, it's usually easier to parent EVERYTHING to a Null node and rotate it all to where the light hits from the direction you want.
I'm sure there's tutorials about the Uber Environment, buit if you're stubborn like me and just want to make some freaking pics NOW and figure that stuff out later... setting the Environment Map to None and specifying a Sun Node is the way to go.
EDIT: Oh, yeah... for the lights you can create, you have to click on them, go to Parameters, click on the gear in the "Intensity" item, click on "Parameter Settings" and Turn Limits Off. Seems like the default intensity settings for these is nowhere near bright enough to see in iRay unless you set them to thousamds. or tens or hundreds of thousands %.
EDIT 2: Skydomes will block the default lighting in the Environment Options Unless you're setting up your lighting from scratch or a Lighting Preset, no skydomes!
Further tinkering has provided a big clue in this problem. While in the same session with Daz, I tested with a G3 Female figure and found that using the same Facegen export file, an Iray render produced pretty much exactly what I was hoping for with this character. However, starting with G8, the same file suddenly renders much darker.
Below are the results of starting with a blank scene, opening the basic G3 and G8 Female figure, applying the same Facegen "face" file to the Face surface only (leaving the default for other surfaces) and rendering. G8 and G8.1 produce what appears to be the same outcome.
That tells me that the problem is not inherently either the file output by Facegen, or Iray itself. The problem comes from something that is different starting in G8.
You don't have to look far to find that surface settings in G8 are actually quite a lot different than in G3. I am guessing that at least part of the problem is due to what appears to be an entirely different configuration of "Color" options in G3 vs G8 (and I'm sure there's important things that don't have "color" in the name). I'll keep working on this but if anyone has any ready insight, I'm all ears. I want the color of the G3 render but with the G8 features - especially considering that I have now collected a bunch of stuff that is only compatible with G8 figures.
That does leave this question: Why does the default surface file still render reasonably and mine come out so freakishly dark? Visual inspection of the files does not immediately explain why the default skin is so much lighter than what G8 renders for my Facegen export.
And here's the cheesy workaround for my problem ... I noticed that for G3, it was using the AoA_Subsurface shader for the face and other relevant body surfaces while in G8, it had gone on to Iray Uber. So I switched the shader for my G8.1 test character and got the more correct skin color for this character (and others). I don't know yet what the knock-on effects may be, causing bigger problems at some future step, but in the meantime, this appears to be the quickest way to render my characters reasonably as they were meant to look.
How about this theory: When I'm better at using Daz, I'll be better at trying to figure out why the Iray Uber shader causes this problem.
If I've read your posts correctly, you're looking for more vibrant skin colours? You've tried boosting the exposure and adding more light to the scene, but you're clipping your whites?
I have some ideas for you to try. Have a play with these settings and let me know how you get on;
I've personally found that setting Crush Blacks and Burn Highlights to 0.00 in Tone Mapping helps bring out more colour. That said, at first you'll notice that this makes the image look more washed out, but if you then drop gamma down to somewhere around 1.0, and boost your scene lights accordingly, you can then bring back the colour and contrast, while retaining vibrant colours;