Strange artifacts appearing on skin in IRay and renders
 stripe6499_9253833ae8
Posts: 142
I've been using a model in a poolside gym scene. The Base model is Park HD, with a few minor adjustments. In some of the scenes, odd artifacts show up, on the chest, upper left arm and forehead. sometimes one or two, or all three. Does anyone know what causes these artifacts to appear? The upper arm one looks like a squiggly tattoo, the chest one is a ring or blotch, the forehead one looks like the distorted shadws from her glasses (no, they don't go away if you remove the glasses. Any ideas?
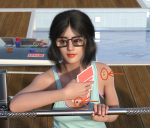

Chingym1bArtifactsLarge.png
990 x 845 - 1M
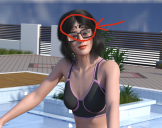

Chingym3bArtifacts.png
1120 x 886 - 2M


Comments
I sometimes get those when I move the characters very far from (0,0,0); I've taken to keeping them at or near there and moving the scene instead of them. Sometimes the hair is the culprit, especially the forehead issues, which can be helped by adjusting the fit of the hair. I'm not sure about the chest/shoulder issue; I've not seen that (yet?).
Redacted
Thank you for the ideas. Yes, she's far away from the original origin, so that makes sense, I can't figure out why I'm getting it in some renders and not in others. I'll try taking the scene apart, one component at a time, if all else fails. Maybe I'll be able to isolate it that way.
Forehead solved. It was the hair colliding with the forehead. A minor adjustment of the hair against the forehead depth in Parameters and problem gone.!
I also resolve this issue sometimes by simply turning off the hair object and then turning it back on again (Visible Off/On option in parameters, or clicking the Eye button in the Scene Editor. It may be when hair objects also use shells, not sure.
I usually fix these in the render settings. Go to the Optimisation section and change Instancing Optimisation from auto to speed and that will remove those render artifacts.
Hope that helps
So far, selecting the hair, going to Shaping, and adjusting the forehead depth by just 1 click (1%) has fixed the forehead issue. I'll try the Rendersettings for the body artifacts the next time they come up. I'll report results here.
You could still have artifacts, if your doing other shots. Your best bet to fix this and KNOW you have fixed it is to change to "Smooth Shaded" view, this will allow you to easily see the geo caps easier. And where it overlaps (intersects) with the character's head is where these cracks will appear. You have multiple ways to fix it. First see if the vendor supplied adjustment sliders for the hair. Or drill down to head node and try different scales. Or use mesh grabber to tweak it.
I had this very issue this evening. One of my characters had weird black lines/circles appearing all over skin (legs, arms, etc). I changed instancing opt to speed and they went away.
Weird.
This is a problem you will never get rid of, and the only thing I can recommend based on my own experience is Photoshop and the "Spot Healing Brush Tool"; it takes about 20 seconds. Trying to fix this problem through DAZ is unnecessarily complicated, and you will never get rid of it completely. It may happen that for one image it won't and for another it will. So if you want to save time and nerves, use Photoshop and this great feature :) Good luck
This is a very practical solution that is appropriate 99% of the time. People resist this (including myself) because is seems unsatisfying somehow. Maybe its just annoyance after having spent a couple of grand on a GPU powered monster that can't seem to get it cleanly perfect. I guess I should look to the movie industry, where the phrase "we can fix it in post" are words to live by.
One should always try to have the characters close to world origin, put the buildings, props etc in a group and move the group to bring the part one wants to focus on near the world origin and place the characters there.
One can have distant objects and one can have minute details but one can't have minute details on distant objects, this comes from the limits of floating point mathematics and the effects can be seen in many 3D programs including the "industry standard", AutoCad.
Changing the Instancing Optimisation from one method to another can help, it is said to fool the system to think the object is near world origin even when it's not.