Is it possible to make my avatar a bit sharper?
 Subtropic Pixel
Posts: 2,388
Subtropic Pixel
Posts: 2,388
I know that 100 X 100 pixels can't do justice to any image beyond simple vector graphics, but I'd like to know if there's ANYTHING I can do to improve the quality of my avatar images, even if it's just a little bit.
The image below shows the render settings for the Avatar currently showing for my profile.
Can anybody offer any suggestions for improvement to sharpness/clarity?
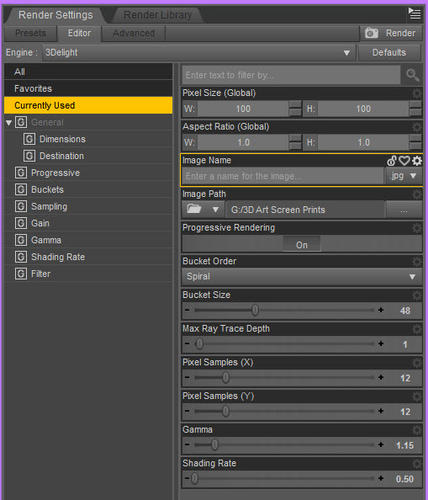
Avatar_Render_Settings.jpg
509 x 594 - 78K
Daz 3D is part of 
Connect
DAZ Productions, Inc.
7533 S Center View Ct #4664
West Jordan, UT 84084
Licensing Agreement | Terms of Service | Privacy Policy | EULA
© 2025 Daz Productions Inc. All Rights Reserved.
Comments
For additional reference, here is a screen print of the same image (with only minor changes to the man's fingers) rendered at 800 X 800, but with all other settings the same.
Getting the most out of tiny images is an art.
Because of the limited pixel dimensions all you can do is change the "perception" of the image. In some cases exaggerating contrast or simplifying parts of the original leads to a "clearer" perception of the reduction.
With a sophisticated image editing product like Photoshop you might find ways of increasing clarity by emphasizing figure outlines, reducing the number of different colors, changing gamma settings, etc.
I have no specific recommendations, except play around and experiment.
Diligent research might find suggestions in Photoshop forums.
But actually, the avatar I'm seeing here is pretty good!
Thanks. Yeah, I already make my avatars with plain single-color backgrounds with medium contrast to the subject, and I zoom in to crop the image before rendering in an attempt to get a bit better quality on the important items of interest, such as shapes, lines, or faces; basically what I do when shooting photos of human subjects. But these seem a bit blurry. Maybe the effect is being exaggerated due to my zoom level in my browser (150-200%).
I just noticed that my current Avatar's file size is 11KB, which seems very small and low-detail. It just occurred to me that I'm saving as JPG, while a prior PNG was 663 KB.
Would PNG or another format help and/or be compatible for forum avatars, or could I increase the quality of the JPG that DAZ Studio is saving?
Render at the size the avatar needs to be for the forum
Use a shading rate of 0.1
And use a bucket size of 8 when you do this
Thanks Matty. I uploaded a new avatar with the rendering options you suggested. I see a tiny bit more detail. The cat-stripe lines on her arm and leg are clearer too; unintended but probably a function of the small image size, but I see a few other minor improvements, which is a good thing. I tried both PNG and JPG and I thought the jpeg had a little better detail, particularly in the man's right hand fingers. The PNG made it look like his hand was... um... where it shouldn't be, not when dipping a lady!
Incidentally, neither dance partner's form is proper for this type of dip. I need to clean up the poses, but then they probably would not fit a square image. Right now, posing characters so that they "look right" while also avoiding embarrassing aberrations (e.g. fingers or other body parts appearing to poke/point/touch places where they shouldn't, backgrounds growing out of heads, and other things that any photographer would also try to avoid) is the most challenging thing for me right now.
I think you need to work on the image after it has been reduced to thumbnail size. The reduction process always seems to have a degrading effect, no matter how good the original image.
I took your 800 pixel image reduced it to 100, then applied the simple sharpening filters in my old Photoshop CS2. In the attached strip you can see from left to right: Original reduction; Sharpen filter; Sharpen Edges filter; Sharpen More filter.
Wow!
I was rendering straight to 100 X 100; not reducing. I like your post-processing idea, however; super results. I use Corel Paintshop. Will try these things myself later today.
Thank you for the suggestion, I look forward to trying this.
The banding on the skin is reduced by a setting in the surface shader for the AoA SSS shader. For all the surfaces using that shader on both of them, find the setting "Shading Rate" and change it to 0.5 and you will not see the banding.
In short, on a small rending that setting has to be low where as on a larger rendering the setting can be set higher and still see no banding. I forget the technical bit behind it but it has to do with the render engine doing math calculations on those surfaces. Higher number means fewer calculations and lower numbers mean more.