Retaining the most detail from Zbrush to Studio?
 SnowSultan
Posts: 3,643
SnowSultan
Posts: 3,643
I exported normal and displacement maps from Zbrush for a simple jar prop to see how much detail would be retained when it was rendered in Studio. The result isn't awful, but it's not as good as in Zbrush even at SubD 5, and was wondering if there are other steps I overlooked to get better results or is this as good as it can get (aside from exporting the 800K polygon Zbrush mesh to Studio). Thanks in advance for any suggestions.
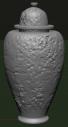
jar_zbrush.jpg
374 x 700 - 43K
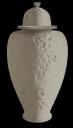
jar_ds.jpg
400 x 700 - 110K
Post edited by SnowSultan on
Daz 3D is part of 
Connect
DAZ Productions, Inc.
7533 S Center View Ct #4664
West Jordan, UT 84084
Licensing Agreement | Terms of Service | Privacy Policy | EULA
© 2025 Daz Productions Inc. All Rights Reserved.
Comments
You need to use the same colors, glossiness, and every bit of that to have your eyes or our eyes give an accurate assessment of how much of your details in zBrush actually made it into DAZ Studio. If I artificially adjust my eyes to compare your two vases the details do look very closely similar.
Yeah trust me, easier said than done. I'll see if I can improve it a bit.
Alright here's another one. The detail appears to be there, but not as defined.
Hi,
I thought that your first example looked pretty good in terms of the surface details. What format of maps are you using? Are they 8-bit or 16-bit, jpegs or pngs? Bump and normal maps work better when they are 16-bit maps (or higher) and haven't under gone any compression -- so 16-bit pngs would be better. Also the normal maps directly exported from zBrush aren't that great, and depending on the version of zBrush that you are using you have to invert one of the channels so that it renders correctly in DS. I typically save my base model and then my high-poly sculpt as obj files and then use xNormal to make the normal maps.
When sculpting maps, you need to start with a smoothed mesh. In Zbrush, subd the object once or twice and then delete the subd history. Subd the object a couple more times again before sculpting. Also double check the resolution of your maps and make sure they are larger thank like a 256 x 256 map.
Rascal: The maps aren't changed from when they were exported from Zbrush, so I assume they're 16-bit. Normal map is a TIF, Displacement is a PSD for some reason but it works. Interesting information about the quality of exports though (I'm using the Zbrush trial from 2020, so it's slightly dated), I'll keep that in mind. Thanks.
chevybabe: Yes, this mesh was very low res in Studio, I subdivided it four (I think, four or five) times in Zbrush until it went from about 14k or so to around 800K polys. Exported maps are 4K, I even tried 8K but didn't notice any difference in quality when rendered.
Ok, you may be missing what i said. The mesh has to start smooth. So if you start with a low poly mesh the calculations will be between the high res mesh amd the horrible low poly one. Which gives that low poly look you see now.
You need to start with a higher base res mesh. You can do this by subdiviiding the object a couple of times. Then deleting the history. Then subdivide the mesh more and sculpt on that.
Do you mean subdividing it in Studio before exporting to Zbrush or just making sure the first level of detail in Zbrush is a high subdivision?
I didn't save the meshes, so I'll need to recreate this and test again. Thanks.
Yeah. You can do it that way too. In daz, subd the object and export it out at a much higher resolution.
Then in zbrush subd it at least once before sculpting on it.
The scale of the displacement might be off. Afaik there isn't a tried and true method but generally a) make sure your displacement map is a format with higher bit depth (.exr is a good option) and you will probably have to fiddle with the displacement min and max values.
other things to consider re displacement -
for ref: one of these is using displacement and the other is the high res object while they are not absolutely identical they are pretty dang close.
Well now it's absolutely ridiculous, no maps are being exported from Zbrush no matter what settings I try. I swear, if I could redo ONE THING in life, it would be to learn how to freakin' draw so I wouldn't have to mess with 3D insanity.
Anyway, I see a lot of adjustments in the export panel for normals and such, so if I can ever get this working, I will test those out. Thanks for the help so far. Jcade, you're right, there are more polys on the top of that jar than the middle. Would you need to use the Zmodeler and add more polys to the middle by hand for best results or could you dynamesh to get a consistent density?
OK I don't know what fixed it, but it started exporting again. I set the options in the Zbrush exporter to use Subdivision 5 and sent these out. This is probably as good as it's going to get, not quite as sharp as in Zbrush but likely good enough for most work. I had to flip all three color channels in the normal map to get the swirl to cut in though, it was making it appear raised normally. Is that...normal? :) Anyway, thanks for the help.
Another idea here would be to use decimation master in ZBrush to reduce the model's polygon count while retaining the detail.
In cases where topology doesn't really matter, decimation master can retain a lot of detail while substantially reducing the polygon count. For example, try reducing your 800k ZBrush mesh to about 100k and see how much detail is retained.
I'd forgotten about that, thanks Galien. I reduced the mesh to 150K, then 35K, and while the grainy details aren't all that visible, the carved part actually looks better than the one that fakes it with a displacement map.
um shouldnt you have put that in the OP or we supposed to just guess what youre doing lol
What? I didn't know that the texture exporter was basing the normal and displacements off the first subdivision level of many when I originally asked the question. If I knew that, I probably wouldn't have asked to begin with.
To the best of my knowledge the normals are calculated off the distance between the original mesh and the finished, sculpted mesh. This is why it is so important to subdivide it and delete the history. Deleting the history (i think its delete lower? sorry, far away from my computer so i cant check) tells zbrush to start from this new resolution. I hope that makes a smidge more sense.
You can use an external application to bake normals from a high rsolution mesh to a lower, but I thought in ZBrush the workflow was to lower the divisions back to the base and then ZBrush takes the no-longer active detail from the higher divisions as the basis for the normals. If you lose the base level then it loses the point of comparision.
Yes. That is exactly it. However, if you start with something that is too low poly, you end up with low poly looking normals. Which is why i suggested either exporting something from studio that is a higher resolution to begin with or making the base higher resolution (to start) in zbrush. The normal maps,once extracted, can be used on the super low poly mesh without issue.
Unfortunately I am far from my computer or I could provide some imagery that better explains this.
FWIW, when I look at the image from ZBrush, I can't help but see a lack of supersampling (or anti-aliasing of any kind). That, and an overall harsher lighting, for sure account for some of the differences you're seeing.
- Greg
I'm probably going to buy Zbrush in the next few days, so I'll be better equipped to figure some of the things out that I don't know much about yet. I just saw a video where it appeared to be much easier to bring the detail from a Zbrush high-res sculpt over to Blender, so I don't know for sure what workflow I will be going with. Lots to learn and experiment with...I kinda miss actually making art. :) Anyway, thanks for the replies so far.