3d printing template
 sterlenejc
Posts: 178
sterlenejc
Posts: 178
in The Commons
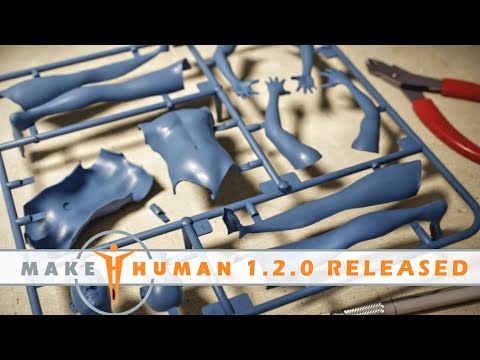
I don't know how to explain this better, but years ago, 3d plastic models were popular. they were printed in a mesh of plastic around it, you had to clip them off, glue pieces together and paint them. Recently, I saw makehuman video which showed that. So I was wondering if anything like that was possible with Daz?
It's shown in the video below
Daz 3D is part of 
Connect
DAZ Productions, Inc.
7533 S Center View Ct #4664
West Jordan, UT 84084
Licensing Agreement | Terms of Service | Privacy Policy | EULA
© 2025 Daz Productions Inc. All Rights Reserved.
Comments
That style of sprue isn't really to do with 3D printing, but instead injection plastic moulding. 3D printing does have sprue/scaffolding, but it's very different in appearance, as it's needed to support the model during the print, rather than to feed molten plastic into the chambers of the mould.
In any case, I don't think it's very practical with just Daz Studio. At a pinch, you might be able to slice a model to bits in the geometry editor or using GesCon, but the sprue would probably need to be put together from primitives, which would make it quite a tedious process to do for any model.
I'd say it's still popular - companies like Games Workshop have been growing like mad over the last few years.
But how would I turn my 3d model into a file for 3d printer to create something like shown above? I surely need to cut the character mid body, and limbs, but how to do it automaticall?
Nothing like that exists for DS and honestly DS isn't capable of that since it is posing, rendering and animation software, not a modeling app. You would need to create a model like that in a modeling app like blender or hexagon and then export it as an .STL file to use in a 3D printer
Can I ask why do you need to have such a setup as pictured above?... The purpose for doing this in a model kit (and virtually everything that is injection molded) is because the item will be injection molded and the molten plastic once injected into the mold cavity has to travel to the area that will become the parts... those pathways remain filled with plastic as the mold cycles into the cooling phase and the whole thing is ejected from the mold, at which point that framework (called "runners" or "sprue") serve to hold the parts together, either until a worker (or machine... in some cases parts are actually designed so the sprue breaks away upon ejection) cuts them away so they can be assembled into whatever product, or if it's a model kit, a hobbyist cuts them away at home... this isn't necessary for a 3D printed model... depending on what you are printing, some sort of support scaffolding may be need, but it's for support or to allow a unique shape to be printed... it's for a totally different purpose.
Unless you are thinking of resin casting a figure cut up into kit format to sell as a kit for folks to assemble... that makes sense, but honestly it might make more sense just to print out a cut up version of the figure (which will be the "pattern") and add runners to that before laying it up for the RTV molding.
For small scale production, I'd do it that way... even though it's probably more precise, being able to physically hold the item in my hands while figuring where the air needs to escape from the mold and how the material will flow inside the cavities seems more preferable to me... besides anything that I've ever made for a kit, the sprue was cut off before sending out, because it's more of a liability in shipping.
Anyway, as others have mentioned previously, to do this you'll need model making software... you can do it in Blender for sure, I've even seen stuff designed for resin casting with the runners designed in... but I'd imagine for serious production work you might want to use some solid modeling CAD software.
Edited to add...
You could look into Autodesk's MeshMixer... https://www.meshmixer.com/
Its a free program people use for fixing or tweaking 3D models for printing... but you need to have a good closed mesh for it to work properly... otherwise it has lots of features for 3D printing.
It has similar features to the iPad app (Nomad Sculpt) I used to cut up this figure... it's a quick and dirty example, and I'm not suggesting Nomad Sculpt for this purpose, but it has a feature that automatically closes the mesh when you cut it... or in this case separate a section... otherwise just separating a part of a mesh leaves it open or "hollow" inside.
Further Edited To Add...
I decided to mess around with the above figure in Nomad Sculpt... just to see what it would look like as a kit on runners (it's nowhere near accurately set up for injection molding)... But it was actually pretty easy to do, so if that's something you really want, I'm sure you could do it in MeshMixer too.
I've done a bit of 3D printing and my first thought is it would be a nighmare trying to print that. You would probably need supports on all the curved parts going down to the print bed, and if you printed it with the parts supported in a mesh you would probably end up with supports under almost all of it.
Printing the torso as one part instead of two halves, same for the limbs, is a more natural way to do it with a 3D printer so unless you enjoy glueing parts together that seems like a better option. The only reason I can see for printing in two parts like shown is if you want the figure to be hollow inside, if you print them in one you would need infill to stop the parts collapsing.
That is not normally how one would ready a model for a 3D printer.
This is what supports for a (resin) 3D print look like, a very different look to the sprue used by an injection mould.
In an injection mould, the intention is to get the molten plastic into all the voids. For a 3D print, the intention is to make sure that no parts of the model are trying to print in thin air, with no supports underneath them*. There's software (called slicing software) specifically for the job of creating these supports.
*For those not familiar, resin 3D printers use clear bottomed vat that UV light is shone into from underneath. The print is actually done upside down, and at each stage the build plate lifts up (hopefully bringing the print with it) so that the next layer can be printed. If there are islands that try to print without supports that tie them to the build plate, the resin just hardens onto the base of the vat and cannot be lifted for the next layer.
there are 3D printed kits but I'm not sure how they are packaged. You have to glue the parts together and paint them yourself. Clint Hawkins, prior to his passing, was doing exactly that. Gothic Blend 3D Prints
thanks for all the answers, it seems like this is more complex than i first thought. I will have a look on ready printed models