It's spooky season..Re creating Pinhead / Hellraiser?
 JeremyD
Posts: 265
JeremyD
Posts: 265
in The Commons
It's that time of the year! So now I'm in a horror mood & I'm trying to recreate some iconic characters.
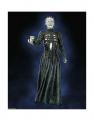
Sadly Im not having much luck re creating Pinhead from Hellraiser. Especially the "pins." Any advice is welcomed!
Screenshot_20211004-131725_Chrome.jpg
1080 x 1463 - 145K
Daz 3D is part of 
Connect
DAZ Productions, Inc.
7533 S Center View Ct #4664
West Jordan, UT 84084
Licensing Agreement | Terms of Service | Privacy Policy | EULA
© 2025 Daz Productions Inc. All Rights Reserved.
Comments
Nice!
I sadly can't offer any advice, but I'd love to see your render once it's done! I'm also in a horror mood, planning on doing a few horror characters when I get the chance!
Some free Hellraiser Puzzle Boxes:
Lament Configuration for Poser - Poser - ShareCG
Puzzle Box - 3D Model - ShareCG
Hellraiser - Puzzle Box (renderosity.com)
you could try strandbased hair pins
Maybe for the "diced skin" effect draw displacement map for the skin. Try and calculate the size of each square correctly as you can.
For the pins, use something like modeling a pin or finding one already modeled on shareCG (eg included in a sewing kit) and then if you have it use UltraScatter Plus from the DAZ 3D Store, which will allow you to distribute the pins in a regular pattern to the 4 corner intersections of the diced skin. Maybe manually add nulls to each intersection if you can't get the math exact enough and then try telling Ultra Scatter to use the nulls to distribute to? There are several methods but you need to read up on it. Ask the PA Howie Farkes if you don't understand the directions well enough.
The gown, I remember Billy Corgan wore a similar gown and had a similar shaved head too when The Smashing Pumpkins came to Oslo for a farewell concert in Oct 2000. I don't notice it then but he just needed the white makeup with that squares drawn on and fake needles glued on & he would of had the Hellraiser look down pat. Very funny, but the band in their unusual concert clothing were out in a local Oslo park the next day playing with puppets. So for that, it looks like a fancy Edwardian (women's) gown to me. Or maybe late Victorian.
Export to Blender and make a geograft, following SickleYield's tutorial.
In Blender's Edit Mode, use edge select to pick the edges running over the figure's head. Use the Bevel tool to split them in half and then add a third cut right down the middle. Select only those middle cuts, all of them at once, and use the Shrink/Fatten tool to pull them down into the skull.
You're halfway there already.
Model a little nail out of a cylinder. If you don't know how to model, our friends at FlippedNormals can help you. Once your nail is modeled, use the 3D Cursor and move the origin to the tip. Enable Snapping, vertex mode, "Snap With Center", and "Align Rotation". Position it over one of the vertices in the trenches you made. Once it snaps into place, hit Alt+D to create an instance and move on to the next one. You can use local transform orientation to move the pins deeper if you want.
That's pretty much it. If none of that made sense to you, don't worry. Unlike Daz Studio, Blender actually has documentation.
Once you get the hang of it, the hardest part is coming back to Daz Studio and having to work without all these tools.
I'll just leave this here...
Nice.
I was thinking a wireframe modifier and then boolean difference modifier for the grooves in the face.
And I can't help but think there is a way to get geometry nodes to distribute the pin object along the face normals at the points on the face, with a mask vertex group.
I'm hesitant to use booleans for anything, since I remember how awful they used to be. In this case, using Select Shortest Path, it's just a few quick cuts so it's simpler to do it by hand.
As for geometry nodes...there might be a way, if anybody knew how they worked. Or if the foundation could lock down the interface for longer than one version.
What about using Mesh Grabber with a really small affect zone on the skull to make the indents for the pins then stick the pins in manually?
I tried recreating Pinhead earlier this year and like you, the pins gave me the most trouble. Not only in lining them up but also from distorting. Maybe I should have just kept them as a prop and not a conforming headpiece? Or maybe I need to look into weight mapping (I think?) which is mostly unknown.to me.
I created the grooves in the head similar to how others have said - loaded G8M into Blender, upped the subdivision, then sculpted the lines. The difference to the other post who did this was that I exported as a normal map, not displacement. It was rough as my 'skills' in Blender are basic but it kinda worked.
After that I put him aside to look at later and since then I've started getting into 3D wrapping using existing meshes. I'm working on another classic horror character, one that likes clowning around, and so far it's gone much better, I'm very happy with the results. Still got a bit to do, some tweaks, sorting the eyes out etc but 'IT's' getting close.
If I can a decent head sculpt of Pinhead (ideally based on Doug Bradley) then I plan on giving him another go with wrapping. The outfit is another thing entirely.
Maybe the PA @Mada will swing buy and explain if it's possible to attached the pins like she does buttons and badges to some of the DAZ clothing models she has done in the DAZ Store. Sounds like it might work easier than other methods.