Trouble with shoe rigging: my soles are warped and bumpy

Eternal ForceEternal Force Posts: 301
edited October 2021 in Daz Studio Discussion

Hello guys,

I am rigging my first shoes. As a guide I use this great tutorial of Allen Renfeldt Rigging High Heeled Shoes in DAZ Studio for Genesis 3 - YouTube   The process includes using Transfer Utility, baking geometry, apllying  and zeroing pJCMs and JCMs. (You can also find the short text version of Allen's rigging tutorial here Genesis 3 High-Heeled Shoe Creation - Google Docs )

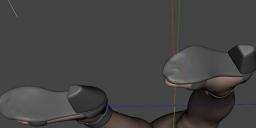
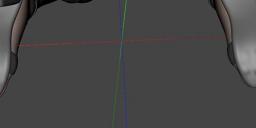
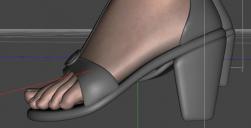
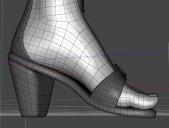
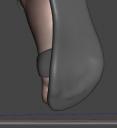
It works great except one thing: every time when I repeat the rigging process I get warped soles. Please look at the pictures.

For some reason I am unable to get a smooth surface. The soles of my shoes have bumps and dents. Not good! The logical solution would be to fix them using weight maps. Believe me, I tried it. For some reason, playing with weight brushes makes the surface even bumpier.

I have a feeling that I am doing something wrong. I remodeled my shoes and changed the pose of the feet. There was a hope that if the feet are further away from the soles, the soles would stay smooth. Nope, every time I get the same result.

However, when I look at the products made by PAs, I see that their shoe soles are smooth and beautiful. 

Why do I get so mush distortion on the soles in the toes area? Can you help me? What is wrong here?
shoe sole warp.jpg
763 x 838 - 115K
shoe sole warp1.jpg
750 x 342 - 68K
shoe sole warp2.jpg
750 x 263 - 51K
shoe sole warp3.jpg
750 x 382 - 102K
shoe sole warp4.jpg
750 x 567 - 206K
Post edited by Eternal Force on

Comments

  • When you insert the image inline you are using a link to the attachment - by deleting the attachments you have removed the images (except for anyone who has a copy in their cache, as you do).

  • Richard Haseltine said:

    When you insert the image inline you are using a link to the attachment - by deleting the attachments you have removed the images (except for anyone who has a copy in their cache, as you do).

    Damn! Thanks, Richard. Now I know it. I am going to reload my images. 

  • The images have been reloaded. Hopefully, now you won't have troubles with seeing them.  Let's get back to the topic. As I said, when I save my shoes as a preset and load them back, the soles are warped even in the default pose that have been modeled for. 

    The distortion happens in the toe area. What can cause it? 

  • I think this is happening because in effect the shoes are not in the zero postion - as modelled - but have been automatically converted to the zero pose from the high-heel pose, then baked to the real zero pose, so there is some distortion from the posing applied. The method given should avoid that with the high-heeled pose, but it is still easy for weight irregularities to cause issues. Unfortunately the fix is probably to smooth the models for the zero pose and update the geometry, then work on the weights and JCMs for the posed state.

  • Richard Haseltine said:

    I think this is happening because in effect the shoes are not in the zero postion - as modelled - but have been automatically converted to the zero pose from the high-heel pose, then baked to the real zero pose, so there is some distortion from the posing applied. The method given should avoid that with the high-heeled pose, but it is still easy for weight irregularities to cause issues. Unfortunately the fix is probably to smooth the models for the zero pose and update the geometry, then work on the weights and JCMs for the posed state.

    Thank you for your feedback, Richard! 

    It looks like the method of rigging that I tried before is not the best one. Today I've found another tutorial. It is a lot faster and what's more important, this one WORKS for my shoes! 

    Making high heels shoes for DAZ Genesis 3 Female by amyaimei on DeviantArt

    Here are steps:

    I. Create the high heels shoes 3D model.

    1. Pose Genesis 3 Female to the pose as she wears a pair of high heels by using "Foot Tip Toes" and "Toes Spread" pose controls.
    2. Select "Joint Editor Tool."
    3. Select Genesis 3 Female, right click, then select "Edit"->"Bake Joint Rotations..."  The objective of that is to turn the JCM's to 0.
    4. Export Genesis 3 Female in the pose into an OBJ.
    5. Import that OBJ into a 3D Modeller.
    6. Model the shoes around the posed Genesis 3 Female.
    7. Export the finished shoes model as an OBJ.

    II. Prepare the scene for making the conforming shoes.

    1. Create a new scene and load Genesis 3 Female.
    2. Pose Genesis 3 Female as the pose used for making the high heels shoes.
    3. Select "Joint Editor Tool."
    4. Select Genesis 3 Female, right click, then select "Edit"->"Bake Joint Rotations..."  The objective of that is to turn the JCM's to 0.


    III. Turn the shoes model into conforming shoes for Genesis 3 Female.

    1. Import the shoes model.
    2. Use "Transfer Utility", select Genesis 3 Female as the source with the item shape as default; select Shoes as the target with the item shape as default.  Do not select fit to.  The objective of that is to turn the imported shoes into a figure.
    3. Go to the scene tab and click on the name of Genesis 3 Female.  Hold Ctrl key, then click the name of shoes figure.  This select both Genesis 3 Female and the shoes figure.  Noted that the order is important.
    4. Right click, then select "Edit"->"Transfer Rigging (Figure Space)."  It will get the shoes conform to Genesis 3 Female.
    5. Delete Genesis 3 Female from the scene.
    6. Load Genesis 3 Female into the scene.
    7. Apply the pose used for making the high heels shoes to Genesis 3 Female.
    8. Fit the shoes figure to Genesis 3 Female.  It should fit.
    9. (Optional) Remove all bones for the big toe and small toes.  I found it is helpful because I don't want to see the toes portion of the shoes deforms.
    10. Test various rotations of the foot bones.  Fix weight if it is necessary.
    11. Save the shoes figure.

    IV. Make wearables (optional)

    1. Create a new scene and load Genesis 3 Female.
    2. Pose Genesis 3 Female as the pose used for making the high heels shoes.
    3. With Genesis 3 Female selected, load the shoes and it should be fitted automatically to Genesis 3 Female.
    4. Select "File"->"Save As"->"Wearable(s) Preset...," then select the shoes, select pose, select the modified parameters only.
    5. Save it as the same name as the shoes figure, it will overwrite the old shoes figure loader file.

    Many thanks to Amyaimei from Deviant Art who created this tutorial! 

  • Eternal Force said:

    Richard Haseltine said:

    I think this is happening because in effect the shoes are not in the zero postion - as modelled - but have been automatically converted to the zero pose from the high-heel pose, then baked to the real zero pose, so there is some distortion from the posing applied. The method given should avoid that with the high-heeled pose, but it is still easy for weight irregularities to cause issues. Unfortunately the fix is probably to smooth the models for the zero pose and update the geometry, then work on the weights and JCMs for the posed state.

    Thank you for your feedback, Richard! 

    It looks like the method of rigging that I tried before is not the best one. Today I've found another tutorial. It is a lot faster and what's more important, this one WORKS for my shoes! 

    Making high heels shoes for DAZ Genesis 3 Female by amyaimei on DeviantArt

    Here are steps:

    I. Create the high heels shoes 3D model.

    1. Pose Genesis 3 Female to the pose as she wears a pair of high heels by using "Foot Tip Toes" and "Toes Spread" pose controls.
    2. Select "Joint Editor Tool."
    3. Select Genesis 3 Female, right click, then select "Edit"->"Bake Joint Rotations..."  The objective of that is to turn the JCM's to 0.
    4. Export Genesis 3 Female in the pose into an OBJ.
    5. Import that OBJ into a 3D Modeller.
    6. Model the shoes around the posed Genesis 3 Female.
    7. Export the finished shoes model as an OBJ.

    II. Prepare the scene for making the conforming shoes.

    1. Create a new scene and load Genesis 3 Female.
    2. Pose Genesis 3 Female as the pose used for making the high heels shoes.
    3. Select "Joint Editor Tool."
    4. Select Genesis 3 Female, right click, then select "Edit"->"Bake Joint Rotations..."  The objective of that is to turn the JCM's to 0.


    III. Turn the shoes model into conforming shoes for Genesis 3 Female.

    1. Import the shoes model.
    2. Use "Transfer Utility", select Genesis 3 Female as the source with the item shape as default; select Shoes as the target with the item shape as default.  Do not select fit to.  The objective of that is to turn the imported shoes into a figure.
    3. Go to the scene tab and click on the name of Genesis 3 Female.  Hold Ctrl key, then click the name of shoes figure.  This select both Genesis 3 Female and the shoes figure.  Noted that the order is important.
    4. Right click, then select "Edit"->"Transfer Rigging (Figure Space)."  It will get the shoes conform to Genesis 3 Female.
    5. Delete Genesis 3 Female from the scene.
    6. Load Genesis 3 Female into the scene.
    7. Apply the pose used for making the high heels shoes to Genesis 3 Female.
    8. Fit the shoes figure to Genesis 3 Female.  It should fit.
    9. (Optional) Remove all bones for the big toe and small toes.  I found it is helpful because I don't want to see the toes portion of the shoes deforms.
    10. Test various rotations of the foot bones.  Fix weight if it is necessary.
    11. Save the shoes figure.

    IV. Make wearables (optional)

    1. Create a new scene and load Genesis 3 Female.
    2. Pose Genesis 3 Female as the pose used for making the high heels shoes.
    3. With Genesis 3 Female selected, load the shoes and it should be fitted automatically to Genesis 3 Female.
    4. Select "File"->"Save As"->"Wearable(s) Preset...," then select the shoes, select pose, select the modified parameters only.
    5. Save it as the same name as the shoes figure, it will overwrite the old shoes figure loader file.

    Many thanks to Amyaimei from Deviant Art who created this tutorial! 

Sign In or Register to comment.