how to make the d-morphers more exact?
 Drekkan
Posts: 459
Drekkan
Posts: 459
in The Commons
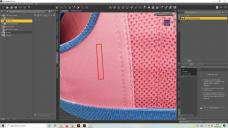
So I want to just do an inverted rectangle hole on a clothing item (see red rectangle in pic) about half inch deep it would be about a cm wide. I try use d-formers to do this but I really have trouble getting it to be precise. Its hard shrinking the d-morph field of vision and strength etc to get it so it can do this, does anyone know the best way how to accomplish what I am trying to do here with d-morphers? thx.
ex.jpg
1920 x 1080 - 354K
Daz 3D is part of 
Connect
DAZ Productions, Inc.
7533 S Center View Ct #4664
West Jordan, UT 84084
Licensing Agreement | Terms of Service | Privacy Policy | EULA
© 2025 Daz Productions Inc. All Rights Reserved.
Comments
For a hole, I think you will get a better result with a transparency map.
K sorry I think I explained it wrong. I wanted it so the material inverts into a trench about a half inch deep across the rectangle.
I suspect a displacement map would work for your needs.
you can't explain more? I've never used them.
All UV maps shown in this post are approximations created by the me for TOS compliance.
Quick n' dirty displacement map indentation.
I used the Tank Top for G8F located in Genesis 8 Starter Essentials > Wardrobe, for this.
1. Select the object you wish to use displacement on.
2. In Surfaces locate Displacement Strength and see if there is a map already in use. If yes skip to 3A. If no proceed to 3.
3. Copy one of the maps that shows the UV lay out well enough to see where you need to work. I used the Base Color map of the Basic Wear Tank Top. [If you don't know how to do this; Go to one of the little boxes to the left of the sliders that has an image, mouse over it and take note of the file name. Now click on the box, go to browse, locate the image and copy it, close the window and save the file someplace where you can find it again.] It should look something like this.
Save it someplace where you can find it again.
4. Open the map in an image editor that supports layers. (I used GIMP.) Create two new empty layers on top of the image you just opened.
5. Select the top layer, locate the area on the image you wish to displace and cover it with pure Black. (I used select and fill.) Save it someplace where you can find it again.
5. Select the layer below the layer you used black on, and fill the layer with neutral grey. (It should look something like this.) Save it someplace where you can find it again.
6. If needed Export the image you have created as a .jpg. Make sure you name it something you will remember, and save it someplace where you can find it again.
7. Go back into Daz Studio, make sure the object you wish to displace is selected, and in Surfaces locate Displacement Strength, and add your newly created displacement map. (The .jpg file you just saved.)
8. Max out the Displacement Strength slider (2.00), set the Maximum Displacement to 0.20 (ish).
9. Displacement WILL ONLY be visible in Iray preview / spot render / render. Check and see if it is working. It should look something like this.
10. You should notice that the entire object been displaced (slightly expanded). You will need to compensate for this by using the displacement channel values, or in this case the Tank Top fitment sliders worked as well.
===========================================================
3A. Copy the map used in the displacement channel, and save it someplace where you can find it again. [If you don't know how to do this; Go to the little box to the left of the slider, mouse over it and take note of the file name. Now click on the box, go to browse, locate the image and copy it, close the window and save the file someplace where you can find it again.]
4A. Open the map in an image editor that supports layers. (I used GIMP.) Create a new empty layer on top of the image you just opened.
5A. Select the top layer, locate the area on the image you wish to displace and cover it with pure Black. (I used select and fill.) Save it someplace where you can find it again.
6A. If needed Export the image you have created as a .jpg. Make sure you name it something you will remember, and save it someplace where you can find it again.
7A. Go back into Daz Studio, make sure the object you wish to displace is selected, and in Surfaces locate Displacement Strength, and add your newly created displacement map. (The .jpg file you just saved.)
8A. Displacement WILL ONLY be visible in Iray preview / spot render / render. Check and see if it is working. It should look something like this.
9A. You may need to adjust the displacement channel values to get the results you want. ( If you go this route I strongly suggest you take note of the original values so you can revert back.)
=============================================================
If you need the displacement to be smoother you can try the SubD Displacement Level, (Also subD on the object its self.) but it will use more computer resources. You can also smooth it out by blurring the edges on the black layer you created. (In GIMP, duplicate the layer with black on it, select the dupe >> Filters> Blur> Gaussian Blur> 3.50 3.50 is a good place to start. )
Hope you found this helpful.
Sorry for getting back to this so late but thankyou dtrscbrutal for your in depth tutorial I shall get onto it. :D