Morphing- bones not following scaling... fixes?
 Whitehart Creative Arts 3-D (fionathegood)
Posts: 230
Whitehart Creative Arts 3-D (fionathegood)
Posts: 230
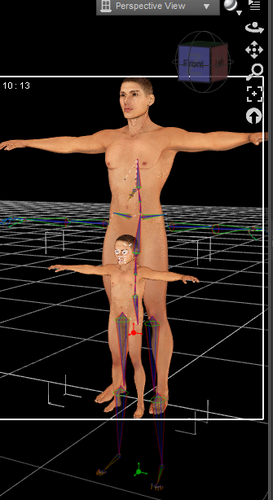
Using Daz 4.7, I am working on making child morphs for Dusk, and have run into an issue where when the morph is applied, the bones have not scaled down with the figure, so the limbs do not bend correctly. Oddly, the bones from the face/head morph, which I made on top of the first body size/shape morph, works fine. (I did not realize there was a bones/posing problem until I was at a stopping point for the night and tried to pose the character and it did all kinds of ugly things). Is this because when I originally scaled the figure, I did not use a deformer to do so? (I scaled it by loading the figure and resizing it under the parameters tab, not by applying a deformer to do so) Or is there some other problem? Is there a way to scale down the bones and re-rig the figure, or a way to revert to the pre-spawned version with all the deformers available, or to add a bone scaling to the existing morph somehow? How do I fix it?
TY in advance! This is my first time making morphs. I have been using Daz about 4 months and had about 3 months of self-teaching myself Blender clothes-making before this, so I have a very newbie perspective on rigging/deforming. for the sake of any helpful replies it is safest to assume I know nothing, and avoid abbreviations if possible. TY for the help... screenshot of my viewport showing the bones issue, below.
I made the morphs with none of Hivewire's morphs dialed in. (I only own the ones that came with the figure, anyhow, but reading on morphing said it is important to start from the base model). There is still work to do all around but getting this issue resolved will really help! (Strategic camera angle on bones intended to protect nudity issues... because the bones aren't right, the clothes don't fit either. :-( (If there is too much skin let me know and I will photoshop in a fig leaf)
Thanks in advance!
fiona
Daz 3D is part of 
Connect
DAZ Productions, Inc.
7533 S Center View Ct #4664
West Jordan, UT 84084
Licensing Agreement | Terms of Service | Privacy Policy | EULA
© 2025 Daz Productions Inc. All Rights Reserved.
Comments
If you actually change the mesh size, in whole or in part, rather than scaling then you need to adjust the rigging to the shape. This is largely automatic - apply the morph to an otherwise zeroed figure, then go to Edit>Figure>Rigging>Adjust Rigging to Shape. Check that that works fairly well, and if it does zero the pose (not the whole figure). Now right-click anywhere in the Parameters pane and set Edit mode on, if it isn't, then right-click on the morph slider and select ERC Freeze. You should have your morph listed at the top of the dialogue, and a lot of joint centres (and nothing else) in a scrolling window at the bottom - if that's OK, click Accept and test your morph at various values, then zero the morph and save as a morph asset (or save modified assets if it is already saved) if all is well
Thank you, Richard! That is exactly what I ended up doing and it worked great. My friend Kerya pointed me to this excellent tutorial which says exactly what you just said, if you start at #8. The only advantage is it is in tutorial format with links to pictures in case you get lost.
http://www.daz3d.com/forums/discussion/6483/
However, I had a few tough "wrinkles" in the figure from the deforming, and using deforming to fix them was going to be a slow tough go. I thought, "here are the very instructions I need on how to export to Blender, fix the problem quickly and easily, and just as easily import the figure back into Daz"
Haha. LOL. Or so I thought. I should never let myself think its going to be easy, yet I always do. I am so like Charlie Brown, and Daz, Blender, and all computer software is soooo much like Lucy, tricking me into trying to kick the football.
Right now I am struggling with exporting to Blender and importing it back.. it seems I have two options, to keep the groups, or not. When I keep the groups, all the bones groups are separated (as in not joined to one another at a vertices level) and when I use the sculpt tool, they hence pull apart at the edges. Not good since getting them to match up again is impossible..
The second thing I tried is exporting a version of my figure without keeping the groups, but when I do this, I lose my bones, and I couldnt figure out how to get Daz to transfer the bones back from my base figure to my sculpted out figure. It says it needs the figure to be a different format (Maybe I am not following the instructions right... the instructions I have make it seem like finding the morph loader pro is easy, but I keep having trouble figuring out where it is! And so not doing that part is probably the key to whats not working. We'll see when I give it a try with fresh eyes)
The third thing I tried was opening my sculpted out no groups version in Blender, importing a version of the figure WITH groups, and using the "Snap to" option to mold the grouped version to the form of the non grouped version. I am about to try importing a the bones/non bones mix into Daz and try rigging that... we'll see how it goes.
It is never easy to learn a new thing. I keep reminding myself it must be possible, others have done it!
I have determined that I am stuck on #6 because now that I have found the "Morph Loader Pro" (it's under "edit") I don't know how to use it. Would someone who knows either answer or point me to a clearly written tutorial that explains it? I could go the search myself route again, but that keeps leading me down the path of half-answers, when asking the advice of someone who can tell if a tutorial is complete and accurate for version 4.7 seems to be giving me better results. TY!
(I have the .obj file saved 3 ways... 1. as my vertices welded "dont keep zones version that has been sculpted out2. 2. as the "bones only" of the "torn apart vertices" set that were "snapped to" my welded sculpted version, and 3. As bones attached to a figure. Under the Edit option I am choosing Figure->Morph Loader Pro->Choose Morph files, as this is the option that allows me to choose an .obj file. Under convert file from I am using "lightwave" as the type since they are saved as .obj files. I pick either of these three obj versions and get a message "morph not created because geometries do not match" :-( hellllpppp.... )
Are you wanting to change the base mesh or to create a morph? You shouldn't need the bones or groups for the latter. Just export the OBJ, export the figure if you need it as a guide (for example to make sure you don't create poke-through) and sculpt your morph in Blender. Actually, I would first try reimporting the exported OBJ to make sure your options haven't changed the vertex count or order - with the clothes selected, open Morph Loader pro, click Choose Morph Files and select your exported OBJ, make sure you have the same preset under Convert to DAZ Studio as you used on exporting the OBJ (so that the scaling is right) and click accept - as long as you don't get an error about the vertex count not matching you are OK (instead it should say the morph had no effect and so was not created).
Once you have your morph in Blender and have exported it back to OBJ, you again open Morph Loader Pro and use Choose Morph Files... to select it (you can actually load multiple morphs at once, if desired). Your morph(s) will then appear in the lower half of the dialogue, with a triangle next to them that you can click to see the options. You probably want to change the Property Group - that controls where the morph appears in the parameter panes - so right-click on it and select the one you want. If this is a morph to fit the clothes to a particular morph you need to give your morph exactly the same name (not label, the name that you can get from Parameter Settings) as the target morph so double-click the existing name and replace it with the correct one (it's a good idea to name your OBJ for the morph, that makes it easier to remember which file does what and automatically applies the correct name to the morph). The other things you may well want to change are Reverse Deformations - assuming you are modifying the clothing as it was on a posed or morphed figure you want that set to yes (right-click) - and Overwrite Existing - if you are modifying an auto generated morph you will want to set that to Deltas Only.
Just so we are on the same page, there isn't any clothing involved, its a full body morph for the dusk figure. And it keeps saying geometry does not match. I KNOW that after I exported the figure to Blender, I didn't do anything that would change the geometry in Blender. I sculpted, only, with the most basic of tools. I also know that the morphed figure I did in Blender is scaled and oriented correctly when I import it back into Daz as it scales and orients identically to the one I made just with Daz's own deformer. I have no idea why it does not work.
Did you have 'Keep vertex order' checked on the Blender import? Export?
If not, it probably split it at the group boundaries, adding extra vertices...each vertex on the boundary becomes two.
maybe this topic is best for you. blender exprot etc,,
http://www.daz3d.com/forums/discussion/27454/
(yes these setting really frastrate you, untill find which option work well)
============
and I feel funny to read again this topic,
because many guys recommend their favorite setting, I think ^^;
anyway the option which work well for you is best.
just keep vertex count and order.
almost it is all about morph I think.)
Did you have 'Keep vertex order' checked on the Blender import? Export?
If not, it probably split it at the group boundaries, adding extra vertices...each vertex on the boundary becomes two.
Thank you, this is valuable insight, I will give it a try!
thank you so much for the feedback, I will give it a try. What needs to happen is a comprehensive tutorial breaking down the steps into impossibly small parts, with screenshots of each small part.
Did you have 'Keep vertex order' checked on the Blender import? Export?
If not, it probably split it at the group boundaries, adding extra vertices...each vertex on the boundary becomes two.
I didn't have keep vertex order checked originally, no. So I redid everything, includeng exporting the obj from Daz, because I read in the thread that was linked that a materials group had to be checked and I hadn't done that before either. And so I did this as well as having vertex order checked both as I imported my obj file into Blender and as I exported it back out to Daz again on this try, and it still said the geometry did not match. I am including a graphic with all my settings. Perhaps that will show what I am not doing right! The scaling and orientation settings should be okay because if I simply import the obj file without trying to use it as a morph, it loads exactly the same way as my duf file does. Helllllppp..... this is so frustrating. I have hope though that it IS something that can be figured out!
Try these setting for exporting and importing
I think I found your problem...you aren't exporting him at base resolution. He loads at a SubD level of 1. That needs to be 0, or all the other settings (vertex order, etc) won't matter.
At 'Base' resolution, he should have 39,096 verts...
I wanted to say ty for the help, and I haven't forgotten about this... just having a pain episode here at home and the pain meds make it impossible to work on this project at the moment. Hoping to be back at it in a day or so! Appreciate the input greatly, this has been something I have wanted to conquer for a long time.
Wow, between the advice given at the Daz and at the hivewire forums, it worked! The piece of info given at Daz to correct my mistakes this last time around was the polygon count. The piece of info given at the Hivewire forums was the importance of keeping "write groups" and using bone welds so the geometry does not split. Furthermore it was pointed out that I had checked off "vertex count" but had failed to check off "polygroups" to go along with it. I appreciate all the help from both places...I am pointing out the info needed for the next person who comes along and perhaps sees this thread, but not the other, so they aren't missing all the info that I have. I am using the screengrabs and bits of advice from all sources and working on a comprehensive, pictorial tutorial showing which default settings in blender and daz need to be changed in order to accomplish creating a full body morph- and what pitfalls to lookout for, given the frustration of this experience. I will be sure to beta test my tutorial! Tutorials which work 75% of the way are cause for flattened foreheads as one bangs their head into wall trying to figure out what isnt working! I truly appreciate the experience and the corrections.
I have one last bunch of questions before heading off to document what I learned while it is still extremely fresh in my slightly flattened mind:
When I scaled down the figure to make the morph, resizing it moved its "zero position" up off the y axis. I followed the directions and made sure it was zeroed out, even though it was floating, when I exported from Daz to Blender. I don't really want the "zero position correction" to be a morph of its own, I want it to remain in the correct Y (vertical) position as it morphs. What do I do to fix this? Do I just fix the position in blender and it will be correct when I import it or will that break something? Or do I export from Daz to blender in the -49 position (more or less putting it flat) and leave it that way when I import it back in and that will become a new zero? Will that break the morph? My next step in making this morph is to adjust the body and limb proportions, which would cause the same issues with the "zero" position, theoretically, so it is something I need to figure out.
I appreciate all the help!
Thank you all for all the help so far.. it may not seem so, but I have made a lot of progress (changing things on the inside of the figure that affect the posing which were thrown off by the enthusiasm of my work on the outside of the figure. Now making sure he has a sweet smile when he opens his mouth, working on the skin between bouts of sculpting, etc.)
Okay- new issue. It is driving me batty... pleaaasssseee someone help!
I am now able to create lovely morphs either with Blender or Daz deformers. I have been adjusting rigging to shape, erc freezing, and saving morph resources like a champ and it has all worked fine....
until I tried to rig the eyeballs. I know this is possible.... I am missing something! It shouldnt be this hard.
When I use rig to shape with all the nodes selected both for "to be rigged" and all nodes selected for what node groups influence the bones rigging, the rest of the shape works great but the eyeballs do not receive the correct bone positions to rotate correctly in the socket. (I think this is because the head is smaller, the head meshes are closer to the eyes, giving it too much influence? The bone should be centered in the eye, but it is pulled towards the center of the head.)
I tried re-rigging it manually but then I figured out that if I used rig to shape with just the eyeball selected both in to be rigged and what nodes influence the rigging, it rigs perfectly.
However, I cant get this to erc freeze and save as part of my morph. When I scale the morph down from 100%, the bones stay behind almost as if they have become disconnected from the rest of the rig because I did the rig to shape on that bone alone. (although it keeps both eyes together even though I did those separately)
OR... if I erc freeze, save and re-open the file, the full rig to shape is once more applied as it was when I originally made the morph, as if I didn't do an erc freeze and then save the file with the new eye rigging. Not sure why it is not "sticking". I tried the Erc freeze with all combinations of the "restore" options at the bottom just in case it was that.... with both checked, with restore rigging unchecked, and then with both restore rigging AND restore figure unchecked, neither worked.
I tried saving the whole figure as as a pre-set, just so that I wouldnt have to re-do it for the thousandth time, and opening that was even worse... my eye bones were down on the 0 point of the y (vertical) axis.
I even tried making a dummy deformer and create a cheater morph to add this bone change, and it didnt work.
Any suggestions? Am I missing something? Also... if there is a rigging tutorial for Daz or a video, I would be game for that. ( I am sure there must be, rigging is one of the most frequent issues in the forums! Why is this so frustrating when it ought to be simple?) Here is a pic of the setting for the "bad" eyeball rig, and the settings for it, and then the good rig,and the settings for it in case that is the problem.
I appreciate any help anyone could give.
fiona