How do I get this render result?
 rnollman
Posts: 310
rnollman
Posts: 310
in The Commons
I have attached an image file from one of the DAZ product ads. I am wondering how I can get these rendered image results shown in the image. I have tried using several portrait programs and I am beginning to think that there is a lot more to getting the result shown in the image than simply using a specific lighting program preset. My renders look like the second image and I am using the Boss Pro Lighting product.
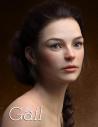
00-main-gail-for-genesis-8-female-daz3d_1 (1).jpg
1000 x 1300 - 153K
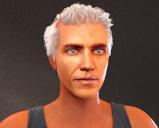
Capture_0001.JPG
813 x 653 - 88K
Daz 3D is part of 
Connect
DAZ Productions, Inc.
7533 S Center View Ct #4664
West Jordan, UT 84084
Licensing Agreement | Terms of Service | Privacy Policy | EULA
© 2025 Daz Productions Inc. All Rights Reserved.
Comments
Or this one (attached).
I'm by no means a render expert but there are a lot of variables that could be in play. Are you rendering in Iray? Is the skin of your character a good one? How many iterations are you rendering to? Maybe if you post your render settings someone better than I can point you in the right direction.
Or this one (attached).
Well, here is another render that I did and the face on the far left appears to have more of the characteristics of the ones I am trying to emulate. It could be that where I place the character has a lot to do with how the light affects the image. It is interesting that all the different faces appear very differently with the same lighting.
This product:
https://www.daz3d.com/photography-masters
Has presets that are probably closer to the look of the image you posted than the lighting set you're using.
What skins are you using?
Looks to me like you're not using good skins but I could be wrong.
To be perfectly blunt the face textures are awful to begin with, I'm assuming you used face transfer or another program that does somehting similar. There is so much stuff baked into the face textures that it will probably be difficult trying to achieve a similer look to the examples you want.
rnollman,
I've only ever used iRay so I can't speak for other rendering systems in Daz. Looking at the first two images of the females you shared, they're pretty much a straightforward studio headshot. With the amazing photorealism that Daz offers, I'd venture to say that if you approach the task as a studio photographer would, you'd get results that closely approximate what you're aiming for.
In general terms, you want to think about:
(a) Lighting (softboxes, key lights and fill lights, rimlights for the hair and body silhouette);
(b) Hair and skin texture of the figure (which wold be make-up and hair styling in the real world);
(c) Backdrop (balance between shadows and light, texture and hues);
(d) Post-edit work (blurs, contrasts, color balance, highlighting the catchlights); and of course
(e) Posing (body language)
There are a number of great lighting systems in the Daz market. I think people have highlighted a few in the forums. I find that using plain-old-geometry with the emission set can also stand in for softboxes and gobos. When approaching the mix of illunination and shade, it's best to think technically in terms of "light painting", and artistically in terms of emotions you want to convey to the viewer.
In my experience, skin texture of the model is the one factor that's hard to control. To get things right, some folks dive under the hood and fidget with the shaders. Unless you already have the model to experiment with under different lighting conditions, all you have to go on really are the product images the PAs make available. Caveat: a lot of these images are retouched (i.e. Photoshoped) at a professional level. Your results might veer far off from the ideal.
Ultimately the image that speaks to the heart comes from the heart -- your own, not some else's that you're attempting to emulate.
Remember to have fun as the journey may be worth more than the destination.
Cheers!
Are these rendered with Filament? If so, what are your results like with Iray?
Do you have the headlamp on? It looks like it. Turn it off and leave it off in the settings if it's on. That's going to stop any chance of you getting the lighting you want. After turning it off, use one of the preset light kits and it'll look just like the pictures. My recommendation is this one HDRI PhotoShoot | Daz 3D Any character I pick up, I turn on setting 23 and it looks like the picture in the first post, only the light is coming from the opposite direction. It's my favorite testing light preset so I can make sure everything looks great in perfect lighting.
Firstly, have you remembered to set the Environment Mode in Render Settings -> General to 'Scene Only?' when using the BOSS lighting? If you've left the default HDRI as a light source as well, you will be getting a very murky mix of lighting which won't work well.
For portrait lighting I prefer HDRIs - they are much easier to work with as essentially you are simply rotating the environment dome and adjusting the intensity. Occasionally you might add an additional spot or point light for rim or backlighting but 99% of the time I don't. If you're looking for one-click lighting simplicity they're hard to beat. Also, for female portraits the general rule of thumb is to use lighting which casts soft shadows so you want the light source to be as large as possible and HDRIs tend to do just that.
This set here - https://www.daz3d.com/hdri-photoshoot - is my go-to lighting at the moment. It's of very limited use for anything other than portrait work but it just works out of the box.
This render took almost zero effort. Loaded a character and prop, loaded the HDRI, rotated it until it looked about right then turned on Spectral Rendering and hit render. I also changed the character's skin; the original was ok, but the skin from this character - https://www.daz3d.com/murphy-hd--signature-smile-hd-expression-for-genesis-8-female - is far better. Bluejaunt's character and skin work is exceptional.
You do get more control with individual lighting sets, like the BOSS one you have (which, incidentally, is very good), but I rarely use them now. I highly recommend the above as well as the LY Leonine HDRI lighting sets which also have additional discrete lights for rim and backlighting. It's Lighting for Dummies and that suits me fine!
https://www.daz3d.com/ly-leonine-pro-hdr-lighting
https://www.daz3d.com/ly-leonine-pro-hdr-lighting-vol-2
Do remember that there are a myriad of different ways to get good lighting, HDRIs being only one, and a quick browse of YouTube for some tutorials on real-life portrait photography would do you a tonne of favours. If it works in the real world it (mostly!) works in Daz and there are loads of videos out there by professional photographers who are happy to share their knowledge.
Images:
1 - As rendered out of the box with no tweaks.
2 - Dome rotated to change the atmosphere of the portrait.
3 - Different preset from the same HDRI set.
4 & 5. Photoshop time!
Thanks for the help! I purchased the HDRI Photoshoot and some of the other recommended packages. I have posted the renders from the HDRI Photoshoot with Revel HD and Murphy right out of the box. I believe there is a tremendous improvement. I have not played around with MATs. For the fourth image, I did a Face Transfer using the same preset as the third image. Not perfect, but much better.
Don't be shy with messing around with the rotation. Flat lighting with no shadowing at all doesn't look great for figures in my opinion. Shadows define and sculpt the face so rotate it until it looks great. If it's too bright, turn down the environment intensity, or vice-versa. Remember you can rotate the dome in all three axes as well so there's nothing stopping you shifting the light source to come from below the character, for example, or directly from the side. You can get some very striking effects with a dark background where the character appears to merge into it.
There's one 'gotcha' with the Photoshoot package that is worth mentioning - one or two include an additional point light (but are clearly marked) and it is not deactivated if you load another HDRI; this can mess up the effect.
If your character is getting lost, not by design, against the backdrop, the simplest fix is to position a spotlight directly behind and above the character at a distance of a few metres, angled 45 degrees down so it's aimed at your character's head/shoulders. Turn up the intensity until it's painful and you'll get a nice backlight effect to separate them from anything behind. LY's sets are kind and include a one-click solution to this as well.
I'm not sure if you know this so apologies if I'm teaching you to suck eggs but you can load a skin material from any G8 character onto any other G8 or G8.1. The reason I mention it is that the materials that Face Transfer creates are beyond terrible. It's no reflection on anyone who uses it, they're just strange and odd and I have never seen one that didn't evoke Cthulhu-like imagery... Load up Murph's textures onto your Face Transfer geometry, though, and you'll have a great character. Try it with a bunch of different skins that you have and see which comes closest to what you're after. Face Transfer materials are the stuff of nightmares!
Anyway, glad you're happy with the results. I just spotted that I recommended the same set as Bennie (above) and he's spot-on that preset #23 is just excellent without doing anything else. #02 is also a staple for me, the others being great for various environmental effects or atmospheres. Lighting is 95% of getting a scene to look good imho, and there are loads of videos on YT to help you out with more complex setups such as volumetric lighting or setting up real-world-mimicking emissive lights if you want to go further.. Type the words 'Daz lighting' into its search and you'll be overwhelmed. Daz also sell an all-in-one guide to all things lighting which is excellent, I'm told, but it's not cheap.
Still, the benefits of using an HDRI are an instant setup, minimal tweaking and improved render times. They're not a catch-all for all lighting situations but they're a great place to start with good results 9 times out of 10. I think you'll be pleased :)
Here's a couple of videos to get you started:
And a channel that's got some great info:
https://www.youtube.com/c/RaukoDaz3D/search?query=light
It's a matter of Texture maps, Shader Settings, Lighting and Post work...(that image you want has clear Post work on it, meaning they did final editing after the render in something like Photoshop)
Your textures and shaders are no where close to the the original image you want. Nor is your lighting.
You're going to need to learn the Uber shader settings in a lot of depth before you have a chance at getting something close to another skin.
Sure, they could refine the lighting and such, but the first order of business should be to get the textures sorted out (probably just use better skins), then to get the shader settings right (looks to me like they need a lot more translucency, and some blue in the SSS reflective tint channel to cancel out the orange.)
Only after all that would I mess with lighting and postwork.
And I've just picked it up for $1.40. Thanks for the recommend!
I would agree, your issue is the face-transfer or whatever was used; fix that, then worry about other aspects
As others have stated, start with some nice textures. I only use the Daz Core figures for skin and list them right in the promo :).I also use a custom skin shader of my own for all my promos. You can get some really great information on skin shading here: https://www.daz3d.com/forums/discussion/313401/iray-photorealism/p1.
Beware, it's a lot of reading but so worth it.
This is a face transfer with the face transfer fix. I look for a figure that's about my age and apply their skin. The first one has Floyd 8 skin, second is just regular face transfer.
Everybody has their own favorites, but I feel like I have been getting consistenly good results with Render Studio 2.0 - Volumetric Plus, specifically the Rembrandt scene. You might be able to dig around those lights and settings and learn some helpful tricks.
Attached is an image using these lights and RY Dario.