Hiding Surface with weird polygons
 marble
Posts: 7,500
I have a project where I have a passageway leading on to stairs going up to an attic. I am using the passageway from the Euro Appartment set but it doesn't really matter which. The problem I have is with the attic. I have the Creepy Old Attic and it is perfect in that it has stairs which I can bring together with the passage doorway. Except that the stairs have an end wall.
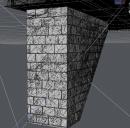
So I thought, no problem, I'll hide the wall with the geometry editor but that is not going to work because I'm finding it impossible to select the geometry. Here's why:

So can anyone suggest how I can hide that wall?


stair_geometry.jpg
972 x 955 - 261K
Post edited by marble on


Comments
Try viewing the stairwell from the side (Left or Right View), and use Marquee selection on as thin a slice as you can make off the stairwell wall. It might catch a few polys on the sides, but the entire face will be selected.
Or, using the Front View, without showing any of the side walls (get in close), use the Drag Selection with a large Selection Radius to select the wall. This might also catch a few polygons on the sides. The Marquee or Lasso selection will grab the unseen polygons, so basically they will select the whole stairwell.
To clean up the selected polys on the sides, use the Drag Selection with the Alt key to subtract whatever got caught up with the initial selection. The cinder blocks are modeled, so you might need to touch up the selection from different angles to get all those tiny polygons.
I made the attachments using a marquee selection. It misses a few polys along the top edge, but that will only take a minute to clean up. Hide the selected polygons, and voilà, open doorway.
Oh wow ... thanks so much for making the effort to solve that head-scratcher. I'll try to follow your lead.
Then, can someone remind me how to save the scene so that it loads the prop with the polygons still hidden. I seem to remember something about creating a surface with a bone from a previous time I tried something like this but the procedure escapes me.
You can make a new Face Group to keep it separate and turn it on and off at will. With a bone, you can hide it in the scene tab. Add a new bone then assign the Face Group to the bone.
You could make new surface from the selected polygons that you can hide with opacity properties. Copy the surface settings from the original and paste into the new one.
You could permanently delete the polygons and save as a new prop asset (Save As -> Support Asset ->Figure/Prop Assets..) with a different name. You will go through the Save Scene/Prop Asset dialog where you can give it a different item name.
They all involve a little technical know-how. It is late for me, maybe someone else can pick it up...
Many thanks for your help - I think I can figure out at least one of those methods. Getting a little late for me too. I'm in New Zealand.
@NorthOf45 ... Again my thanks. I finally managed to figure out how to add a bone and assign a face group so now I can load my scene and I have a little eye visibility icon to toggle on and off. I wasn't too particular about my polygon selection as those edges are hidden so all is good.
Glad it worked out!
You would normally add a bone to add some rigging to a face group of the geometry instead of, say, adding morphs to control movement. What it does, as a consequence, is add the node to the Scene hierarchy, which can be made visible/invisible, and selectable/unselectable. In this case, a quick way to hide the wall.
Yeah, that was something I didn't get right away. It is simply to be able to click the visibility option in the Scene heirarchy, not for manipulation of the mesh geometry.