Creating Iray Shaders
 Pendraia
Posts: 3,598
Pendraia
Posts: 3,598
I've been importing some of the preset shaders that come with the latest version for Iray into Shader Mixer and I was wondering if anyone knows anything about the brick called Users Parameters?
It seems to be in all of the shaders I've imported but each one has different options.
Also when I tried to insert it into a mdl network it said that it couldn't be used in that type of network despite having ALL as the description at the bottom.
Does anyone know any more?
Daz 3D is part of 
Connect
DAZ Productions, Inc.
7533 S Center View Ct #4664
West Jordan, UT 84084
Licensing Agreement | Terms of Service | Privacy Policy | EULA
© 2025 Daz Productions Inc. All Rights Reserved.
Comments
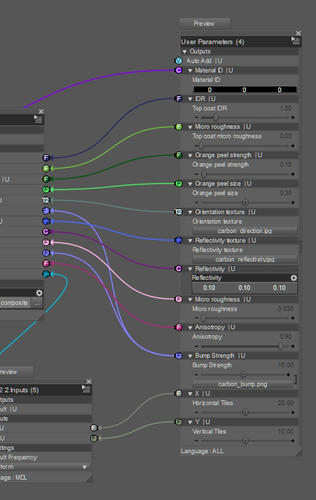
If there's a User Parameters brick then only the parameters it shows will be in the Surfaces pane - it's an alternative way to control what is shown, and to keep everything together. If you drag a connection from its default V output to an input on another brick the right parameter will be added to the User Parameters brick - you can also alt-drag (opt-drag for Mac) a connection to add a parameter for every input on the target brick.
Thanks for the response Richard.
I understand what you are saying about what is shown on that brick is the only things that will show in the Parameters tab but don't really understand what you mean by dragging a connection from it's default V output?
Sorry to be dense...just starting with looking at these bricks for Iray.
Hi pen, richard said V means , in User parameters blick Outputs, there are "Auto Add | U " then the out put type "V"
Now I add "Apply Dust blick" (I do not know how it work clear, but interensting,,,)
then locate the blick between MDL Surface, and Uber Add Geometry.
I think it maybe work ,,,,
but I may hope to change dust Color, visibiltiy, amount in user parameter .
then use Auto Add | U
drug from out puts V (Auto Add) to "Apply Dust" input C (Color), (usuall connect way, when use shader mixer as you know well^^)
suddenly it auto add the C "Color" parmeter in user parameter.
connection line auto made.
now I can twaek the Dust Color value in user parameter,
(If I apply the new simple dust apply shader")
I know we can manually add parameter first, then connect it. but the Auto Add may more easy to apply
new parameter from blick input I think,,,
Thanks that makes more sense...auto add seems to work well.
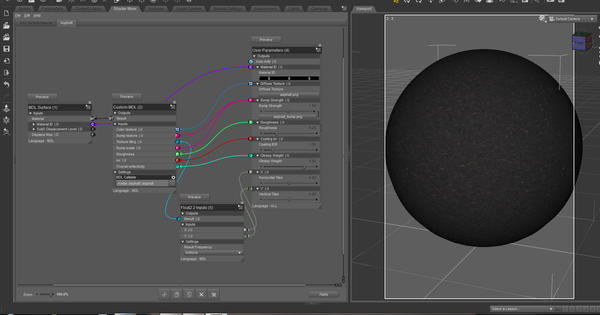
So I realised I'd unplugged something by mistake. Plugged in the float to texture tiling on the custom mdl from the wooden mahogany shader I started with add a rough glass and this is what I got...how do I mix bricks using mdl?
I haven't been able to play much but I think you'd use MDL>Material Editors>Layering>Add Weighted Layer. It's certainly the most obvious thing to try.
Thanks Richard...I wondered what Weighted Layers do. Not being familiar with the MDL language/code it's like a whole new system and is totally different to the parts of Shader Mixer used by 3Delight. Most of the bricks I tried to insert didn't seem to have the MT in and out nodes that I need.
I have no good view about MDL, but just found when I test them,,
mathmatical>operators (add multiple etc) blicks (not grouped as MDL) seems work for both shader blick.:roll:
just hope to tell it ,, before go work ^^; (if some one not foound it yet,,)
Hi,
I have been playing.
Have created some layered texture maps (weighted layers), but moved on to trying layered procedural noise textures (for dirt / paint pealing / rust etc) as they do not need UV maps (can be object/world space)
Still a long way to go, quick render of progress so far.
1, simple procedural noise
2, Layered procedural noise
I am new here. How do you actually import the Iray Shaders?
I went to import, Found the shaders directory but everything is in a Duf file. there are none of the extensions available in the list of import.
How can i import one to get a look at it and see how it works?
You can simply drag-and-drop the MDL file into the Shader Mixer main area.
Nice to know...I would have to move my tab though as my setup wouldn't allow that.
The other way is to select the item in the scene tab. Select the surface in the surface tab and then go to the shadermixer tab. From memory it's under file and called import material from scene.
"The other way is to select the item in the scene tab. Select the surface in the surface tab and then go to the shadermixer tab. From memory it’s under file and called import material from scene."
This is how i ended up doing it. I had to make a Plane , select the surface and apply an Iray shader to it. Then i went into mixer and import from scene while having the plane selected. Only problem i have is when i use any preview tab it loads but nothing appears? Do i have to have my scene mode in "Iray mode" meaning my view in Iray Mode" to see the resulting texture?
Also a side note. I have applied the Iray Uber to a plane also, then imported my own texture etc, made adjustments and did same thing in the mixer. when i go through what you guys call bricks i see all of my assets there as if it made a new shader and i have the option to save it as a new shader but still no preview. I would really like to make these since i intend on making some products to sell with Iry shaders "Preferably once i make" to go with the items i make.
Also is it best practice to make shaders for both render packages ie 3delight also?
Ps, i did notice when i import the shader it is coded in Mdl and rsl? but when i import only the default material in fresh scene it is in Rsl only. Sorry for being ignorant here but what are the differences and is it possible for me to just make the shaders as i said i did and save them as new Iray without any real scripting?
Thanks for all the help in advance.. Really new at this. I did some shaders in Unreal Ed but nothing with this.
Think i figured it out. I can only see the texture when in 3delight mode while in the Shader mixer "Odd" but obviously it does not render like it looks in 3delight. However easy enough for me to apply the new texture to my surfaces edit the iray setting in the surfaces tabs then import into the mixer and save them as my Iray shaders :) I will submit some tests here for you pro's to look at and let me know ok?
still getting the hang of iray shaders myself. ..but I did have an issue importing an rsl shader when I was in iray mode, so I think it might be an issue.
Hey all,
I've been curious about what I could do using additional weighted layers since I examined the terrain and snow shader Stonemason included for his Winter Castle set. I was not able to make much sense of the slope controls (documentation on that would be fabulous) but the three texture layers seemed like a nice way to surface a large terrain set. From my experiments, I could combine the textures using masks, using the image editor to tile-up the diffuse/normal, while keeping the masks at 1:1. I have been trying to learn more about how to add weighted layers (and if possible, increase the properties to include bump/displacement maps), and this thread is the only thing I've found so far that even mentions doing that.
Has anyone worked with that enough to break it down for someone who's just starting to dig beneath the surface of iray shaders?
Messing with the Iray Uber MDL script is a good way to go insane. If the shader requiresments aren't too complex, you might start with the nVidia examples, which don't use Uber MDL. These use a simpler network with few or no ternary switches to control the shader flow. The nVidia examples have only one "layer," though you can then look at how the layers are connected in Uber to see how it's done.
For some (many?) situations, you could try a geoshell, applying a separate set of shaders to it. You can give the shell either a slightly positive or slightly negative offset. I've seen some outrageously realistic skin shaders that use a negative offset and transluscent skin (using the volumetric/SSS sliders) to literally provide a separate dermal layer with all of its own unique properties.
Fair advice, Tobor. Once glance at the Uber node network is enough to convince anyone. As it happens, I have been using geoshells, masked, to apply different ground shaders on the same terrain. It just did not seem like an elegant approach for sets I might want to sell. For freebies, I don't mind; but somewhere down the road I want to be able to do better. Stonemason's layered shader shows a lot of potential, but as I said, I couldn't sort out the slope controls on my last go, so I reverted to geoshells and I'm not happy with the "seam" where one overlaps another. I plan to update my masks and try again, but you can see where I'm at now on the following page:
https://davidbryanroberson.artstation.com/projects/65GZn
I agree with Tobor...the sheer number of nodes on some of the Iray shaders could drive you insane. I did attempt to remove some in shadermixer at one point and it didn't change much. I think that's because they are set up to include all the option in the surface tab I have noticed that when you click on some items in the surface tab more options pop up and I think that is why the nodes are so complex but I freely admit that's me guessing as I'm not a shader expert.
avmorgan, I love what you are doing...I would really like something like that set up for Terradome 3...
You could try iray decal nodes. They have options for UV mapping the decal as well as blanket planar/cubic/etc methods. No displacement option, though. I've been using them a lot, especially on my later images. The beauty of them is you create a mask for their cutout and they sit right on top of the underlying geometry and shaders with their own surface properties. You can also apply them to geometry shells and therefore hide unwanted surfaces in the Shell parameters.
To add to Tobor's comment about using geo shells for underlying dermal layers, almost all of the figures in my gallery use them. Some have separate vein geoshells, and skeletons autofitted from the V4/M4 skeletons to act as light blockers.