How to transfer completed scenes to Blender
Hey I've been working at this for a few days, because I have some older machines, (like Sandy bridge i3 to i7 laptops with no GPU at all beyond intel HD graphics.) that are running Linux that crash when I try to render them, but Blender works just fine & can render without issue. The problem is, not many pre-made assets for blender & don't have the time & skill to make all the assets from scratch.
So, since I can load DAZ on those systems & build the scenes, just can't render them, I found a way to use both programs to make a final scene. Now, I won't get into the weeds on how to use Blender, with areas such as setting lighting, the camera & such, There's loads of turtorials out there for that, I will say this, learn the hotkeys. The camera alone was a nightmare until I learned to use the hotkeys.
I'll instead focus on the issues more specific to how to get the scene from DAZ to blender, & how to fix it so it's usable there. First, Don't waste time with the Daz to Blender Bridge or diffeomorphic importer. they are totally useless. If you just want to import 1 single character or model to blender, they are fine for that. otherwise, they are trash. & Before anyone says "Nu uh, you can import whole scenes with dem", I spent weeks scouring the internet looking for ANYTHING on how to do it with those tools & it was nowhere to be found. So even if the ability to is techincally there, Where's the directions? Nowhere? or at least nowhere that's clearly articulated? Yeah. Point proven. Like I said. Completely useless.
So if you're like me, where you want to just take your saved scene & move it to blender to render there, This is what you do.
Step 1, Build the scene in DAZ. Basically get the scene in DAZ all put together exactly how you want it when you're raeady to render. Don't worry about setting lighting though because it doesn't transfer over, so unless you're able to render in DAZ, save the wasted time & energy. Then select EVERYTHING in the scene, (click the item at the top of the list, then scroll to the bottom, shift + click the last item, should select everything in the scene). then go to file, export, save it as an .obj. When you're exporting it, 2 things to be aware of. In DAZ, the Y axis is up, but in Blender, the Z axis is up. So make sure when in the export settings, you set the Z axis as vertical, (you can select this in Blender's import settings too), & make sure you tick the boxes for write surfaces, write material library & quote paths containing spaces. Otherwise, you'll end up with blank, white statues of everything with no textures. Now to see them in blender, there's 4 circle icons in the upper right of blender. The 3rd & 4th ones are going to be the ones where all your textures will be visible, the 4th one being the rendering view.
Step 2: Import the .obj file of the scene into blender, (file, import, route to where the file is in blender), Now if everything went well, you should be seeing a all white, backwards version version of your scene. Like I said, click on the third of the 4 balls in the top right of blender, now it should just look like your scene, only backwards & no eyes.
Step 3. Ok so from here, first to resolve the eyes. You need to select each character one at a time & go under material properties. It looks like a red Globe. on the right hand menu options. That's the one, (At least for blender 3.1, which is what I'm using. you might have to google fu if you're using a different version). once under there, you'll have to select eye moisture, cornea, possibly iris & pupil, & with each one, set alpha to 0, & under viewport display, set blend mode to alpha hashed. Go down the list of those 4 items until their eyes look normal.
Step 4. Ok so the eyes are fixed, but the scene is still backwards. Well, if you're rendering the whole thing in blender, Just build the scene backwards in DAZ, otherwise, in Blender, just hit tab to go into edit mode, then select meshes at the top, mirror & mirror along X axis. Now all the pieces should be where they belong.
Step 5. Now, the next issue is lighting. This part took me 2 days to figure out. As it is, if you try to add in lights, it will be a mess because all the normals are inverted & I couldn't figure out how to correct it. If you put a light in the top left, it will behave like it's coming from bottom right, & it will leave black marks on anything it reflects off of rather than light spots. In short, it will turn your render into a deep fried meme. Here's how to fix that. On the options on the right, there's the Object data properties. It looks like an upside down triangle with dots on the points. You might have to hit tab & go into edit mode to see it. You need to select the first item in your scene, then go under the object data properties & scroll down to the option of clear custom split normals. Then repeat that process for every item in the scene one at a time. I tried doing it for all of them, no luck. So you have to do it individually for every listed item in the scene.
Step 5. Once all that is done, you should be left with essentially a mirror of your DAZ scene, minus camera & lighting. There's tons of turtorials that should work fine now on how to do cameras & lighting in Blender, So I'll leave that to them, I will say this though, get familliar with the hot keys. for example, if you have a floor lamp in the scene like I do, shift & right click on the lampshade to set the 3d curser there, then shift a to get the menu to add a light. Puts it almost right where you want it to go, so you don't have to do a lot of moving. With the camera, when it's selected, G selectis it to move just by moving the mouse curser & left click sets it, g then z adjusts the vert axis, g & then z 2 times ajsusts the linear, etc.. There's also a hotkey for making the camera view the full viewport, somthing with the home button, but I can't remember.
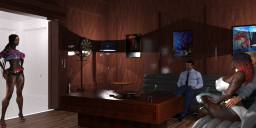
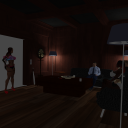
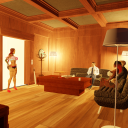
Following these steps though, you should be able to fairly quickly & easily build your scenes in DAZ, then move them to Blender & render them, even on a potato computer. Here's a iray render I did of a scene I made, then the same scene in 2 renders in blender, an eevee engine render & a cycles engine render.
I hope this helps some of you out there. I did the days of suffering, frustration & work & then left this here so that you don't have to go through the same nightmare.




Comments
Hmm .. not sure if Diffeo useless in exporting and rendering Blender case . The Diffeo actually save your time with Lighting - Camera and in some case shader network build up . I`m not sure how you can spent your time with hundred of materials without automation just like Diffeo offer . In some project Ii`ve even combine both render to get style I wanted , so to get that I need same ( exact) camera and lighting placement . And Diffeo give me those features
Documentation really good in my opinion , much better than any daz product or plugin they ever sold in store . I believe The problem is , not everyone care to spent time read those documentation and Diffeo blog post . Yeah I was one of those guy !! But those opinion shifted after doing some time reading and actively asked for help from @padone or anyone else in Blender forum .
If you have time , check my gallery in DA , I literally work only with props these days ( including my freelance gigs in FIVERR) . Much more complex than your examples . And Diffeo proven to be my number one tool in term of bring DAZ content in there . FYI I`m nowhere near to be Blender or DAZ expert guy so , my experience should be not take as "special cases"
All Daz content imported via Diffeo
(except the skycar was freebie from sketchfab)