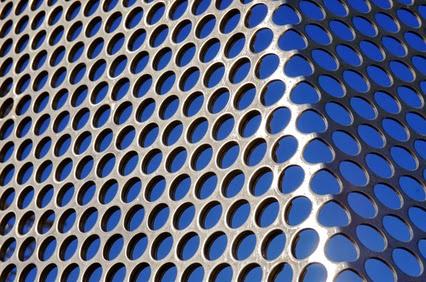
Metal with holes
 garbanzolasvegas
Posts: 53
Anyone know the easiest way to pull this off. I am NOT interested in having the sheet metal BENT like it is in this image I just want all the holes where one can see the THICKNESS through the holes. I know I could make this in like Carrara with a alpha mask for the holes BUT if your looking at an angle you would not see the thickness of the metal trough the holes


10.04_.13_perforated_steel_.jpg
426 x 282 - 64K


Comments
Is it a flat sheet? (no contours or curvature)
What application will the model be used in?
Hex has instancing and Carrara has replicators. However, if you need to use the model in another application, converting a large number of replicated objects or instances to geometry when exported might make very large model.
This can be tricky, as you do not want to move the mouse to much when using the Extrude surface tool, you will want the Extrude Surfaces Independently selected.
Please note I have the Extrude Surfaces Independently icon selected.
Rather than Delete the faces, I extruded them down first, then deleted and added a couple levels of smoothing.
Well I want to make it in HEX but use it in Carrara 8.5 Pro. Also note that the HOLES are not right decides one another but diagonal with one another
Thats what I need BUT like I said the holes are not side by side rather diagonal or offset like 4 Degrees
What you would need in not a 4 sided QUADs Poly but a sheet of Six Sided Polys! I don't think you can do that
Ottimo WDJ!
Grazie
What you would need in not a 4 sided QUADs Poly but a sheet of Six Sided Polys! I don't think you can do that
I think I know what you mean, I'll have a little think about it and let you know. It can be done, maybe just do something with copy on support or multi-copies. - We'll see :)
This took a while to do, its not complicated just takes a while and I think its better if I leave it to the week end when I have more time - sorry.
But basically, its an 8 pointed circle extruded in and down, then copied a number of times and positioned using the snap tool. And muti-copied.
1. Create 4 circles evenly spaced (as required)
2. Delete 3/4 of the circles (to leave highlighted edges)
3 That will leave you this shape (I have joined the circles with lines)
4 . Create polygon from shape
5. Copy/paste align and weld
Add thickness when done.
Come sempre: ottimo!
Grazie anche a te Steve
Bye
I am not sure how to join the end points of the 4 separate parts of the partial circles? How do I make ONE line object out of the 4 separate circle sections?
Nice one Steve, the end results are not exactly the same but I think your process is a lot more elegant than mine. I was trying to re-create the flower pattern, 6 holes around 1 in the middle.
Garbanzolasegas, I hope Steve jumps in if I get this wrong, but it looks like he deleted the lines which are not highlighted, then joined them together with another line on the corners then welded everything together.
UPDATE. I finally figured it out. I wanted a sheet of sheet metal with holes in it. Could not find what I want so decided to make my own digital one...
If I had only looked closer to my computer.
I did it different than most would have because I knew I would be rendering in Carrara and it is real good at smoothing. The holes are actually hexagons, NO PUN INTENDED.
Carrara handles it pretty good.
Final image