What causes this dress distortion and can I fix it myself?
 barbult
Posts: 24,875
barbult
Posts: 24,875
This is the slip from Platinum Cocktail Dress by DAZ Originals and Ravenhair. It is fit to G2F with the heavy morph dialed to 100%. Look how distorted it is. The dress distorts like that, too. What causes this distortion? Is it something I can fix myself, maybe with Blender or even with tools within DAZ Studio? (I don't know much about Blender, but I'm willing to invest the time and effort into learning.)
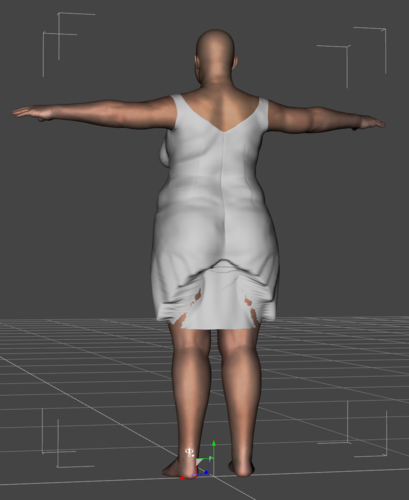
Platinum_Cocktail_Dress_heavy.PNG
1012 x 1236 - 479K
Daz 3D is part of 
Connect
DAZ Productions, Inc.
7533 S Center View Ct #4664
West Jordan, UT 84084
Licensing Agreement | Terms of Service | Privacy Policy | EULA
© 2025 Daz Productions Inc. All Rights Reserved.
Comments
You can use rigidity to stop the bottom part of the skirt from distorting :) Use all the polygons in the skirt area to just above the thighs as participants and reference. Fade the rigidity weight map to smooth the transition between the skirt area part and rest of the morph. You can use smoothing to get rid of the poke through or take it into a modeller to fix.
http://docs.daz3d.com/doku.php/public/software/dazstudio/4/userguide/creating_content/rigging/tutorials/rigidity/start
That's a very helpful tip, thank you. Not being a content creator (much of it is over my head anyhow), I'm not usually aware of these features. But I've often thought that I wish morphs didn't distort buttons and other rigid items yet it looks like the answer was there all along. :)
EDIT: Don't do it the way shown in my pictures here! They illustrate what I tried before I understood. See SickleYield's instructions below.
Rigid follow nodes are nothing to do with rigidity, they're for assigning smartprops to follow the object surface.
You can see the rigidity options in the polygon group editor by clicking the "vertex selection" button. It's at the top, and it looks like nine connected dots behind an arrow.
It's often more effective to set just a couple of verts in the hip area as the reference. You might get the skirt getting weirdly long, in which case, right-click in the viewport and choose Geometry Assignment-Rigidity Groups Editor. Set the First Axis Scale to Primary.
Thanks, SickleYield, I'll try again!
...when I get skirt distortions like that I use the base MFD and fit the dress to it (as teh upper portion fo the MFD completely covers the arms, chest, and neck like a bodysuit) and then turn off the opacity of the MFD. Kind of a "quick and dirty" solution but it works most of the time.
Cool tip, I used to use MFD as Transfer utility base for dresses so SHOULD have though of this too.
Here's a progress update. SY's clue to use vertex selection was a huge help! At least now between Mada and SY I know how to create rigidity. My weight mapping skills leave lots to be desired! The issue I have now is that the rigid skirt falls mostly inside the Heavy G2F and requires smoothing of at least 20 to pull it out. Then it is so shrink wrapped that it looks bad, but better than the way the product was delivered. So, I consider that progress.
I don't know what the rigidity editor selections for scale and rotation mean, so I don't know how to set them. I left them at the defaults.
I will see if I can figure out how to use the MFD and Transfer Utility to help.
Edit: pictures are - top row: rigidity but no smoothing in parameters tab
bottom row: rigidity and smoothing of 20 collision 3 in parameters tab
Kyoto does not use TU he just fits it to the dress instead of the figure, easy peasy and good idea!
You can also add a map to smooth the transition at the edge of the rigidity map. This is in the weight map dialog.
An important difference is that the map cannot go outside the edges of the rigidity participants, so you have to select the participants, fill weight (of say 100%), then smooth it so that it fades at that top edge where it connects. You can also get less rigidity or control the amount by filling with lesser percentages.
I think the main problem I have with this rigidity approach is that the rigid area is inside the Heavy model. I don't know how to make it scale up.
Well, I tried loading G2F, dialing in heavy 100%, fitting the G2F_MFD to her (looks smooth and nice), then loading the slip with fit to the MFD. It looked better, but not smooth and nice like the MFD itself. And when I turned smoothing up to 10 on the slip to try to compensate for the poke through and jagged areas, it got much WORSE! What is going on??? (This was done with the original slip, not my rigidity slip.)
OK, now I am getting some better results. I still fit the slip to G2F_MFD, but I set collision to Genesis 2 Female instead of the MFD. There is still some funkiness near the bottom of the slip, but it looks SO MUCH BETTER. KK you are brilliant!
Looks like you got a handle on fixing it :)
There's so many ways to do things in Daz Studio. Here's a link to a tutorial by Josh Darling as well :
Rigidity - https://www.youtube.com/watch?v=X1_NWz99jEw and
https://www.youtube.com/watch?v=xWP2FrU_Izk
How to bake smoothed morphs so they load automatically on the clothing item - https://www.youtube.com/watch?v=RU1kQBeEb3Y
and most of the other videos on his channel is also very informative - def worth watching.
A little tip if you're losing a lot of detail when smoothing something 20 iterations - once the fixed morph is loaded on the clothing item and its a saved asset, smooth it again at a low setting like 2 to 5, using Base Shape Matching. Daz Studio will use the original obj to base the smoothing on but with the new morph so that you don't have as much stretching going on, a lot of the original detail will pop back into the morph.
Baked in smoothed morphs.. Mada, thank you so much for this link honey! *kisses*
Thank you for the links and tips, Mada. I've watched a few now and will watch more. I now have created a Heavy morph for the slip and dress, which I have saved. I used the "fit to MFD" method. That seemed to work the best for me. I'm sure it could be improved in Blender, but that is a lesson for another day! Right now I'm just happy I turned an unusable product (for the heavy morph I wanted to use) into something passable. I learned a heck of a lot along the way. thanks to all of you who contributed to that learning process.
Lighting is 05-20_Park_C from No Emotion HDRs. It is free, released under the Creative Commons Attribution-NoDerivatives 4.0 .
Nailed it!