IRAY help: How do spotlights work?
 Scavenger
Posts: 2,674
Scavenger
Posts: 2,674
I've been googling and searching and I'm not finding answers.
I can't get spotlights to work in IRAY as spotlights....
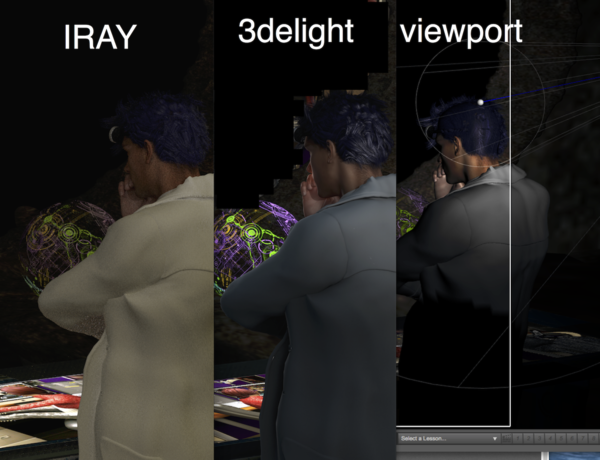
they do some illumination, but they're not...shafts of bright light hitting something, casting shadows..spotlightly
In the picture below, you see the 3 things..the spotlight in viewpoint, hitting the back of the head in 3delight, and not really anything in iray.
(It's the best example I can give at the moment from this scene).
I've tried a lot of settings..different geometries -- i thought "column" then after reading a thread here, I went back to the default of point.
higher lumens....it defualted to 1500...I went to 2000...should I do more? less?
(I ALSO can't get the light sphere in front of him to emit light...I set it to immision, put the diffuse map in the emission color slot and base color, the opacity map in the cutout field . It pretty much just goes all white (with the cutouts). Should "emission color" besides the map be black or white? If it multiplies, it should be white, but that for sure goes all white, rather than the colors.)
Daz 3D is part of 
Connect
DAZ Productions, Inc.
7533 S Center View Ct #4664
West Jordan, UT 84084
Licensing Agreement | Terms of Service | Privacy Policy | EULA
© 2025 Daz Productions Inc. All Rights Reserved.
Comments
Can you post the image. You forgot to
Sigh..that would help, wouldn't it..
I would change your units to kcd/m^2. (That's kilo candelas per square meter.) It takes a LOT of lumens to light a scene (hundreds of thousands to millions, unless the light is right up a character's nose).
I don't see that as an option.
(BTW SY, I've been using your quickstart tutorial to get this far...SO MUCH BETTER results and feelings about iray using THAT when I was purely fiddling around on my own, so thanks)
Oh, sorry. I was forgetting it's not an option with photometric spotlights, only mesh lights. :(
Also, you're very welcome!
Is there a way to use a mesh light to do what I want? like I said, it's a spotlight that illuminates the back of the person it hits and casts a shadow on the ground.
Here's another part of the pic using the same spotlight (duplicate) in 3delight, casting the shadow.
Edit: forgot the pic again..sigh
Definitely, just use a plane or sphere primitive and put it where the photometric light was. Then put the Iray Uber shader on it, turn the emission to white, and set your light settings.
and it'll be directional?
It will emit light in all directions. If you want it to just emit toward the character, use a plane and turn off "double-sided light" in the material settings. You might have to flip it over so that the side that emits is toward the character (it's not always immediately obvious which one it is) but it will work.
I assume it's the face of the plane...I'm trying a square in the same position as the spotlight, set it's lumience at 199000.0 and so far I'm not seeing any difference which side it's pointing. Two sided is confirmed off.
Double check that your camera headlamp is off? That's actually sort of low for a light at default tone mapping if you're using lumens, so the headlamp could very well drown it out if it's on.
Headlamp is off
I hit that as a high number.. what would be good for a spotlight?
----
Ok there's 2 attempts, with it at 90degrees and -90degrees. I'm guessing the one with the red circle surrounding the white square is facing away..it's a bit darker...and I guess the white square is the light?
(sorry the pics are so small..couldn't get the forum to accept them)
I can't tell from those where you've put the mesh light.
in the top pic..the viewport, it's the white square on the far left next to the spotlight.
---
ok, this one has it at 9,999,000 .. so that's too bright..or at least spreads too wide....can it be narrowed?.. the plane was a 1ft plane, reduced to 10%
I'm just guessing from looking at the pictures you posted, but did you turn on photo-metrics for your spot light in the parameters tab and increase the "Luminous Flux" to at least 50,000 (a much larger value may be required, 50,000 works well for a low intensity rim light). I attached a screen grab of the the parameters tab, the last two settings control the brightness and intensity of the photo-metric spot light.
I did do photometric, but didn't go that high..I'll give it a try...assuming i don't get another mega crash :/
EDIT: Yep, mega crash...I can do about 4 or 5 renders before I get a crash that just takes down the computer...I don't know if there's a cache on the video card that gets filled and not emptied or what...but that's for another thread..
BUT bumping up the spotlights to 50,000 did. Why does Daz default the spotlight to 1500..... I mean, I have access to smart people like here, but someone setting up a spotlight should get a spotlight...not a ..bulb.
I'll get back to experimenting with SY's mesh later.
I'd increase the size of the mesh; the bigger it is, the more light it gives off.
also, for the lights, a value between 45.000 and 55.000 units is a good starting point.
You can also try andd adjust the settings in Tonemapping, like increase the ISO, lower the f/stop, increase the cm^2 factor, lower the shutter speed. The image below is using the default 1500 units, and controlled it by the tonemapping. I didn't complete rendering, but stopped it early in the process, but but should get the light levels across.
EDIT: To answer the question about the default value - it's what a normal 100 Watt light bulb would emit. So imagine your single 100 Watt light bulb trying to light up the huge room, or have it in quite a distance from the character - it won't work.
If you were taking a real photo, and were unable to increase the strength of the light, you'd have to fiddle with the settings of your camera to make the picture look good again, and pick up every morsel of light. That's what the Tonemapping does.
Personally, I'm a bit on the lazy side and prefer the "more light in the scene" approach.
I did do photometric, but didn't go that high..I'll give it a try...assuming i don't get another mega crash :/
EDIT: Yep, mega crash...I can do about 4 or 5 renders before I get a crash that just takes down the computer...I don't know if there's a cache on the video card that gets filled and not emptied or what...but that's for another thread..
BUT bumping up the spotlights to 50,000 did. Why does Daz default the spotlight to 1500..... I mean, I have access to smart people like here, but someone setting up a spotlight should get a spotlight...not a ..bulb.
I'll get back to experimenting with SY's mesh later.
Glad to hear it worked! Definitely the default starting value is way too low.
With regard to your crashes - are you closing your renders completely (render window)? Because of the way DS handles the data now that pausing/stopping and resuming Iray renders is possible, data is "cached" in both system and video RAM (even when the render is "completed" and the window isn't closed - because you can change the render settings in the open window and resume rendering). I was running out of RAM on my video card and defaulting to CPU rendering because I was leaving test renders open for reference. I use Open Hardware Monitor to watch my system resources and temps which helps a lot in understanding what is going on (http://openhardwaremonitor.org/).
I wonder if any of these would be helpful...
http://www.seleconlight.com/index.php?option=com_content&view=article&id=475
Well, yes, they just may help. I've got a Luxrender render cooking using PL1 20 DEG CW.IES from that link...it's a nice tight beam, great directional light and proper 'spot' falloff/behavior.
I only let this cook for about 10 mins...
(yes, it's Lux, but the behavior of the IES lights between it and Iray is very similar, once you get them set up...)
I had started rendering directly to file..thinking it would act like Lux does and ongoing writing the file so if it crashed part way thru (while I was asleep), I'd have at least some kind of file.
I wasn't expecting the dramatic improvements that following SY's tutorial caused in performance (like I was expecting the thing to be going after 6 hours or more....and it actually took 30 minutes.
I've found several times after trying the render to window, I start getting distortion all around my screen, leading to a full freeze/crash, so I thought maybe if it just goes to file, rather than also having to draw to screen, that was part of the better performance..so I left it as is.
I noticed in your first screenshot of the light parameters on page one of this thread that the spotlight is set to Point. Point light is just that a point of light that emit spherically and not a spot.
Mesh lights work differently in that the light rays get emitted in random angles and not perpendicular to the objects surface so they become less directional that a spotlight.
From my readings on light geometry for photometerics, the different shapes control the different sharpness of shadows...the more area on a shape, like a sphere, being softer, and a point being sharpest.
Is this incorrect?