Question about Angel Secrets Vol 2
 Nyghtfall3D
Posts: 782
Nyghtfall3D
Posts: 782
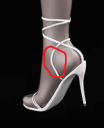
Are the side straps on the heels their own material zones? I'm going to want to set their opacity to zero if I buy the outfit.
https://www.daz3d.com/angel-secrets-bites-vol2-lingerie-for-genesis-8-and-81-females
angel heels.png
184 x 227 - 33K
Post edited by Nyghtfall3D on
Daz 3D is part of 
Connect
DAZ Productions, Inc.
7533 S Center View Ct #4664
West Jordan, UT 84084
Licensing Agreement | Terms of Service | Privacy Policy | EULA
© 2025 Daz Productions Inc. All Rights Reserved.
Comments
I don't have it, but I hardly doubt it.
But you could make or change an image for the cutout oppacity to give the wanted effect.
Welp... I decided to take advantage of the sale and grab a copy myself to check... The entire shoe is one big mat zone, and the modeling is among the worst I've ever seen. They look like a distant afterthought to the rest of the outfit.
In order to evaluate a model, you should see at it on unmorphed feet.
Feet morph can distort shoes rather much. That said, I don't understand the gab between the straps and the feet.
Fair point. Here they are by themselves (Fig 1), and a few Wireframe views (Fig's 2-4).
I may have a solution. Tried it out first. Are you familiar with the Geometry Editor tool? I tried it out on that strap and it made it go away.
Hi,
Just a quick guide:
1. Go to Tool Settings. Drill down to Geometry Editor.
2. In the example you see, (my wip), you can see a list of Surface thats the same as the Surface you see from the Scene.
3. Find out how to select Polygons, then right click on the Tools/geometry editor, and you can assign it to a new Surface Area.
If you can spare me some time, I can take you step by step on how i did it with the Geometry Editor tool. I have the the same product as well. Don't know how to do screen shots so I'll have to do some quick renders so I can show you as well as tell you.
Unless somebody beats me to it.
Where do I find my Screenshots on Windows?
To capture your entire screen and automatically save the screenshot, tap the Windows key + Print Screen key. Your screen will briefly go dim to indicate that you've just taken a screenshot, and the screenshot will be saved to the Pictures > Screenshots folder.
Windows 10 and 11: Easily Take Screenshots on Your PC - CNET _ Jul 14, 2022 _ thanx
Hey thanks for the tip. I've seen it done by other people but but never took the time to find out. It'll make my tutorial a lot easier to make.
OK here goes. I learned how to use this tool from The Geometry Editor by Digital Art Live tutorial. Don't know how to make it a link. Highly recommended if you don't mind handing over $44.95 for it. Ok let's get this shoe strap gone.
Get the highheels loaded up and in the Drawstyle Options menu go to Wire Texture Shaded. This is what I use.
Zoom in really close. Use the magnifier icon to zoom in even closer.
Go to the menu at the top left where it says "Tools". Go to Geometry Editor. Make sure the highheel has been selected first.
Zoom in more if you have to and move the camera around until you can see the polygons that make up the strap. I started at the bottom of the strap. The curser should have a red circle attached to it. Click on a polygon. It should turn a yellow color. Press and hold CTRL (Windows. I think it's Command on a Mac. I have Windows.) and click on the polygon next to the first. Right click to bring up another menu. Go to Geometry Selection> Select Loop. This will highlight the rest of the neighboring polygons.
Hopefully I haven't lost anybody yet.
Right click and go to Selection Mode> Lasso Selection. Left click and hold to draw a loop around the rest of the strap. Most of the strap should be highlighted. It depends on how precise you want to get.
Right click. Selection Mode. Change back to Drag Selection.
Right click for menu. Go to Geometry Editing> Delete Selected Polygons. Box will come up saying you are about to delete however many polygons are selected. Click Yes. They should disappear.
Zoom in or out and move around the highheel to get more precision in selecting polygons. However precise you want to get.
Repeat for the other strap.
The strap I deleted was the one that was circled in the picture from the first post.
If you accidentally highlight the wrong polygon then press ALT and hold and click on the polygon you want to keep.
When you are finished deleting the straps click back on the Node Selection tool. The arrow that points to the northwest looking thing.
The other highheel I kept the strap but I deleted the polygons in the center to make two thin straps.
Well hopefully all of this makes some sense and is clear as mud. Practice and experiment on the shoe and hopefully you can make it look how you want it to.
The tutorial I mentioned goes into better detail and explains practically all of the functions you can to with the tool. That is if you don't mind coughing up the money for it.
Anyway good luck to you.
~ you're more than welcome ~
If the item has a clean topology (which is usually the case with straps and borders), then for selecting the desired strap you can use symmetry (left and right feet) and select loop and then grow the selection using ctrl+ to cover the entire strap.
OTOH, if the item doesn't have a clean topology then the loop selection may bleed into other surfaces and even while growing the selection.