Valley of the Cliffs Village -World and Village Builder (Magix 101) - SOLVED
 jjoyner
Posts: 635
jjoyner
Posts: 635
Hello,
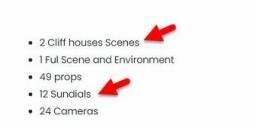
I've just spent the past two hours trying to figure out why a few components are missing from my installation of Valley of the Cliffs Village -World and Village Builder (Magix 101). The store page and PDF user guide refer to two cliff house scenes and 12 sundials (You can also easily change the Suns position by using the Sundial Presets for even more variety and moods.), but they do not appear in my Smart Content or in my Content Library Products. They do appear in my Content Library Mapped Folders though.
I initially installed the product with DIM; I just unzipped the two product folders and manually installed the three folders (data, Environments, Runtime) to the same locations as the DIM install. I’ve tried to get the scene and sundial presets into Products so that they would appear in Smart Content, but no luck. If I double click on the missing scene file in its mapped folder, it loads into the viewport. If I double click on the missing sundials files in their mapped folder, that does not appear to affect lighting from the sun object.
Has anyone experienced this with this product? Solve it? Have any advice on it?
I have other Magix 101 product from this line and the one that I checked (Everglades Tavern and World Set) does not have this problem. The Sundial presets appear as Utilities and double clicking them definitely changes the sun lighting in a scene.
Thanks in advance.

Daz 3D is part of 
Connect
DAZ Productions, Inc.
7533 S Center View Ct #4664
West Jordan, UT 84084
Licensing Agreement | Terms of Service | Privacy Policy | EULA
© 2025 Daz Productions Inc. All Rights Reserved.
Comments
When Smart Content is not quite right, the first suspect should be the metadata, not the installation. In this case the sundials are not included at all, a couple of cameras are deliberately categorized as Lost and Found, none of the props (MGX Objects) have any compatibilities set, and one of the Cliff house sets (x11) is completely omitted.
So, yeah, exactly as provided.
@Northof45,
Not good news. Other products in this line by Magix 101 do not suffer the same lack of packaging attention to detail. I still like the product, though. Other than logging into the Daz3D server to update metadata (which I think is not there), can one manually add items to the metadata? The Edit Metadata option does not seem to offer that functionality.
The metadata is created and supplied by DAZ, so if it is not there now, it won't be until they correct it. Adding/changing metadata is a bit tedious, but it can be done. There might be some drag-and-drop shortcuts with the Smart Content pane, but I do not trust it, because I do not know exactly what it produces.
(If you know what you are doing, just edit the metadata file and add the missing bits. It can be a bit cryptic unless you understand all the required fields and syntax, but is quick.)
First, add the missing parts to the Product. Go to the Products view in Content Library, and navigate to the Valley of the Cliffs product to get the exact name. Copy it and paste it somewhere you can get to later (just a sticky note or notepad). Go to the Content Library folder with the assets to add to the product. Multi-select (or add the whole folder) and right-click -> Create Product from...
Enter the exact Product name (or it will create a new Product). You will be prompted to add to the existing Product. Accept. Repeat for any missing assets.
Go back to the Product view, Valley of the Cliffs. Edit the metadata. There are two tabs, Product and Assets. You don't need to change anything on the Product tab. Go to the Assets tab. Ensure "Sync Product and Local Database" is checked. Go through each listed asset to see which need more data, which need correcting, etc. You need to set the Content Type. Select one or more assets from the top window, then under Categories, select all files, right-click and "Add Default Categories to Selected File(s)". Here it is a bit of a judgement call for which default category you want to use, but pick something that makes sense to you. You can also copy from another asset if it already has the necessary data.
Do the same for Compatibilities. Instead of adding Compatibility Bases from the list of all available, find an asset that already has the proper base and right-click "Copy Selected Compatibilities to Listed Files". The other tabs are not required in this case, IIRC. Compatibility Base would be required for any asset with an object in the scene (props, figures) but none of the missing assets are of that type. The "x11 Cliff-Houses" is a set and all of the props are already defined.
Before you accept, you will want to Export the metadata file so that you can make the changes permanent. (It would be in UserData, but you would have to re-import ALL UserData, unless you export only this one Product, but why not correct it once and for all, instead of patching it). If Auto-Export is checked, it will create a new, updated metadata file in the same location as the original when you accept the changes, otherwise Click the Export button. (Making one with a new name will go to the first library in your library set). Beware, though, any Custom Categories included here will get saved in the metadata file as Vendor Data, and mark your Custom Category branch as Read-Only. PITA to undo.
So as to not lose your new metadata file, copy it somewhere safe, and replace the one in the package, so that if you need to re-install, your changes will be installed, too. You can re-install now, or re-import metadata for that product (faster from DIM rather than the Content DB Maintenance menu). Refresh the Product view, and your new metadata should magically appear (okay, it could be done earlier, but the reveal is always more satisfying when it is all done). Smart Content should now show what you expect to see, if you got everything.
Have fun...
Thanks for your detailed reply. Unfortunately, the first step doesn't work for this product.
I tried that multiple times yesterday, and again just now, and the missing parts (sundials or missing scene x11) don't appear in the Product. However, the strange thing is if I right- click on the sundial icons or the missing scene x11 icon in their mapped folders and select Show Asset in Product, the Content Library jumps to the Product but the missing items are not there!!
I discovered two things earlier this evening:
So, I can get all parts of the Valley of the Cliffs Village to work. For the sun position/lighting, either I have to use the sundial icons in the mapped folder in the Content Library or the corresponding icon in the other two products – either from their mapped folders for sundial lights or from their Smart Content.
I'll play more with the metadata aspect of this product but it's of lesser interest to me now that I know how to get the product to function fully.
Odd, that first part. They could be stuck in the LOCAL USER product. If so, remove the references from there and try again.
TBH, I edited the metadata file myself, so when re-importing, I am assured it will contain what I want.
I had checekd LOCAL USER yesterday and there was nothing stuck there. I finally had the idea of deleting the Product. That did not delete the product's files on my hard drive - just Daz Studio's awareness of the files in Products. I then created a new Product using the mapped folder in the Content Library and recategorized the files. Everthing shows up and works as expected in Products and in Smart Content. The issue was either something in the Support or Manifest files or in the DIM installation of the product from the two zipped folders.
Deleting the Product from the database was the next step. I save the nuclear option for last...
I had forgotten to mention that metadata is not purged from the database when you uninstall something. In that case, look at the bottom of the list in the Content Library - Products view, and there will be a greyed-out generic DAZ Studio folder icon (also in the Smart Content - Available tab). If ever you install manually, any matches to that metadata will be used, that is why you would still see the Content Type flashes on the asset thumbnails, and perhaps some compatibilities in Smart Content. Of course, if it is not good, it will still be not good, so to get rid of it completely, it must be deleted, even if it is not installed. This will allow a fresh start the next time.
Also note that Vendor Data can only be modified using a metadata file. The Content DB Editor allows you to make changes, but they won't persist. The single-pane version from a Content Library folder will only create User Data. However, if you are using the two-pane editor (from a Product view), you can create a new metadata file with Vendor Data for the Product by exporting during the session. Even if you accept the changes but don't export the metadata, anything you tried to remove will return the next time you open that product in the editor. (Unless something has changed recently in DAZ Studio...)
I did not remove the product by having DIM uninstall it. Instead, I removed it using the Delete option on the product folder in Content Library/Products. I suspect that this cleaned the product from the database while leaving the installed files in place so that all I had to do was manually create a new product from the files. Because the old information in the database no longer existed, the thumbnail in Runtime/Support that was created for the product when it was installed with DIM no longer worked because the product was no longer a DAZ product in the metadata but a LOCAL_USER item in the new metadata. I deleted the old .dsx and .dsa files for the product in Runtime/Support and changed the thumbnail name to the match that in the Support section of the metadata.
Everything is working great with the content.