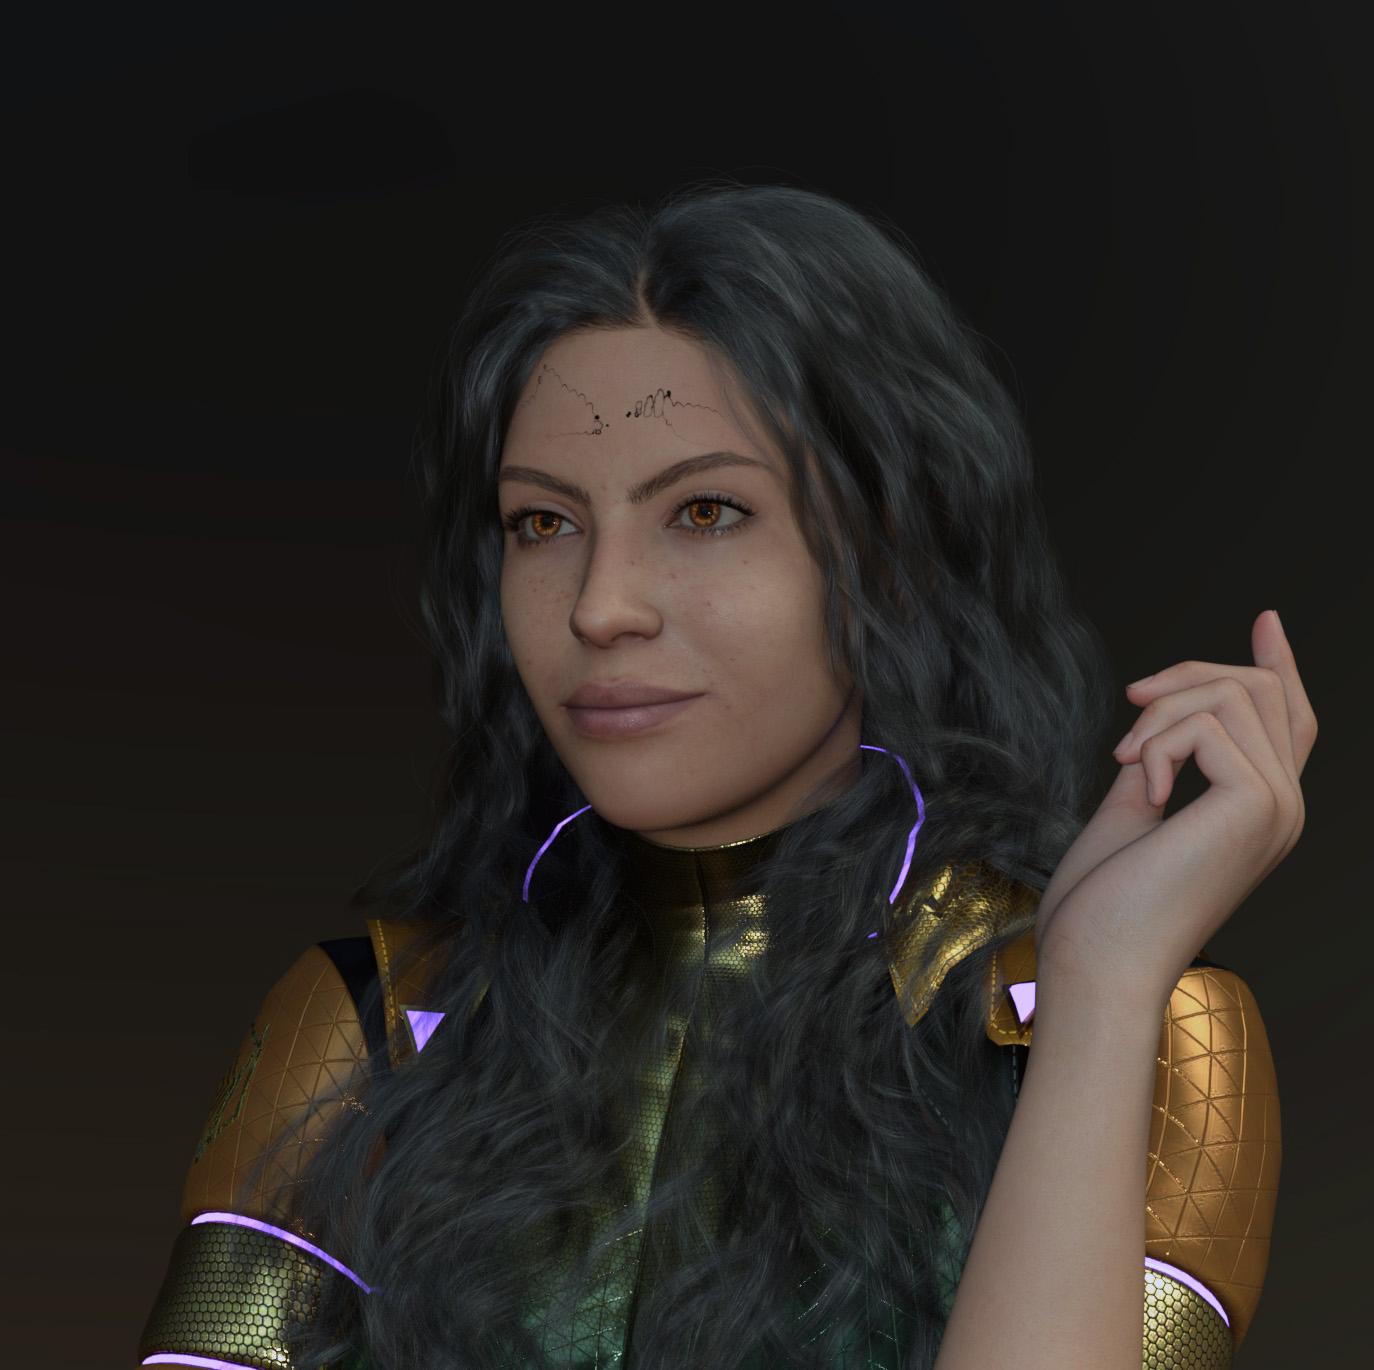
Soft Curls Long Hair for Genesis 9
 Shimrian
Posts: 534
I picked this up yesterday along with the Genesis 9 Essential Shapes Bundle and was excited to jump in, but something seems to be wrong with this hair. I'm getting funky squiggly lines on her forehead when using this hair. Anyone else having this issue? How do you fix it? It kind of ruins the render. I'm sure I can use the clone stamp in photoshop to fix, but bleh, that would suck to have to do. =/


Bad hair.jpg
1374 x 1370 - 258K
Post edited by Shimrian on


Comments
Happens with a lot of hair, even with Gen 8. My first step is always set instancing optimization from "Auto" to "Speed" (under Render Settings/Editor/Optimization)
I know some people will say "adjust the cap size" but, Instancing usually fixes first.
Adjust Head Size or Forehead Depth or Width until the squiggles go way.
I have that same issues with Brows..I have to post work in Photoshop
I was able to fix this by changing the instancing optimization, but I wonder what that setting does vs having it on memory (which causes the squiggles)?
The head I used was the default G9 Feminine Skin 02 MAT with Base Feminine Head at 100%. I'm surprised that I need to adjust anything for head size or instancing optimization for an OOB (out of box) character setting. I did make adjustments to Body fitness / tone details, but I'm not sure if that changes the head shaping/morphs.
Edit: Thanks Expozures and Sevrin for your help!
It is happening for me woth both Soft Curls Long Hair and Curly Top Updo.
I understand it is where the invisible cap is intersecting with the figure mesh, quite a common problem with hiar. Fix by using the expand forhead morph on the hair item in question, just a few percent should do it.
I remember that theer was a lengthy discussion about this in the forum last year (cannot find the link, the search function is *$%@).
The reason seems to be Iray. More preciesly, Iray rounding errors. The hair has a hair cap that auto-fits to the head. This should generate an even surface. During rendering, each light ray will "hit" any surface between the light source and the camera, reflecting, bending, absorbed, coloured as it moves. The render engine thinks it has detected two surfaces (due to a rounding error), thus generates that artifact.
Fiddling with the head size moves the cap a little inside the head, or at a position that eliminates the IRay rounding error.
Setting instance optimization to speed should (in theory) change nothing, as you have a single instance. Instance optimization is usually used if you have multiple instances of an object. If set to speed, each instance is loaded as a separate object. That increases render sped, because the object is already there when the light beam hits it. But it requires a lot of memory, both for main memory and GPU. If you set the otimization to Memory, each instance is created as an object when the light beam is near to it. When the calculatin is done, it is removed again from memory. That takes a lot of time. With Auto, you let the system decide.
If set to "Speed", iray precision is also reduced a bit. Perhaps that eliminated the rounding errors for beam calculation. But that is s side effect. You can also switch to Spectra Rendering, but that generates a lot of other issues (it should be labled as "Expert Settings" in the render tab, imho)
I really don't see any difference in quality on memory vs speed, or any difference in rendering times really. The only thing that I do notice is that when weird things like this, or the black rings in the eye tend to be fixed.
There shouldn't be any difference in quality.
Difference in speed will likely be small unless you have lots of objects which would require extra computations when using the "memory" setting, for example lots of instances. But when you have lots of instances you'll most likely want to use "memory" to save on VRAM...
For the record, from what I read in other threads the trick is not really to set optimization to speed, but to change the setting from whatever it was set to, which will basically tell Iray to recalculate where the "world center" is based on where your camera is.
As I understand it, changing Instance Optimisation, it doesn't matter what to, forces Iray to reset the world centre and so reduces rounding errors (because the leading values are smaller, so more palces for decimal precision). It is the change, not what it is changed to, that matters
I don't think that's true because when I switched it from speed to memory it started showing the squiggly lines again.
Do you have multiple Genesis 9 (if that is what you are using) figues in the scene? Speed causes each to be handled separately, memory uses one set of data for each (geometrically identical) item. If there are instances in the scene then Speed greatly inceases th likelihood of the render running out of memory.
I didn't have multiple Genesis 9 (it was the very vanilla image out of box image I posted at above), but this issue was not reproducible when I tried to recreate it a second time. Maybe I did something with sliders or morphs or something that caused the issue to appear the first time? I am thankful for learning all the work arounds people posted in case I ever run into this issue again. :-)