Genesis 9 - Loading the Dev Landmarks on the OBJ in Zbrush?

GatorGator Posts: 1,312

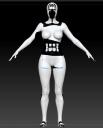
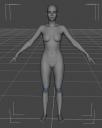
So a problem we should all be familiar with now is that there's nothing in the base topology for nipples.  I can load the G9 Feminine landmarks with Blender and it displays properly, but I don't see where I can set ZBrush to use the Single UDIM.  Screenshots for examples of what I see (not correct = Zbrush, correct = Daz Studio)

There's got to be people here, PAs if not anyone else, that use Zbrush with Genesis figures.  How to do it?

Posted here as there is no Zbrush forum under Software so I think this is the right place.

Genesis9_UDIM_UV_ZBrush.JPG
1045 x 1297 - 83K
Genesis9_UDIM_UV_DAZ_Studio.JPG
552 x 693 - 38K

Comments

  • Are you using GoZ? That drops all grouping, using OBJ export/import would keep them.

  • MallenLaneMallenLane Posts: 161
    edited November 2022

    Zbrush uses flipped textures. You need to flip the texture On the vertical in Zbrush. There's a button for that.

    edit: bear in mind, when you use flip in the zbrush texture palette it creates a flipped copy of the map, and you then have to pick that one.

    Post edited by MallenLane on
  • GatorGator Posts: 1,312

    Richard Haseltine said:

    Are you using GoZ? That drops all grouping, using OBJ export/import would keep them.

    That's with an import/export because of the textures, I only noticed that you only have 1 surface across GoZ.

  • GatorGator Posts: 1,312

    MallenLane said:

    Zbrush uses flipped textures. You need to flip the texture On the vertical in Zbrush. There's a button for that.

    edit: bear in mind, when you use flip in the zbrush texture palette it creates a flipped copy of the map, and you then have to pick that one.

    I'll try that, but even flipped the scale looks wrong. 

  • So, I'm not 100% sure I understand the problem...  When I go over the G9 morphs I definitely see morphs for nipples and such. But I don't use G9, so that's probably inexperience on my end.

    Let's get into Genesis + ZBrush, yah, I heavily rely on ZBrush to edit my stuff but it's tricky, as you seem to have noticed...   For the record: I'm now addressing editing Genesis 1 - 8, not necessarily 9, but hopefully this can help you anyway.

    So the one thing to keep in mind is that Daz Studio, Genesis in particular, uses several textures for its figures, just check the surfaces pane when you have a Genesis (8?) figure loaded: at least the head, arms, legs and torso all use different textures. Of course some also share textures (ears, lips with head, fingernails with the arms, etc.). The problem here is that ZBrush can't use multiple textures on a mesh, only if the mesh is using sub-tools. So if you have Genesis 8 loaded then you can't tell ZBrush to apply a texture for the arms, and a different texture for the legs.

    But we can somewhat work around this...

    • Load a Genesis 8 figure, I'll be using Sukai 8 as my example but of course any will do.
    • Open the surfaces pane and select, say, the torso.
    • Check the "Base Color" 'menu' (the arrow icon); in specific: click browse and make sure to copy the folder where the texture(s) are located.
    • Also check what texture the torso is actually using (in my example: "Sukai8TorsoD_1002.jpg").
    • GoZ the figure over to ZBrush, make sure not to use the current resolution, but do export with deformations.
    • Within ZBrush draw the figure ("tool"), and enable Edit mode.
    • Check the subtool section and you'll notice that you got the base figure and the eyebrows.
    • Now, expand "Polygroups" in the Tool palette, use: "Auto groups with UV", it's also recommended to use "Merge similar groups" afterwards.
    • Press Shift-F and notice how the colors roughly match the surfaces in Daz Studio?
    • Press control-shift and while keeping this pressed click on the torso, notice how everything else disappears?
      • This may be a good time to hide the eyebrows subtool, that can get annoying right now.
    • Now expand the Texture section within the Tool palette, click the map and then use "Import" in the lightbox (browser).
    • Point to the right folder, select the torso texture and either click load or double click.
    • You'll notice your mesh to get darker, but it's still hard to see.
    • Press Shift-F to disable the polyframe, then click the main material selection and switch from Red Wax to PolySkin.
    • Now you should see a rough representation of your Genesis figure, ready for editing.

    Just make sure to re-enable the eyebrows subtool if you have hidden it before, and also press control-shift and then click somewhere outside the mesh to unhide the rest of the polygroups (you may want to disable the display of the texure afterwards because that's going to look horrid).

    After that you can GoZ your changes back into Daz Studio.

    Hope this can help, this is roughly how I'm using ZBrush to edit my Genesis figures.

  • GatorGator Posts: 1,312

    MallenLane said:

    Zbrush uses flipped textures. You need to flip the texture On the vertical in Zbrush. There's a button for that.

    edit: bear in mind, when you use flip in the zbrush texture palette it creates a flipped copy of the map, and you then have to pick that one.

    That was it.  Thanks @MallenLane

  • GatorGator Posts: 1,312
    edited November 2022

    ShelLuser said:

    So, I'm not 100% sure I understand the problem...  When I go over the G9 morphs I definitely see morphs for nipples and such. But I don't use G9, so that's probably inexperience on my end.

    Let's get into Genesis + ZBrush, yah, I heavily rely on ZBrush to edit my stuff but it's tricky, as you seem to have noticed...   For the record: I'm now addressing editing Genesis 1 - 8, not necessarily 9, but hopefully this can help you anyway.

    So the one thing to keep in mind is that Daz Studio, Genesis in particular, uses several textures for its figures, just check the surfaces pane when you have a Genesis (8?) figure loaded: at least the head, arms, legs and torso all use different textures. Of course some also share textures (ears, lips with head, fingernails with the arms, etc.). The problem here is that ZBrush can't use multiple textures on a mesh, only if the mesh is using sub-tools. So if you have Genesis 8 loaded then you can't tell ZBrush to apply a texture for the arms, and a different texture for the legs.

    But we can somewhat work around this...

    • Load a Genesis 8 figure, I'll be using Sukai 8 as my example but of course any will do.
    • Open the surfaces pane and select, say, the torso.
    • Check the "Base Color" 'menu' (the arrow icon); in specific: click browse and make sure to copy the folder where the texture(s) are located.
    • Also check what texture the torso is actually using (in my example: "Sukai8TorsoD_1002.jpg").
    • GoZ the figure over to ZBrush, make sure not to use the current resolution, but do export with deformations.
    • Within ZBrush draw the figure ("tool"), and enable Edit mode.
    • Check the subtool section and you'll notice that you got the base figure and the eyebrows.
    • Now, expand "Polygroups" in the Tool palette, use: "Auto groups with UV", it's also recommended to use "Merge similar groups" afterwards.
    • Press Shift-F and notice how the colors roughly match the surfaces in Daz Studio?
    • Press control-shift and while keeping this pressed click on the torso, notice how everything else disappears?
      • This may be a good time to hide the eyebrows subtool, that can get annoying right now.
    • Now expand the Texture section within the Tool palette, click the map and then use "Import" in the lightbox (browser).
    • Point to the right folder, select the torso texture and either click load or double click.
    • You'll notice your mesh to get darker, but it's still hard to see.
    • Press Shift-F to disable the polyframe, then click the main material selection and switch from Red Wax to PolySkin.
    • Now you should see a rough representation of your Genesis figure, ready for editing.

    Just make sure to re-enable the eyebrows subtool if you have hidden it before, and also press control-shift and then click somewhere outside the mesh to unhide the rest of the polygroups (you may want to disable the display of the texure afterwards because that's going to look horrid).

    After that you can GoZ your changes back into Daz Studio.

    Hope this can help, this is roughly how I'm using ZBrush to edit my Genesis figures.

    You only see the morphs for nipples because G9 loads with SubD by default.  Set it to base, they'll be completely gone. 

    ETA: Normally I just use GoZ to send it over and back.  I normally haven't found the lack of textures to be an issue for making morphs.

    Post edited by Gator on
Sign In or Register to comment.