Weird Texture Issue with Topmodel Updo Hair and OOT Hairblending 2.0 for Genesis 3 Female(s)
 Cyonix
Posts: 212
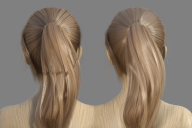
I've recently encountered a frustrating texture isue with the Topmodel Updo Hair and OOT Hairblending 2.0 for Genesis 3 Female(s). I use this hairstyle for one of my recurring characters and, to make things easier on myself, saved the hairstyle (with textures, shaping, etc) as a wearable file. No problems there....until recently, when I discovered that every time I load the preset file, the hairstyle loads up looking like the one on the left in the attached picture below (you can see some odd transparency issues, especially in the ponytail). Fortunately, I also have a separate material preset saved for the hair, and applying it changes the hair's appearance to the one on the right (how it's supposed to look).
Unfortunately, everything I've tried to permanently fix the issue doesn't seem to be working. I tried saving out the corrected hairstyle as a separate wearable file, but whenever I load it, it looks just like the one on the left (the wrong one) even though it didn't look like that when I saved the file. I even tried loading a fresh copy of the hair (not parented or fitted to any figure), applied the material file, verified that the hair's appearance matched the one on the right (the correct one) and saved it out as a separate file....but again, the hair looks just like the wrong one when loaded. I've selected both the wrong and right hairstyles and compared the surface setttings to see if something didn't match up, but they appear to be identical (I even checked the hidden properties, just to be sure....everything's the same). Honestly, I don't know what to do to permanently fix this and I really need it fixed so any suggestions or ideas would be greatly appreciated!


Comments
I've had a go at this and I cannot replicate your issue. I dragged our old G3 drive out from its dusty corner and fired it up: Updo hair on G3 - saved as a wearable and restored perfectly with a hair blending material. Base G8 - hair fitted from G3 wearable with no issues. G9 - hair fitted from G3 wearable with no problems. G3 hair saved as G8 wearable - same on all generations. Studio 4.21.0.5.
If it worked before and now it doesn't this, logically, suggests something has changed in your library that is causing it. I have seen hairs that happily use HD morphs from characters and cause odd geometry effects until that morph is dialled out but nothing that would affect textures.
I'm not sure if this is allowed or not, as I don't know what data is saved with wearables, but I'm happy to send you my .duf wearable and you can see if the issue persists. I suspect it will.
Honestly, I'm still at a loss here. I've tried uninstalling and reinstalling the product (and the texture expansion pack); I've tried loading a fresh copy of the hair from Smart Content that was NOT fit or parented to any figure, but the issue still persists every time I save the hair out as a separate file and reload it....I really have no idea WHY this is suddenly an issue (I use this hair for a recurring character, and I wasn't having any issues until recently...)
Have you tried clearing the DSON cache? (Edit -> Preferences or F2, on the General tab -> DSON Cache files -> Clear...) If it is still in the cache, Studio will use that version. Clearing it will force a fresh load from the files.
Just tried clearing the cache (and temporary files) but the issue STILL persists...
If you save it with a different colour, does it do the same? Or Hairblending options? Note that Hairblending 2.0 shaders are shared between all OOT hairs that use it. You should only have the one "[YourLibrary]\data\outoftouch\OOT Hairblending 2\OOT Hairblending 2 Hair\OOT Hairblending Hair.dsf" file in your library if you install with DIM. Not sure what happens with Connect.
Just tried saving out a fresh copy of the hair in a few different colors, same result. I checked in the folder you mentioned and everything looks the same as the way you described it (so only one .dsf file). I've even loaded a few other OOT hairs I have saved out for other characters and they don't appear to be affected the way this one is....is there any way I can update just the .dsf file (as mentioned, I've already uninstalled and reinstalled the affected hair; however, I don't think the shared .dsf file was updated as the modified date is from earlier this year and not from a day or two ago)?
That's right, OOT updated her Hairblending shader in January, so the shaders work fine now. I tested the hair and could not reproduce your issue either. If you just use General Release, suggest you try this hair in Public Build, see if there's any problem...
Um...I'm not exactly sure what you mean by "General Release" and "Public Build"...
Ah... yes, Daz Studio Pro has two versions
- General Release, an official version (stable version) - https://www.daz3d.com/forums/discussion/595931/daz-studio-4-21-0-x-pro-general-release/p1
- Public Build, a Beta version (with new or enhanced function, and some bugs have been fixed...) - https://www.daz3d.com/forums/discussion/601796/daz-studio-pro-beta-version-4-21-1-48-updated/p1
It's a best practice for most of the users to install these 2 versions. You may place an order of Beta version first (Free) - https://www.daz3d.com/daz-studio-beta, then have it installed with Install Manager.
Just tried testing things in the Beta (both my saved files and a fresh copy of the hair), still getting the same results
Possible to attach your scene file in here?
Here you go, this is a fresh (not fitted to a figure) copy of the hair saved out as a scene subset; I've already loaded it into Studio on my end and can confirm that the issue is occuring when I load the file (again, this is despite the fact that the hair looks correct when I saved the file).
Yeah, I saw the issue... I presume that the preset might've been wrongly applied. Pls follow the SS as below, see if you can get the correct result...
I'm pretty sure I've done this already, but just to be sure, I'll try it again (with a step-by-step breakdown of what I'm doing):
Also note that the issue is affecting EVERY hair surface, not just the two that were highlighted in your screenshot (look back at the comparison renders in the first post, the entire hair looks wrong, not just the two surfaces that were highlighted in your screenshot)
I also performed the exact same steps on another OOT hair that uses the same material setup (Linda Ponytail Hair) and everything worked correctly even after saving it out and merging the saved file into a scene, so whatever's causing the problem seems to be isolated to the Topmodel Hair...
Faint...just check my steps and result first : https://mega.nz/file/WXwimTbK#XTgN6Jea0citxJ-uEjEDtk1qjybzuOc-IcmQuSaA3is
while I'm thinking...
@crosswind
When I load both screen shots of your fix into separate browser tabs and switch between them quickly.
I see "translucency weight" and "share glossy inputs" changing. The fixed one has different translucency settings. So I'm inclined to think the "back" surface translucency is the problem.
I'll check if I have this hair. I have several OOT hairs.
edit: No, I don't have this hair. But the longer I look at the screen shots the more convinced I am that the translucency settings are the culprit here.
Actually I've checked the params. and noticed that as well, but they still have the same values... just the sliders seemed changed a bit. I wonder how could that be... Pls help to double-check if you have the hair .
And I almost tweaked all the values of each 'key slot' on the surfaces of the 'problematic hair', still failed to make any change...
The different look (and apparent limits) of the two versions indicate that there is data coming from different sources. The sliders are defined in the shader itself, and should not change just because you alter the value. Examine the control and its source by clicking the Properties gear at the right of the control. In the Asset tab, there is info about the file path. Click the ellipsis at the far right to see exaclty where the shader is located. Do this for both the good and the bad and see if there are any differences.
I'm just not able to reproduce this with any of the OOT hairs I have in neither the beta nor the current release.
Sorry I can't help more with testing.
Just tried checking this with both a 'good' and 'bad' copy of the hair in the scene....everything (shader location, values, etc) about the two hairs is 100% identical...except how they look, of course....
Well, the new definition is coming from somewhere. It could be in the saved scene or scene subset.
I recall another situation where the original shader crashed Studio, and one user could not stop it even after installing the new version. Turns out there was an older version that had been installed through Connect, but was not updated because the user was, um-m, disappointed (yeah, that's it) with Connect and vowed to never use it again. Unfortunately, Connect versions get priority, no matter what is installed with DIM. You don't have any Hairblending products installed with DIM, perhaps?
Nope, everything I have installed came through DazCentral
Sorry, I meant installed with Connect, but Central uses the same protocols as DIM, so that's not a problem.
Check your saved files for any declarations or definitions that match the suspicious ones shown in the surfaces tab. It could be that something is being redefined in the saved files that does not match the original (hence the difference in appearance) that might also be affecting the shader functionality. It might be a little obscure, but we're reaching, here.
Ok, how would I check for something like that?
Maybe you try to load the Subset I saved, see if it OK or not... as attached.
Keywords, like from the Controller label. It will be associated with a bunch of declarations. Maybe it can be traced back to something relevant.
Well, this is interesting...the Scene Subset you attached works perfectly! I've saved it out as both a Wearable preset and as part of an actual Scene, and both load back into Studio without any issues! So...what exactly did you do to fix the problem?
Nothing special but just the standard funtion - File - Save as - Scene Subset... as what I showed you in the video above