dForce is Awesome!
 Dartanbeck
Posts: 21,723
 Like any physics simulator, dForce might take a little practice to get used to.
For a quicker way of learning, try getting some dForce-Ready products and look at everything they come with: perhaps a pdf manual, video, simulation settings preset(s), surface material preset(s) and weight maps.
These PA-prepared settings and resources are a gift. Take advantage of them.
For that last one: Weight Maps, open the hierarchy of the item. If there's still a weight map node attached, it'll show at that highest level. If not, select the main item and go: Create > New dForce Weight Map Node.
Now select the weight map tool. If the item has a weight map, you'll see colors. Red means full-on simulation, gray mean zero simulation and it will retain its shape and position, and the various other colors, blue and yellow will be somewhere in between.
So if the item isn't draping or moving the way you expected, this is a good place to check first.
If you wish to change the weight mapping, just use the weight map tool with the weight map node selected. If you need to make one and there weren't any weight maps applied, you'll need to make a new map. That's easy too. Select the weight map node and, with the weight map tool selected go to Tool settings. I have mine docked since I use it all the time. But it's easy enough to open and close too, using Window > Panes > Tool Settings. If you don't use this all the time, just open it that way and close it when you're done.
The bottom section of tool settings for the weight map brush, click Add Map on the far right. The whole thing should now be red. Alt + Paint to remove red through blue and yellow and finally to gray - going from full-on (100% weighted for physics simulation) through completely rigid (0% simulation weight) which will be gray.
Playing around with just this can really take you places, but it's not always the best answer. So let's move on to the others.
PDF Manual and/or Video
If the item comes with either or both of these, do yourself a favor and check them out. Don't just skim either - unless you're already an expert. Just comb through and see what the author has to say. I know that, in Linday's case, a whole lot of testing and research has gone into these products and the provided information is trul invaluable and will help you out with Much More than just this product. These things give an overall knowledge of how certain settings and adjustments work toward getting the results you're looking for.
Settings Presets
Some items give presets for the behavior you want from the product you're using. Check out the surface materials and look at what the dForce Material Settings are before you click a preset. Now click the preset and check out the changes. The same applies for Simulation Settings. If you don't actually want the changes, simply hold Alt and click the values to bring them back to default, which can often result in a fast simulation process - but not always.
Before long, depending on how much we practice, we can go in and set our own preferred setting out of our own muscle-memory and get darn close to the effect we're looking for. If not, we know what to adjust to fix it. And in those times that we're just stuck and don't know what to do next, try the default settings or use a preset. If it's a custom conversion to dForce, and you're really stuck, well... come on in here and ask!
I never really wanted to do physics simulations. For more than eight years I just ignored it, using the Hexagon Bridge to make my own movement morphs to animate motion by hand. So I have a decent understanding if reluctance has been keeping you from using it.
Now I use dForce and VWD all the time - All The Time!
Sometimes I'm only using dForce for the first few frames of an animation, just to get a better fit with the clothes, and then let auto-follow do the rest. Then I freeze that and simulate more stuff. Rosie 7 is often getting at least three or four simulations done to her each animation scene. Sometimes it's even more. So much for not wanting to do simulations! I really like the end results, and I'm still relatively new to dForce. But it's a pretty darned friendly simulator to get used to - and there's a lot of help available for it since it's included in an amazing Free app: Daz Studio.
Daz 3d's Help Center has some great tips as well!


Comments
Those of you who have my Dynamic Character Animation in Daz Studio Course will know about the 30 frame buffer zone I use for All of my character animations.
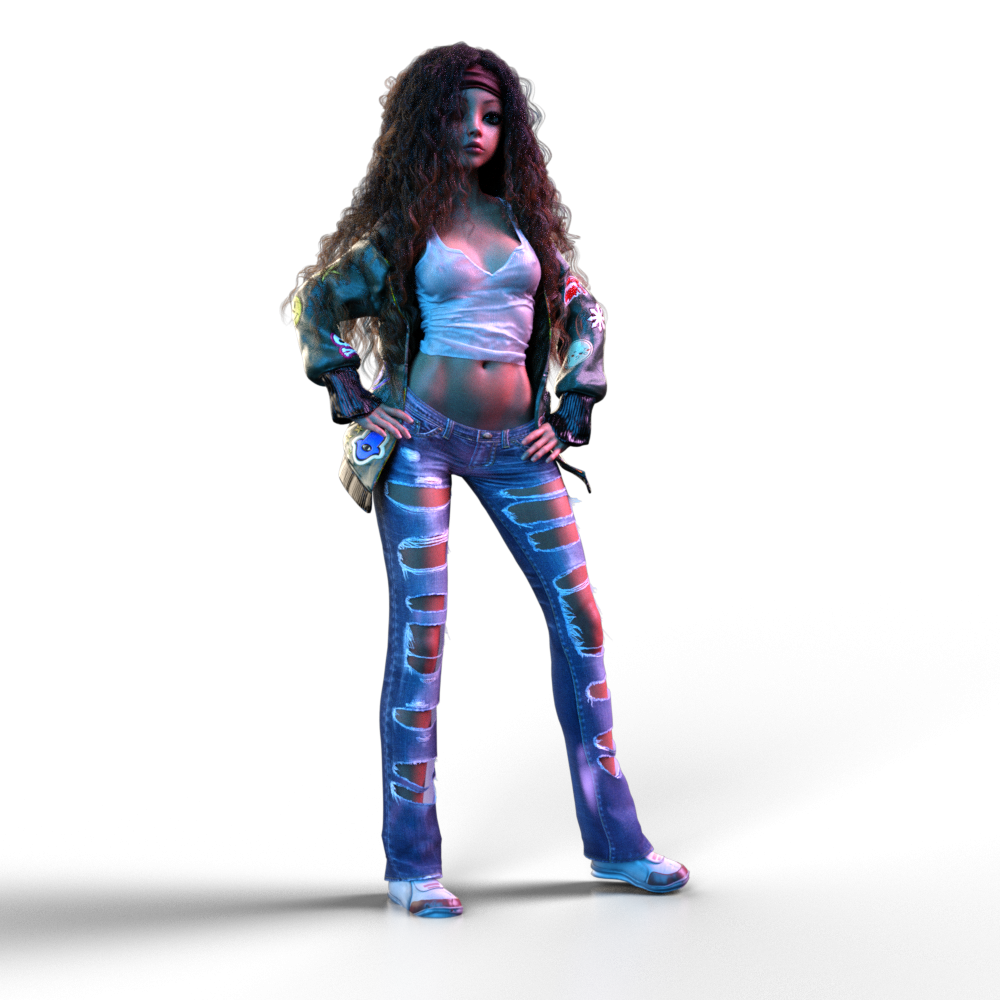
Using the image above as an example (click for larger) the first simulation I performed was the Tank Top shirt (Linday's Car Wash Girls), in which I only ran dForce through frame 20 or so to tighten the damp shirt to her.
The pants (smay's Torn Clothes) are next. If they blow up because the legs get too close to each other, I use "Legs Spread" as a temporary pose on the legs to get through the simulation, then selct the Legs Spread key frame and get rid of them. That's something I really love about dForce - we can do things like that and the rigging will work with the simulated cloth as long as we don't overdo it.
Then comes the jacket, which is actually hanging off her shoulders. dForce Rebel Yell (Joe Quick) is awesome! For a rather fast motion that she was doing, it took a bit of practice and test renders to get the behavior that looked best, and each time was fun! :)
The jeans had to come first because the jacket has to collide with them. The shirt is kept from simulation visibility unless a need arises otherwise - which is very rare.
The Classic Long and Curly Hair with dForce (Linday) was last, as it needs to collide against the jacket.
Now, for this example with an unfinished WIP of Rosie 9, I worked Compression and Expansion in the dForce surface materials of each layer of hair - making the back longer and bigger and some of the upper layers more constricted to introduce more curl and a bit of messy. Worked great!
Additionally, I'll change (for example) the sleeves of the jacket's dForce surface material to have higher friction so the hair likes to stick to it a bit more than default. It seems very common for many folks - especially folks having issues with things blowing up, to go the other way and reduce the friction value to its lowest state. I like using friction and experimenting with different values to really get interesting with my simulations - and it's been working really well to my eye.
All of the products mentioned in the above example are a real dream to work with in dForce, by the way, as are many others.
Believe it or not, this shirt is actually from 3D Universe's Willow for Genesis 3 Female
I added Fit Control and had to do some clever mesh work to get it working in dForce.
Sixus 1's Evade finishes out the costume.
The final wearable preset is a wonderful 'load n' go' dForce experience, as are most of my dForce custom wearables.
...and this time Rosie's sporting the newer Linday Wet Style Curly Hair with dForce, which is yet another Home Run by Linday! I've been having such a great time with every Linday I buy, I've taken it upon myself to start collecting the entire store. In the recent sale event and Flash Sales, I've got a pretty decent haul going!!!
I really like Rosie 7!
First I couldn't agree more, then I'm gonna read what you wrote above ....

I think you'll agree that this is some pretty practical information for anyone new or having troubles with dForce.
If not, I'm Always happy to be corrected by Crosswind! Always!
...and I still Love that Avatar! The colors, the style of that feathered hair... Bravo!
You meant Josie 7 ... ?
100% agreed with no doubt. You've named them all well.
I mean Rosie 7!
I have a nice little page regarding how she's made. Still a WIP, but has some cool info!
It took a lot of work and time to create her - and she's worth every bit of it!
Haha ~~ sorry! I was lost....
sigh
if only we could bake Dforce to keyframes along the timeline like Optitex
I used compare on saved uncompressed scenes in Notepad++ and the vertex information is there after simulation
Dforce2morph can only destructively do one frame, what's needed is a way to queue up reloading the scene in one frame increments and saving a morph each frame, preferably in the scene NOT the data folder for the clothing
or alternatively a cache of obj exports (Sagan can do this) that can be loaded into morphloader and keyframed along the timeline
vertex animation
there is a script for Marvellous Designer that does this but it doesn't work on other obj series
yes I can load all the obj's into morphloader but that's a lot of morphs to manually keyframe 100% then 0 each preceding and subsequent frames
also the issue of just exporting the base resolution clothing so vertex order matches
I agree with all of this - at least I think I do but I might not really understand some of it.
Anyhow, my own oft-repeated request/wish is for saving out individual frames from the timeline, whether they be dForce or animation frames. I had to do this just a few minutes ago and my cumbersome method is to copy the keyframe and paste it into frame 0 (copy/paste in the DAZ Studio timeline is a challenge in itself). Then I deleted all frames after frame 0 and save the scene with only that single frame. Then I re-open that scene and add a required number of frames to the timeline (if necessary).