Toon Generation WIP

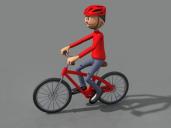
Here is something that I am working on. It will be a full set for the Toon Generation. I still have to create a bodysuit, backpack and goggles. And perhaps some gloves.
I have the bike and helmet rigged. But I could need some help with this. Something has changed in Studio, over the past version, when it comes to rigging in .cr2 format. (or it is just me that don't do it that often )
I wasn't even able to get the colors right.
So I need someone with experience to test this for me. It will eventually be a freebie.
The bike is rigged with the handlebar, pedals and wheels.
I could also need some basic poses for this set. That part is something that I have no clue about.
If anyone can help, please PM me ..

Daz 3D is part of 
Connect
DAZ Productions, Inc.
7533 S Center View Ct #4664
West Jordan, UT 84084
Licensing Agreement | Terms of Service | Privacy Policy | EULA
© 2025 Daz Productions Inc. All Rights Reserved.
Comments
Sorry, I don't have this figure so not offering to test.
For rigging, yes a major change was made when it comes to clothing:
As I recall ... rigging for a .cr2 clothing item is a little more involved than for a .cr2 prop.
Clothing item must be 'all one mesh' with EACH bone area its OWN shading domain/material.
This is then imported into D/S.
Then one uses the content creation tools to make "groups" of each of those Shading domains/materials.
Then one can change the Shading domains/materials to preferred mesh areas and names.
Then one exports out that .obj file to the Runtime > Geometries > wherever you put it folder.
Then one uses the Figure set up tab to rig the clothing; loading the main person figure in the scene and copying over those bones to the tab. Then right-click add the geometry for the clothing item and slide it over. Leave the old one there so the numbers make sense. Further edit out any unnecessary bones. Ghost bones are not a good idea AFAIK. Then check that it says for "legacy" [or whatever it's called] and check a little box at the bottom to replace the figure in the scene. Create.
Save the .cr2 via File > Export > .cr2 ...
Then one can use the Joint Editor button to further edit the bones, i.e. adjust the twist/bend/side to side; rename the dials if so desired ... apply the desired textures image [must FIRST be in the Runtime > textures > wherever you put them folder] ... and export out the final .cr2 file.
Now, IF 'any' morphs are required ... load the main figure, load the new clothing piece, morph the figure ... send it all over to your modeler, morph the clothing, send that back to D/S to the clothing piece to create the morph. Each time a set of morphs is "done" [i.e. before you delete the clothing from the scene or close the program], be sure to export out again the new .cr2 file. IF desired, if working in "parts", testing etc ... one could export out under new names.
The main idea is that we do not have inj/rem morphs nor a script to put them in ... so the morphs have to be made and then saved into the .cr2 file via export to .cr2.
It is possible that some have figured out ... but I have yet to discover said info ... something further about saving morphs into .c2 files HOWEVER the expected latest and greatest D/S [when it's released] does not read those further options AFAIK so ... zee ol' morph and export to .cr2 file is the way to go.
.cr2 files created in D/S4.x do NOT necessarily work as desired in Poser dot anything.
.cr2 files created in D/S3 tend to work as expected in Poser.
... and save to .cr2 Poser 9 as the earliest. Poser has made changes too ;-)