How to get soft shadows on models? (Is a bit harsher shadows a bad thing?)
I heard some knowledgeable individuals point out that hard shadows on your female models are something you need to avoid, so I'm trying my best to steer clear of them for the most part. In any case, does anyone have tips on how to get softer shadows without making the model a bit washed out?
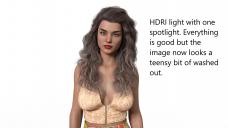
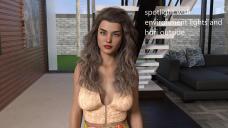
* HDRI light, an emissive plain in the ceiling, or environmental lights do make shadows on the model's face soft, but at the same time, the model gets a kind of washed-up vibe.
See picture examples 1 and 4
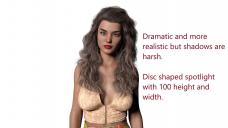
* You can increase the width and height of the spotlight to 100 and change its shape to a disc for a bit of soft shadowing, but still, that won't be enough in some situations.
Picture Example 2
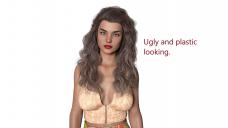
*You can give a spot light directly into the model's face, but that will completely remove shadows and give the model a plastic, ugly look, so once again, it's not helpful.
Picture Example 3
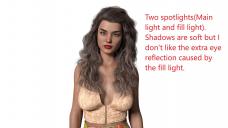
*The 3-point light system is very helpful for portrait lightning with soft shadows, but two spotlights on the same model give messed-up eye reflection.
Picture Example 5
Any help will be greatly appreciated.






Comments
I think you're at a point where you're just splitting hairs perhaps. There's only so much you can do with light sources if the rest isn't keeping up, but I also think that everybody has a bit of a different definition of the plastic look, so it's a bit hard to guess what you're trying to achieve without seeing some examples perhaps.
To me personally, all renders look more or less the same, and the harshness of the shadows looks just fine. The light angle changes on #2, but quality and style is otherwise the same and equally plastic as the other renders.
I would say your results fall well within the style of the background in render #4, which is quite plastic too. It's hard to escape the plastic look when everything has a soft, consistent shine on it.
That aside, how you want to light things will depend on the setting, the environment they need to fit in, and the style you're going for. There are really no wrong shadows, harsh or not, if they fit the light source, mood and setting.
Rather than trying to reach perfection with the light setup alone, I'd probably just get it to being 70% there, get the angles and tones you want for the light and shadows and adjust the rest through the tone mapping options.
As mentioned above, the surface properties play almost a bigger role into the plastic effect, so often, getting rid of the plastic effect involves tweaking surfaces and character skins to not have plastic properties, usually having more contrast or noise in the gloss/roughness maps, adding one of those maps as a soft bumpmap too if needed and adjusting skin tones and SSS to be more natural if they look too much like an action figure skin tone.
Either way, for what you seem to be looking for, the tone mapping options may give you the extra control you're looking for. Setting the Pixel filter radius (default 1.50) to something lower, like 0.75 will also render sharper by default, losing less of that soft roughness noise that seem to be there.
Hope that helps, I'm no expert either.
Good experiments ! There's no problem that you use mesh lights (increased Height + Width values) to get soft shadows, and the pattern of 3 point light + ambient light is also a good choice. You can play with it by using various 'combos' to make lots of dramatic and subtle changes.
As for harsh shadows, it's never a bad thing and we used a lot patterns to make it in photo studio. And we should not set an 'absolute rule' for it. It better be subject to the genre / style of your art work, the visual effect you wanna get, the theme the vibe you wanna show to the audience, so on and so forth.
2 examples of harsh shadows from my renders. 1) A lingerie model with Rembrandt lighting pattern, with harsh shadow on the face and upper body to show an extravagant and enchanting atmosphere, a high contrast. 2) A pure sunlight from outside. Sunlight is parallel light, so there're harsh shadows in the real world. It's very natural.
So don't limit your creativity to some 'rules'...
I'm still struggling with this topic myself, but for Example 5, you could easily remove the second eye reflection with a bit of postwork in GIMP / Affinity Photo / Photoshop / etc and I'm sure you could improve or fix plenty of other things in postwork too.
Nice examples there!
Thank you !!

Yup, that's the quickest way we frequently use, however, in quite a lot cases, multiple eyes catch light are natural and sometimes even pretty charming... Anyway it's always up to you to keep or eliminate them depending on the cases...
Are there any specific render settings that help in this regard?
Not that I know of. If the spotlight doesn't have an option to reduce shadow intensity or turn off reflection, then you won't find it anywhere, I'm afraid.
So unless some hero comes forth with a custom spotlight product with those settings, post-work and real-life techniques are the only way to go.
Greedy Green IRAY tries to imitate real life, even though more than 90% of people here are not professional photographers.
So I guess post work is the quickest way for a situation like picture 5. At least it's good to know that there isn't any other short cuts.
That was really helpful. Thanks crosswind.
You're welcome and Happy Rendering !