Max -> Daz : Patterns when Shading
 Scavenger
Posts: 2,674
So, I'm working on converting an object in .max to Daz usage. Using 3DS Max (grabed it for a 30 day trial), I opened the file, then exported it to obj (after FBX gave me bad results). Brought it into Daz got it scaled right.
It only had 2 surfaces...a couple of screws...and everything else. Not sure why the screws got to be seperate. Anyhow, I went into Geometry editor and went about using the Face Groups to define the different surfaces.
All good so far.
The object (exercise bike) has a display screen, so I used the UV view to get a UV Map and made an image map for the screen. works as it should (well, it's mirrored, but flipping in photoshop takes care of that).
I use PD's free leather shader for iray to make the seat look good. Then I go to the shell around the wheel.
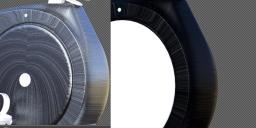
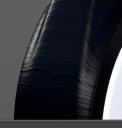
I try different shaders on it, and it gives me...wavy patterns. (see pics 1) . I move the camera to see if it's a light issue (using iray's default sun) pic 2...still there.
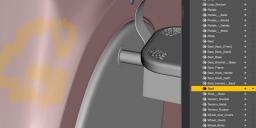
Is thhis caused because the shell is made up of a ridiculous number of polygons? (28k!!!) pic 3
The seat, seen in the right half of pic 1 is made of 3.5k, and doesn't have this...
SO, what's causing it, how can I fix it? Would using a UV map to make an image for it take care of it? But would that wreck using neat shaders? Would reducing the polygons do it? How would I do that? Can I do that?




Comments
Looks almost what you get with two layers of mesh with virtually no offset...make sure all duplicate vertices are collapsed/removed before exporting to obj format.
So, you're saying go back to 3Ds Max, read the menus on the screen....what part of Mac user in my sig do you not get?
Ugh, the thought of redoing the surfaces fills me with...ennui...darn pharmacologicals.
------EDIT-----
Ok, went back, and didn't see anything about duplicate Vertices...
I did find export presets for Daz and Poser... Poser seemd to give me the same model as before. Daz seems to give me 2x the polygons I had which seems...bad.
any suggestions for settings here?
I'm not sure...one thing that could help is to run the obj through this...
http://www.sharecg.com/v/47407/favorite/10/Software-and-Tools/PropViewer-3.2
It's a simple viewer and editor, but you can weld vertices and remove duplicate faces with it.
Something to think about; how clean and regular is the UVMap on those parts of the mesh? I've seen something like that distortion on much-converted models where a tiny area of the texture is mapped to a much larger or nowhere-near-the-same-shape area of the UVMap, or vice versa. Unfortunately, I think the easiest way (and it isn't, very) to fix this is to take a crowbar to the UVMap.
This is the uv map for that section, so I guess that means..it doesn't have one?
Well tried this.. hit various buttons getting some messages about removing faces and no faces and so on, but didn't wind up do any good.
I tried seperating the top of the shell from the sides, but that didn't help either.
I'll fiddle around a bit more trying to figure something out, then I might need to punt and just try to find something that lessens the appearance.
Probably going to need to UV map it, too...
Could you explain more here?
If all you saw when you did the UV view was a single poly/blank square, there is a good chance that it isn't UV unwrapped/mapped. So that will need to be done, in addition to any geometry reductions/fixes.
Some bits have maps with stuff..so might some parts have maps, and others don't?
Is making a big map something that 3dsmax can do? (To the batgoogle, robin!)