Oso Robot Servant for Genesis 9 - Faceplate and Screen Materials
 jjoyner
Posts: 633
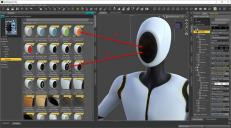
@Oso3D - I snagged new release Oso Robot Servant for Genesis 9 yesterday and began playing with it this afternoon. For the life of me though, I cannot figure out how to get the screen and faceplate materials to apply. I tried selecting the entire figure and applying those materials, selecting the head entire figure and applying those materials, selecting the screen and applying those materials, and selecting the faceplate and applying those materials. No success in any case. How do I do this? Thanks.


Oso Robot Servant for Genesis 9.jpg
1000 x 554 - 189K
Post edited by jjoyner on


Comments
I've just tried, and they seem to work. However - be warned some of the effects do NOT show up in the preview pane, unless you select Iray as the 'display mode' as opposed to, say, Texture Shaded, Lit Wireframe, etc.
Thanks for your reply. I should have added in my original post that my viewport was in Iray preview mode and that I'm using Daz Studio 4.21 althought I have 4.22 Beta installed as well. I even rendered in Iray to see if anything appeared in the render that was not in the preview. What steps did you take to get the screens and faceplate materials to apply?
I'm trying to remember, but I tred a few things before remembering some stuff does not show in viewport, but I think it did obvious changes after using the Oso Robot Screen All Default under the Materials> Iray> Wardrobe (in smart content). Oh, I think it was with the Oso Robot Head Helmet figure selected.
Yeah, that seems to be it. Choose the Oso Robot Head Helmet, then Smart Content -> Materials > IRay > Wardrobe > Oso Robot Screen All Default and then choose a colour and then the symbol etc.
I stumbled across that combo myself but forgot what exact order I did things in.
Hey there!
The Helmet has the surfaces: Base (part near the neck), Faceplate, Helmet, and Screen. The Faceplate is the oval shape, Screen is a surface that floats behind it (though you can move it back and forth in Pose Control).
The Faceplate is opaque by default. If you want a glow to show up, you need to apply a different Faceplate material (Volume Basic is nice, Clear Fast Render is decent and, well, faster).
Edit (because it's been a bit since I worked on this)
Once you've changed Faceplate, click the first Screen preset ( Oso Robot Servant Screen All Default )
That will set the screen to, well, default settings for the light matrix, brightness, color, etc. Then you can select symbols or change other presets.
Sorry for the confusion!
@SimonJM, @Korvar, @Oso3D,
Thanks for your guidance. I don't know that I would have quickly figured out a sequence of steps to get the color and image presets to work for the faceplate and screen. I'll try it all tomorrow.
It's not just the faceplate and screen materials that are difficult to figure out the right order to apply what where. There are certain other materials that when I apply them like the dirt materials or shaders I get the following result. This product coule use a little bit of an instruction manual on how to put things together if that is indeed what is causing the issues. Wow that image is bigger than I thought it would be I'll have to size down in the future.
It took me a while to figure that I needed to add one or both shell accessory items before applying some of the materials but I managed that. It was the faceplate and screen hoops that I couldn't figure out. I haven't tried the advice given yet, but I'm hoping that it will go smoothly when I do.
UPDATE - Got it working now.
Okay I guess i'll just keep trying combinations until I get it right. I couldn't even find a Readme for the product though. I still thing a few guidelines would be nice.
If you are looking in Smart Content then I would try right-clicking on one of the files Show Asset In>Content Library>Mapped (or Virtual) Folder as the arrangement of files on disc often gives the order of application, which gets lost in categorisation.
I think I am discovering what the issue is. Is the product supposed to include a geometry shell? I see that there are folders in the content library that are labeled Geometry Shell Grime and Geometry Shell Skin but no geometry shell is included to apply these too. I applied my own geometry shell and they seemed to work pretty well when applied to that geometry shell. If there is supposed to be a basic geometry shell included I can't find one and no clue is given in Smart Content that anything needed to be applied to a geometry shell. The only way I discovered this was by going to the Content Library as Richard said and there I saw they two folders labeled Geometry Shell Grime and Geometry Shell Skin. This is a neat figure with asome good options but you are left to learn everything about it on your own. Needs just a little bit of documentation explaining how to apply the various surfaces and what to apply them to.
Is there no Wearables preset that loads the shells and other parts?
I highly suggest navigating to the content folder People/Genesis 9/Characters/Oso3D/Oso Robot Servant
Stuff is more organized there.
Oso Robot Servant has a preset to add an Attachment ' Oso Robot Servant Add Grime Layer '
To change options, you need to select the result, which is:
Oso Robot Servant
> Oso Robot Servant Grime Layer
If you are using a helmet, select the helmet and click the attachment preset again, and it'll make a shell on the helmet.
You can also add multiple grime layers to stack different effects, but you may want to rename them to keep them straight, and you may need to tweak their Mesh Offset parameters to avoid z-fighting (make sure they have slightly different values).
Yes, it's complex; it's part of the tradeoff for flexibility.
Complex is okay, as long as I can figure out how to do it. :)
I had seen the grime layer but it didn't seem to give the same result as when I just created a new geometry shell. I'll continue playing. Thanks for the guidance.
@Oso3D,
I agree with others that you’ve developed a great product but it does need a brief explanation to help the user. A short readme file or tip file in Smart Content advising the user to use the Content Library and the sequence of steps needed to apply some of the materials would be most helpful. When I got stuck yesterday after installing the product, I remembered that sometimes the Content Library contains an organization that gets lost in Smart Content. That helped me to see that the two geoshells where needed for some materials. I still did not see my way forward on how to apply the faceplate and screen materials until I started this thread and asked.
I've added a Helmet material preset 'Oso Robot Servant Helmet Default With Screen Image' to make it easier to jump to a glowing helmet screen, which can then be tweaked.
Hope that makes things a bit more sensible!
That makes for an easier alternative start. Thanks.