Iray Quality Problems!
 Michael L Rogers
Posts: 141
Michael L Rogers
Posts: 141
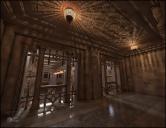
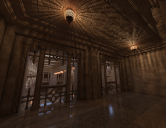
Could someone tell me why I'm getting this gritty look to my iray images when even using a product preset lighting like in the Iray Asian Court 3. Here is the product image and then here is mine. I made sure everything was set to defult in Iray before bringing this scene in with their iray preset lighting. Is there something I need to add, or turn on or off? What did I miss? How do I get my images to look that clear and not gritty?
I'm using a new iMac and Daz Studio Pro 4.9. But I've been creating with DS for 4 years now and have done somewhat well with 3Dlight. http://www.daz3d.com/gallery/users/1179
Would love to get this one problem solved.
Thanks for any help at all.
Daz 3D is part of 
Connect
DAZ Productions, Inc.
7533 S Center View Ct #4664
West Jordan, UT 84084
Licensing Agreement | Terms of Service | Privacy Policy | EULA
© 2025 Daz Productions Inc. All Rights Reserved.
Comments
Here's the readme: http://docs.daz3d.com/doku.php/public/read_me/index/30749/start
Did you load the full light preset along with the full preset scene?
Jack Tomalin is usually very helpful so maybe you can contact him here.
It looks as if you need to let it render for longer
Yeah, I see nothing new to do in the "read me" that I haven't already done, thanks. I wonder how I would render it longer? Anything to get it to do better, lol.
Ok, here is what I found out. I had to do some digging in the Daz Forum on "Iray image graininess". Seems to happen with darker images.
Try adjusting tone mapping settings: A higher ISO, a lower f/stop and a lower shutter speed number should improve it. You can also increase the cm^2 lumiance setting. Also you can keep the samples at default and first try the render quality setting, which is defaulted to 1.00, try 2.00 If it is still noisy increase samples and time out setting and switch on Noise filter. You might want to check the light map setting and ramp it up to 2048 or something like that. Doesn't hurt to give it a try.
All of those are potentially helpful except the last bit. If you even have an HDRI in that set... which I don't think it does. I think 2048 is overkill. And its not really going to help with the problem.
Go to your Genesis 3 Starter Essentials and apply the Advanced Render Settings. Try starting from there (though I think the degain filter just takes up cycles with no real benefit).
If you are using preset lights, you don't want to change the Tone Mapping settings unless the lights came with specific Tone Mapping.
The issue is that it did not render long enough. Be prepared for a long wait.
With these type of scenes, I usually crank up the lights and render it nice and bright, then adjust it in post work with levels. It is a lot quicker.
Agreed. Added lights will simply alter the scene. To extend render time go to the render settings tab and then to Progressive Rending. Increasing either or both of max time and max samples will increase the time. I also always make sure that I have increased rendering converged ration to 99% (and no not 100 because there is no such thing to Iray and it will go woggly). You also can consider increasing the rendering quality to 2 or 3.
Note that the max time parameter is in seconds, so the default value comes out as two hours.
^^^^ This. Increasing the light output of the existing illumination is not the same as adding more light sources. It does not change the scene, as you can then compensate by adjusting tone mapping in a reciprocal fashion. This parallels physical scenes. Of course, you need to be mindful of keeping the balance in your light sources.
By increasing luminance output, the renderer has more rays to calculate, and therefore, all other things being equal (such as pattern noise, direct vs indirect sources, etc.) pixel converge can be achieved faster. Adjusting the tone mapping alone doesn't help you. That does't change the amount of light in the scene -- what Iray is actually rendering -- just how it's reproduced in the output.
Of the OP's scene, the bulk of the illumination is indirect, which Iray has problems with. Some things to try:
1. If using D|S 4.8, you can try the Architectural Sampler. It kicks in a biasing hint to better allow sources of indirect light. (It's so called because in architectural rendering, it's common to use exterior existing light to illuminate interiors.)
2. If using the latest build of D|S 4.9, you can try the new sky/light portal feature. This provides a more direct method of telling Iray where indirect light is coming from, and where it should go. Its use is fairly simple, but it takes some practice to get it right. You basically create a plane, place it where the light is coming from, then apply the portal surface. The plane becomes invisible, and while it doesn't itself emit light, it "channels" the light on the other side of the geometry to the camera side.
As nVidia notes in their docs aboout light portals, using them doesn't improve the render, just the render time. (But they also note they don't always help, and in some cases hinder, the render. You just have to experiment.)
And finally (to keep these issues separate), that floor isn't helping the speed of the render. It's both reflective and "noisy." Reflective surfaces always take longer in Iray to render, especially as it's set up to bounce trace ray paths "indefinitely." It's not really infinite, but there can be lots and lots of bounces. You can often help this along by changing the Max Path Length value from -1 ("infinite") to something like 5 or 6. You can even try lower numbers if there aren't human characters or other elements with complex shaders. (If you go too low with humans, things like the eyeballs will go black, or look very strange. This is because there are lots of reflected light paths within the varied surfaces of the eyeball.)
The floor has a rough texture to it. Pixel convergence takes longer with so-called high frequency textures. The mottle of the floor makes it look more real, but it can add to render time.
And finally, that ceiling, with all its fine filigree, isn't helping much either. The scene is nicely done, but has elements that will weigh in on render times. You can only do so much to fix this, such as increasing lumens from the existing lights, using the Arch filter, possibly adding a sky portal, and playing with surface reflection and bump. After you've done these fine-tuning tweaks, then you can be sure the render is taking the amount of time it needs to take to produce a good result.