UV Mapping: Unfolding gave distortions
 CrissieB
Posts: 195
CrissieB
Posts: 195
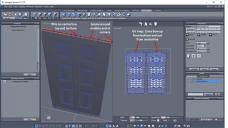
Having finally solved my odd normals problems - thank you, everyone who helped! - I moved on to UV mapping my six-panel door. I decided it would be easiest to work on a front/back map, so I put seams around the midline and at the corners. Following Roygee's advice in an older thread, I placed two pins on each face, on the centerline, one vertex in from the seam. The annotated screenshot shows where I placed seams, and pins. I tried several combinations of projection/pin axes, and the Z projection and U pinning axis gave the best result ...
... but it has distortions. Specifically, the horizontal lines bow up (increasingly) from the bottom to the top, and the vertical lines bow out (increasingly) from the centerline to the edges. If I were to use this for my UV map, a wood grain texture would look warped.
Is there an easier way to fix this than selecting each horizontal line (starting from the bottom) and using the scale tool to flatten it, then selecting each vertical line (starting from the center) and using the scale tool to flatten it?
Thank you all for your help!
Crissie
Daz 3D is part of 
Connect
DAZ Productions, Inc.
7533 S Center View Ct #4664
West Jordan, UT 84084
Licensing Agreement | Terms of Service | Privacy Policy | EULA
© 2025 Daz Productions Inc. All Rights Reserved.
Comments
Depending on how you plan to texture it, not much work may be necessary at all....I mean we're talking a door here ;) Personally I'd just select every face, go down to the bottom left to 'shading domains', hit 'new', select the new domain, then above it in the material bar, go to texture and select one, then just use the UV tools to adjust the orientiation/size/offset/etc. I don't use the DAZ renderer you use, but that may also have some texturing tools to allow you to easily slap on some textures.
In general, gonna be harder to UV things with huge amounts of faces when it really counts. That's typically why we try to keep things with as few faces as possible. Bad thing is it's hard to do things like tesselation after UV mapping, it will just remove it entirely.
This casing and door will be parts of a four-room Basement set that I hope to sell as a DAZ environment. The set will offer a variety of uses: the package will include shaders and some (see note below) props for: (1) family basement with rec room, computer/craft room, utility/laundry room, and lavatory; (2) private club with cardroom, sauna, coatroom, and lavatory; and, (3) apartment/condo fitness center with weight/cycling room, dance/yoga room, cubby-locker room, and lavatory. The dimensions of the casing match the doorways in the set's interior walls, and the dimensions of the door match standard building practices for interior doors.
I know how to create shading domains and add materials. Does that create a 'default' UV map as well?
My concern is that any texture (like a wood grain) should run along the length of each door 'beam'. I didn't model the door with actual beams, but I plan to select the faces that comprise the door's horizontal 'beams' -- top, eyeline, doorknob line, bottom -- dissociate their UVs, and rotate them to vertical. That ensures my (vertical) WoodGrain texture and bump maps will be projected up-and-down along the vertical beams and center panels, and left-and-right across the door's horizontal beams.
The casing is already UV mapped and has door-away and door-to shading domains and materials. Thus, users can choose a casing finish for each side of the wall. The door will have shading domains and materials for the front, back, and edge faces, as well as shading domains and materials for the front and rear panel faces and edges. Thus, users can set the entire door to a single finish (I've made DAZ Iray shader presets for both stained and painted wood) ... or different front and back finishes (perhaps stained on the front and painted on the back) ... or a very elegant door with contrast finishes on the panel faces and/or around the panel edges on the front and/or back sides.
So it's not "just a door." ;-)
+++++
Note: I don't plan to model basic furniture and other props that users can get for free at 3D sharing sites. I will model and include built-in props like this main room ceiling light fixture, a simpler ceiling light fixture for the other rooms, baseboards, chair rails, cornices, light switches, wall outlets, benches and steam rock box for the sauna, a mirrored wall for the dance/yoga room, and coatracks and cubby-lockers for the utility room. I'll also model the lavatory with a commode, TP roll, sink, mirror, towel rings, and a shower enclosure.
I don't have any 3D apps installed on this computer and can't demonstrate, so will try to expalin.
Projection mapping is used fo very simple shapes and can be likened to shining a light onto the object, using the various presets. This method doesn't use seams and pins. Unwrapping is used on more complex shapes, gives more control, but takes a bit more knowledge of techniques and imagination to apply. This method can be likened to unfolding a cardboard model to lay it out flat for painting.
If I was to unwrap this door, I would cut a seam around the outer edges of each side and one across one corner, No need for pins just yet. Then hit the the head icon to unwrap - This will give three islands; one for each side and one for the strip between them. The two sides should be flat and even, but the strip may be distorted. If so you can either put a seam across each corner, or pins at each end along the centre line. Try both methods to see which gives the best result for the method you want to use to texture it.
The advantage of having the strip separate from the main door islands is that you can give it a realistic grain pattern, which will be different from the front panels.
Hope I've managed to explain this without pics:)
A couple of basic tips for Hexagon's Unwrapping process:
Hexagon's Unwrapper works best on objects that are symmetrical. It does not like non-symmetrical objects. (Pins and Seems are there to help for that.) When planning the construction of an object, always take the UV Mapping of an object into consideration. (Either you or your texture artist will thank you for that. :) ) In some cases, you may wish to map symmetrical objects by themselves, because of this. Later, you can create a combined UVmap or use muliple maps, depending upon the resolution that is necessary for the object. (Note- This will mean, by necessity, that the object will not later be welded to others or that verts will be added/removed except in certain specific Hexagon-specific circumstances.) Hexagon preserves "object groups" by default when exporting, so as long as you export the separate symmetrical object (At least with Wavefront objects, that is.) with the rest of the model, and don't "weld it", you'll be fine and the maps will be preserved.
To facilitate the above, you can use multiple projection/unwraps across the same object, so long as you are able to "hide" the material zones of the object that you do not wish the current UV-mapping operation to effect. However, this is a bit tricky and somewhat buggy, but it can make some things very easy, so it's worth trying. In my experience, the best way to do that is to hide the entire object, reveal one material zone, map that zone, then hide that now mapped zone and move to the next on the "list" in the material zone window. I find better succes starting from the bottom in preserving previously mapped regions. I don't know why and, as I said, it is a bit buggy, at times. It "might" go better if the object was first exported, then imported as into a new project. But, Hexagon has issues with material zones, especially when exporting individual objects from a working file that has several objects with differing material zones that you're working on. In any event, while going through this tricky mapping process, do not reveal any other material zones of the object that will be displayed on the same screen as previously mapped material zones, else you will lose your work and the mistakenly revealed zone will automagically get the current map applied to it. Again, this is buggy, but it can work in a pinch, saving you a lot of time and increasing the quality of the map.
It is generally a good idea to think about UVmapping an object before its final subdivision, if you're planning on using subdivision. Or, at least, it's a good idea to try to see what quality of map you'll get for the final version. (ie: "Think" about it and test it.) It all depends on how complex the final object will be compared to how the map turns out for the unsubdivided object. Sometimes, the map will not be suitable, especially in cases where you've used the Unwrapping feature and you're trying to produce very accurate maps. (For highly geometric/inorganic patterns, for instance.) Often, however, it's fine for general work. Again - It depends on the complexity of the object. Most "projections" will yield suitable maps when mapped at lower subdivision levels and you'll have less trouble with them at those levels. (PS - Don't map at it's most basic SuBD level and add another five SubD's to it and expect it to yield good seems and good material zone projections.)
Hexagon will not destroy the UVmap of objects that are further subdivided nor will it destroy the map for objects that have certain processes run on them that add/remove vertices. For instance, one can select a series of edges and, using the Connect tool, add an edge-loop without damaging the UVMap. SubD won't evict the map, either. Some other operations will also preserve the map while still changing the number of verts of the object. Your mileage may vary and I can't remember all the ones that are "safe" to use. It's worth noting, however, that you can only use some of these operations a limited number of time in the same basic region of the object before the map gets blown. In some cases, however, duplicate verts will appear in the uvmap and you can still move them to where they're needed. (Attempting to weld them in the luvmap window will sometimes ruin the map. The UVs don't need to be welded, anyway, in the UVMap window, so just move them to where they need to be.) One can also use the "Dissolve" function (Backspace) on an object, especially if it's an edge-loop you're dissolving, and the map will usually not be disturbed other than having some unconnected verts, which you can then weld to their new position..sometimes. This can stretch the map, though, and require manual correction. It's not always safe, but worth trying if necessary. YMMV)
Lastly - Hexagon does not preserve the dynamic portion of your UVMapping work. It will not, for instance, save your selected pins/seems in your saved file when it's saved while you're still going through the Unwrapping process. It will always attempt to apply the most currently valid map to the object as it can, upon saving. This is sad... But, it is what it is, so when UVmapping a very complex object, plan on gluing your red eyes to the screen for a long time.
As always - Save early, save often, save multiple versions of a work in progress. Disk space is cheap, time is not.