Model Room View Question
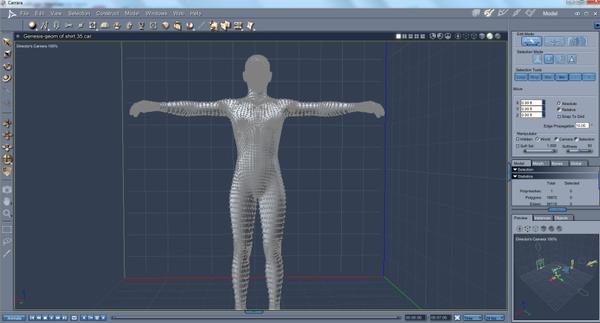
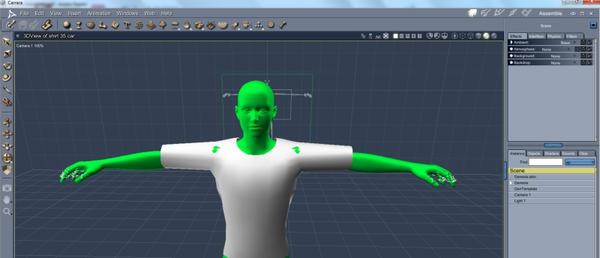
Hi, I was trying to use the model room to make a shirt for gen to be used in daz. The first picture shows I made gen green and saved then opened in carrara, added my basic shirt but when I go the work on the shirt, the gen model and shirt blend together. How do I keep this so I can tell the difference in gen and the shirt which working in the modeling room? ~ Thanks


Clipboard02.jpg
800 x 430 - 128K


Clipboard01.jpg
800 x 344 - 110K


Comments
You need to set it to Texture Shaded, see image below :
I click that but nothing changed. Could be because I have gen set as green or because I saved gen as a obj to get it to load in carrara? I was not sure how to get gen to load in carrara.
Hi Kimber Sue :)
In the assembly room, on the top tool-bar, there are a couple of icons which allow you to edit a model directly in the assembly room.
(See pic) The wrench icon, (to edit the selected object).. and the Hand icon (to stop editing and return to the scene assembly)
Hope it helps :)
The wrench icon works perfect Thanks
Thanks Andy :)
No problem Jimmy C :)
It was actually "My Bad" since I should have explained (how to) in the other thread
Kimber Sue :) Glad to help. and sorry for not explaining earlier,.. but at least you've now got carrara (pro) and can play around with it.
:)
First, I have fallen in love with the carrara modeling room and made a shirt which will work on genesis in daz. However I got a couple things I have been reading tutor, manual on but I need more help.
1) On UV mapping, I get you have to make seams to separate the parts for the uv map and I read
http://docs.daz3d.com/doku.php/public/software/dazstudio/4/userguide/creating_content/surfacing/tutorials/basics_uv_mapping_guidelines/start#control_uv_stretching
but I have no clue after I made a seam line what to click to make it a seam. I really need to find a good step by step uv mapping tutor. Any thoughts?
2) How do I rename the shading domains?
3) Are there any tutors around for learning how to add a seam for design purpose to the shirt object I’m making. I watch a really good tutor for hexagon but could use a carrara one. This is a not a huge deal right no. I can always post a screen show at a later date of what I am talking about.
4) I can't find any books books on cararra to buy. Yes I am old fashion and still love a real book when I learning something. However I am tore between either A) getting cararra pro or b) getting standard cararra and this tutor
http://www.daz3d.com/shop/carrara-8-training-instant-digital-download
Any thought on what how important the pro version is for being able to make clothing? I will probably do textures in adobe cs5 and corel photo paint.
I leave it at that for now.. I have a zillion question running through my head. Sorry to be such a pain with questions but I hope learning this will help me keep my small business alive by pick up some new graphic design clients with the 3D stuff in my small Indiana town.
Thanks for all the help.
Kimberly
As far as I know: the Pro version will not help on modelling the vertex stuff. All you can do in Carrara you can also do in Wings3D (and that freeware has some smoothing tools which Carrara lacks off) or of course in Blender or Hexagon, which is still free. Make your choice.
Simple question: why use Corel Photo Paint if you have Adobe CS5 available? Corel is quite good, but I ever wished to have the money to buy the Adobe suit (with After Effects, of course); missed it, while I was a student, got Max3D for Dos instead ... (anyone here ever used Max3D for Dos? :) )
Uuuh, ooh.
Some simple shirt for Genesis will get you nothing.
It's difficult this times: there's the split between Studio and Poser-users, which cuts possible revenue to half. And there's a small but growing fraction of more advanced users, which simply stopped buying conforming/rigged/static clothes, because that kind of clothing doesn't meet the simplest approach on reality.
I don't do (hyper-)realistic renders, but conforming clothing isn't even enough for the comic style I go for. I want wrinkles and edges and flow ... a shirt like the one you do is 5 minutes work in Marveleous Designer, including UV mapping, and better results, and I spent only two days on this program.
Want to keep your business alive: make shoes (suited for Genesis, of course). Make rigid clothing. Make skin-tight-stuff. Don't bother on something which wrinkles, bents, flows ... that's some stuff which sells at the moment (I don't get why) and which sells the next two years, maybe. Most 3D-starters are 8-to-10-years-off the actual technology ... Poser ... DAZ Studio ... but they will catch up pretty fast when they see what's possible.
The UV Map I want so I can use it photoshop cs5 for adding designs to the front of a shirt. Page 865, got it. I have the manual on my nook and reading several chapters a day but it very hard to read on a nook. The pages flip and flop all over the place and I’ve been reading select chapter on my computer when my health allows. Honestly I have mild Cerebral palsy and my working hours have to be limited some days but with a real book I can sit in bed and read text books for hours.
Your Question: “Simple question: why use Corel Photo Paint if you have Adobe CS5 available?” Because after 15 years as a graphic designer, I can run them in my sleep and most importantly work much faster on them. I can do a 10 clothing textures including adding some cute text or clipart to the front of a shirt in an hour or less on those programs without breaking a sweat. Besides. I like what I know. As you can tell me spelling and sentence structure is horrible due to my crossed wires. Lol lol I am trying to stay off disability as long as I can by running a home businesses. I am only 50 and not ready to sit around for the rest of my life so I am here driving you all nuts with question. Now I have probably told you more than you wanted to know. :P
Carrara makes sense in my tangled wire brain. I tired Wings3D and the window to work in was so small. Blender makes me brain bleed and Hexagon has some features I'll still use but it so unstable and slow. It worth money to me to find a stable modeling program I like. Started my business back in windows 3.1 was the coolest thing ever and some things are simple worth buying what you like.
Sure I love to sell some of the clothing I make, in time; however that is only one part of my 3 part plan.
Part 1 is to target local businesses which I have a meeting with several of them next week. Who want specialize designs that reflect their businesses. Example: There a local tea shop who wants a little girl in a pink dress having tea with her grandmother. I have over a $1000.00 of dollars in content but the lady showed me a dress she liked and I need to be able to match her idea for artwork in order to get her to let me design her new menus.
Part 2 is I have a clipart store and I’d like to make my own unique clothing for kids and genesis kids so I can have one of a kind unique clipart.
Part 3 is while I love Kid 4, I still have a lot to learn for Kids 4 clothing and I love to use genesis kids but there no injections for the genesis kids and no real genesis kids clothing. I like start my own line of genesis kids clothing to sell. I am also looking at Sadie and Sam for Genesis and the clothing and the making hair in carrara. I going to print the hair making chapter printed out.
Have a nice evening
Kimberly
Hi Kimberly :)
Firstly, the "modelled" seam on clothing is a different thing from the UV Mapping Seams.
UV Mapping, flattens out the 3D object into a 2D square grid area,. which makes it easier to apply 2D textures.
When you define a UV Seam,. you're selecting where the mesh will be split, so it can be flattened.
There are some standard, Pre-defined UV Mapping methods for standard shapes, such as Sphere, Cylinder and Box, or planar mapping, and there are different layout options for each type.
In the Modelling room , On the Top Right, there are three blue icons.
Modelling mode / Animation mode / UV Mapping mode.
Then there's UV Unfolding ..(also called Pelt mapping, or UV unwrapping).
This is used when you have a complex shape, you want to be flattened out, and the seams you define on the object, help the program to flatten out the shape onto the grid.
Since this is a "Custom" option which would be used on a "non standard" model shape,.. there isn't a simple guide to where you need to create the seams or add pins,.. it depends on the model, and how you want it split, and how you want it laid out on the UV template area.
for some clothing, you could simply define shading domains and apply a simple UV mapping pre-set like cylindrical, which would give you different areas where the colour / texture could be changed, by changing the shader / texture.
for example: a simple T-shirt would be split at the sides. and mapped with Box, or flat mapping
Once you've defined a seam, then you can hit the Unwrap button.
If it looks wrong,. you can go back and select another seam, hit unfold,.. until it's right.,.. or close enough.
normally, when you Unfold,.. the mesh is split into sections (Islands) ...for example the front and back of a dress, would be split into two separate islands.
NOTE: this UV splitting does not effect the 3D model shape. it only effects how 2D textures and shaders will be projected onto the model.
Carrara isn't great at automatically re-sizing and shaping these islands, but, with a bit of work, you can move, scale and rotate the UV layout to suit what you need. and, Yes,.. there are other programs which will do a better job of Unwrapping a mesh, and you could use those if it makes things easier.
Once you're happy, you can export the UV "Wire-frame" template, by going to the Display tab in the modeller (UV Mapping mode) and clicking the "Export" button and selecting what size of image you want to export.
Then you can take that Wire-frame template into Photoshop, and apply textures on a new layer, to create your final texture map..
Other stuff .....
The Pro version is better, because the modelling tools (all the useful ones) are in the Pro version , ...not the standard.
With Photoshop,. you can work with a PSD image in layers,. and have that displayed on the model in Carrara, ..but you need to refresh the shader in Carrara to display any changes you make in photoshop.
Also,... Carrara has Layer shaders,. which allow you to create a shape layer directly on the model, like a rectangle, circle or oval, and apply a shader or texture to that area,. (like a design on a t-shirt), or a logo on a product box.
The Beta of Carrara 8.5 also has a "Multi-layer" shader, where you can create several layers with different textures or colours, and have different "blending modes" like Multiply, Add, Subtract etc,.. with sliders to control opacity of the layers.
Frank :)
I've used Max for DOS,. although it was called "Autodesk 3D Studio", at that time ;)
Hope some of that helps :)
I did manage to flatten the uv map, overlapping is where I am at right now. I am printing your posting to add to the notebook of postings and articles I am making on carrara. Thanks for all the help.
There you can see, how long it is since then ... I even forgot the name :)