Daz 3D is part of 
Connect
DAZ Productions, Inc.
7533 S Center View Ct #4664
West Jordan, UT 84084
Licensing Agreement | Terms of Service | Privacy Policy | EULA
© 2025 Daz Productions Inc. All Rights Reserved.
Comments
1. I noticed Ears didn't work. I need my elf ears. I've got dozens of elf ears, all the way back to V3. I've already pulled my favorites from V4 into G3F but I couldn't even morph my clone with Izabella's ears. How do I get the ears in?
2. There's been some discussion about head morphs and how you have to use the vertex editor in order to save them. Does that apply to head-only morphs? Like SickleYield's Faces of Asia, etc.?
3. If I create a custom G3F with a whole bunch of partial morphs, you know - dial the eyes, the nose, the mouth, pear shaped hips, give her fangs, whatever. Can all that be transferred as a complete morph?
4. How do I save Favorites? I'd love to have to the morphs that I use the most available with one click every time I load a character (or at least the base characters).
By the way, Dimension-3D has some awsome DUF editor tools - one's called DSON Edit and the other is Morph Organizer. You'll probably want to wait for a sale on those but they're super useful.
Wow, she came out great! I'm going to have to see about transfering her too - you make me what to have her shape for G8F! heheh :D
Well, that's annoying. "None" works just fine. Now. ( I could swear I tried "none" and auto-follow didn't work! Or, I could just swear...)
I'll keep that in mind for all the other G3 brows/facial hair/body hair products I have, (most of which are from RedzStudio!)
I'm working on a fix for that. I've figured out the root of the problem, and have a functioning solution. I'm just trying to work out how to explain it, and how to package the necessary support files.
It doesn't solve the eyes size issue. That's caused by the fact that g3's eyes are open at the back. G8's aren't. With SubD on, this cuases G8's eyes to be fractionally smaller than G3's, because of the way SubD works. At regular size, it's not even notable, though it is detectable. With Toon style, it becomes a thing. The solution is to scale the eyes. Import the morph, dial it on, adjust rigging, then scale the eyes up. so they fit right. Dial up eyes up-down, side-to-side, closed, etc to test that they are fit right. Zero subD and set resolution to base, and export again. Delete G8 from the scene, load a new one fresh and import the morph with eyes fixed. It sounds more complex than it is.
That won't prevent the distortion, but I made a morph for each figure that pulls their eyes out, and separates G3's pupil and both figures' eye moisture. It's the pupil and eye moisture that cause the most distortion, but the way the eyes intersect with the head is also an issue. I also made a morph that helps make a better fitting clone if you make your own G8 Clone for G3, but I'm thinking that's not kosher to share.
I love the examples people are sharing! I'm having more fun transferring my characters to G8F than I ever did using them on G3F. I think it is the sense of accomplishing a technical challenge that thrills me.
Here is a combination of Brita, Frida, and Girl 7 (and a bunch of individual morphs dialed in by the randomizer). I transferred the whole shape as a single morph. The skin is Haven for Girl 7 with surface changes. The eyes were borrowed from V8. The hair is Reyna.
Not sure I can clearly answer the rest of your questions, but this one, I can.
In a word, yes. Yes it does.
Basically, G3 and G8 need helper morphs to deal with the way a person should be shaped when they lower their arms vs when they raise them. The T pose requires a lot more help than the A pose, so you end up with slightly different placement of the shoulder areas, even if you line up the bones exactly. This different placement carries through to the morph, even if all you do is a head morph. To get rid of it, on a head morph, you need to exclude the body with facet or vertex selection.
So pretty :)
Thank you, Laurie. I appreciate all the coments people here are making on the images.
It's usual for ear morphs that autofollow is disabled (so the hair doesn't deform around them.) In this case you'll need to enable autofollow on the morphs you wish to transfer. The autofollow won't apply until you unfit your G8 clone (right click and fit to none) then refit the clone to the donor figure and the ears should work.
This method is ideal for transferring custom dialled characters because you are basically transferring the entire shape as a single morph. That's also why you may get some unwanted vertex changes when transferring individual head/body part morphs.
You may find the transfer utility method better for individual head/body part morphs, as the transfer utility doesn't transfer the base figure shape. In fact if you use the transfer utility method, to get the exact shape of a character, you would need to dial in the donor figure's clone. (though that has it's own problems)
I don't think there's a way to save favourites. I wish there were.
Young Teen (Growing Up) Duffy
If you plan on creating separate head and body morphs, you can save yourself a lot of time by saving a scene with a G8F with Selection Sets. After Step 6, in the quoted instructions above, (still in the Geometry Editor,) right-click in the viewport and from the popup menu, select Geometry Assignment->Create Selection Set from Selected. Name your selection something you'll remember—like Fullbody, Head, Ears, etc.—in the next popup window. Continue from Step 7. (I set up both FullBody and Head on mine, each set being the inverse of the other.) Be sure and save the scene with a name that will make it easy to find later, too.
To access the Selection Sets in the future, open your saved scene and click on the Geometry Editor Tool. Right-click in the viewport and select Selection Type - Vertex Selection from the popup menu. Right-click in the viewport again and select Geometry Selection->Select By->Selection Sets->[name_of_selection_Set]. You can do this before or after loading the morphs. (Don't forget to favorite the morph before continuing to Step 7 above.)
Thank you very much Redz.
Ack! I think it's time to crank up my source-code editor and other tools and just hack all the files at one time. This could get time-consuming.
And, of course, they're compressed. Google said something about a batch decompress tool in DS? I can't find anything except DSF Toolbox in the store. The OP made it sound like something built into DS.
Do you have all of your ears morphs on Genesis 3? If so the transfer utility will port them over without having to alter the autofollow. You need to favourite them and check only morphs favourites when performing the transfer.
Barbult: doing this makes me feel better about avoiding spending several hundred dollars after I just spend several hundred upgrading to G3 literally two months ago.
Also I don't HAVE that money and by the time I do, even if I wanted, all the sales would be over and I'd then face waiting.
Considering I'm quite satisfied using older stuff but want to poke at some of this stuff, too... yay!
Do you have an unzipping tool? I use 7zip - you can run it on a compressed .dsf or .duf and it will uncompress it for you - it won't work on encrypted files like .dse (for obvious reasons) and I've run into a few other files it won't do, but for morphs files it's generally fine.
I'm all for upcycling my purchases. It irks me no end having to leave behind all the HD morphs that I've bought so I can upgrade on the figure. I may have to start baking normal maps.
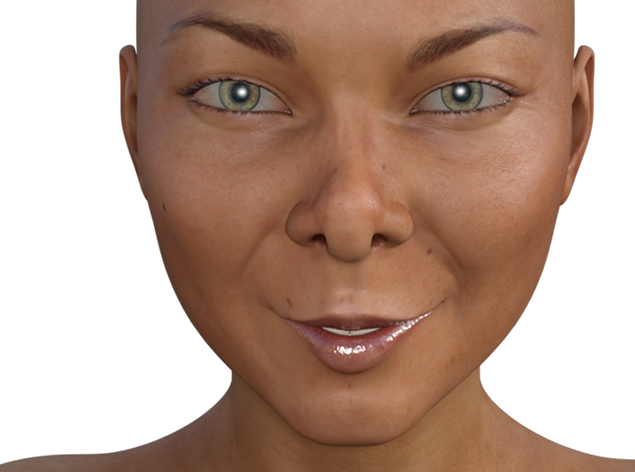
Is it worth the effort to port over the morphs? I think so. Here's a direct comparison of Genevieve 7, same pose, same subD, both with smile expression. G8 on the left, G7 on the right.
For me this is an enormous improvement.
Yeah, I have to admit that the way the body reacts to expressions and posing seems definitely superior to prior stuff. There seems to be a good progression of things like bends and so on with each generation.
I'm not super thrilled about body morphs, something about going G3->G8 does some weird stuff with the shoulders, but I don't care about that as much as capturing different faces.
And yeah, baking Normals seems the way to go.
Here's a closeup of that Exile from before. This was G3M -> G3F -> G8F, and I used Substance Painter to capture Subd4 Normal details. I ended up having to use heal brush on a small bit where the Normal was angular and not looking right; in retrospect I should probably have grabbed the normals at 8160x8160 to get more detail. Next time!
The normal maps really do give the detail. Is substance painter good for normals? I have Mudbox, which I can't get to work properly with creating normals from separate subd and base meshes. A single subdivided mesh no problem, but with two meshes you can see the polygons in the maps, regardless of the settings. :(
More testing. Still having the issue with disappearing parent pointers. It's strange, though. It doesn't impact every morph brought over, just some of them. Which migh explain why things were breaking after saving. I'm not exactly sure atm. Not that I fure it matters much. It's just one extra step in FAR to fix it, so ...
I'm not sure baked normals or displacement would be an effective means of creating an HD like effect. Unless there some way to control the strength of the maps via ERC. Doesn't seem like you can do that. I'd say it was unfortunate, but if it were that easy to hack around via displacement, Daz wouldn't have a lot of value add with HD.
I guess it's not that big a deal if you're only doing stills, but then you have to make normals/displacement at varying strength. Otherwise your only options are HD-like at 100% or at 0%.
So far, every non-HD expression element I've tested between g3 and g8 is exactly the same, and HD makes a pretty big difference.
I like Substance Painter 2, been meaning to get Mudbox but I just don't make enough art money yet to cover another monthly fee.
The big problem with SP2 is that it won't cross surface zones, which is... really flipping annoying. There are work arounds of sorts (like relying more on layers of procedurally generated stuff), but ugh.
It does, however, have a bunch of Bake Shader functions, including AO and Curvature, and a reasonably simple 'bake Normals from higher resolution object.' Bam. Easy.
(And then export and use the Open GL Normal output)
Check out the free demo.
The shoulder issue is caused by the default G3F clone, which is not precise enough. If you follow my clones tutorial (posted here yesterday) to make your own superclone using Singular Blues method, then the shoulder bends come out perfect.
Below is Aliyah ported with the default clone on the left and looking terrible, and with the new clone on the right. Definitely worth the little extra effort, plus into the bargain you get autofit clones to fit G8 stuff to the older generations.
I will do thanks, though the inability to paint across surfaces is a major turn-off. Mudbox is good for many things, but you have to rename all of the textures to import them, so it's not a natural fit with Daz Studio. But you can sculpt using texture maps, which helps a lot for getting nice normals.
I've been using this method (Thank you Redz et al) to convert all my Genesis, G2F and G3F's (how did I ever get so many characters?). Now I am trying G2M but I ran into a bit of a problem. When I get to the part where I load G8 and use the morph loader to import my G2M clone it tells me the geometry doesn't match. I've been doing this stuff all day so I've probably missed a step but my clone looked lik G8 (with breasts) and I wonder if it should look like G2M (without the breasts)? Just want to check (before I do it all again and get the same result) that - if converting from a Male figure - there might be another step. I saw someone talking about Male Clones for G8 (Ithink it said look in the parameters tab) but I couldn't see those and now can't find the thread where it was mentioned.
Can anyone shed light?
Much appreciated.
Awesome!
They have the same mesh from a purely topological point of view. Much the same way as a cow can be abstracted to a sphere for certain physics/math purposes. That is, if you assume the cow is a sphere, you'll get an answer good enough for most abstract purposes. But if you make that assumption while dealing with Bessie directly, there will be problems.
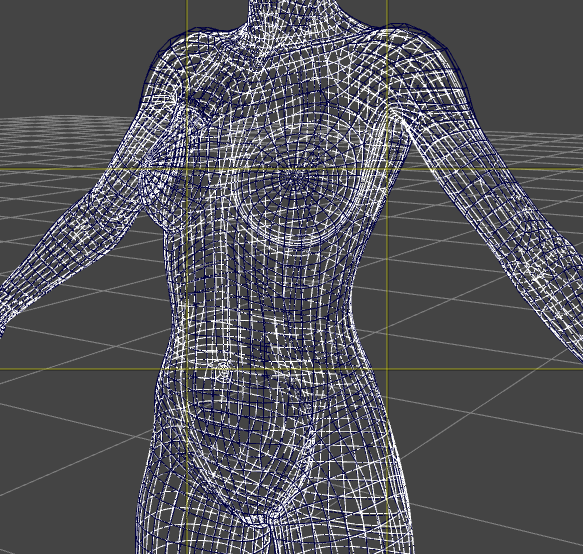
Here's the issue:
G3 in Blue, G8 in White. G3 starts in a T pose. One of the issues with T poses is that human shoulders and traps scrunch up when the arms are held like that. Without some seriously detailed and fiddly weight maps, when you bend the arms down, the shoulder end up bulging out.
In addition to this, G8's pecs, above the breasts, are curved differently, and so is her butt. For whatever reason, Autofit does not correct this entierly, so you end up with areas that are not quite right. There are other differences visible, like along the forearms, and the navel, but that's more sherical cow territory than practical problem.
This means, even using clones, the shoulders will be a bit off. But without a clone, G3's shoulder position combined with her JCMs cause distorition in the transfer, much the same ways as JCMs can cause distorition when trying to bake rotations for high heels.
Clones reduce the issue, but the only way to eliminate it entirely, is to edit your clone externally so that all the verts match up to G8 exactly. When dealing with older figures, there's no real point to that kind of thing, there's no one to one matching, so there's always going to be a variance, no matter what too you use.
It sounds like you're trying to load G2M geometry to G8.
Having not looked at Redz's tut (it was my idea), you don't load a clone to G8. You load the clone to G2M. Trying to load it to G8 sounds like the issue. You shouldn't need to add a clone to G8 for that figure. G8 already has one.
EDIT: If your issue is in part two of Redz's tut, make sure when you are exporting your adjust G8 shape, nothing but g8 is visible in the scene, otherwise you'll end up with two or more figures in one mesh. This can be cause by having G2M visible, or by have g8's eyelashes visible.
This looks great, what did you do with the skin? It's the best I've seen!
I have tried this without complete success. I have een especially confused by the tranference of the textures etc., as you may note from the attachment. I have tried manually matching the G8 figure parameters (left) to the G3F (Molly tewaked, right) of the torso, but as is obvious I have something not working. Is there a simple way to transfer them without having to laboriously enter every parameter by noting its details on G3F and entering them on G8? The eyes also have not carried over, which is a pest because I have no idea which eyes I chose for Molly - probably not her originals. I haven't tried to match the face colouring etc.
Shaping is reasonable but not absolutely right, but I can live with that.