Lighting Tutorial by Laticis Imagery - Pretty good
 Muon Quark
Posts: 563
Muon Quark
Posts: 563
I just wanted to share the results I got after getting that tutorial by Laticis Imagery. I must say, it's an excellent beginning for lighting. What do you guys think of this picture? This is straight out of DS4 with no post work. It is Hitomi with one of the Hitomi Candy textures and her day dress.
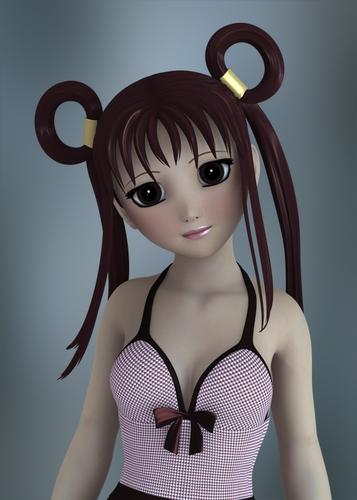
hitomi.jpg
500 x 700 - 209K
Daz 3D is part of 
Connect
DAZ Productions, Inc.
7533 S Center View Ct #4664
West Jordan, UT 84084
Licensing Agreement | Terms of Service | Privacy Policy | EULA
© 2025 Daz Productions Inc. All Rights Reserved.
Comments
I think you did a great job! I had to go find the product because I wasn't familiar with it. Looks like you achieved results just like the example except for the skin types (realistic vs. toon). Now it's sitting in my cart! lol
Here is the link for anyone else interested in the product http://www.daz3d.com/portrait-lighting-tutorial-for-ds4
Thanks Szark. I should have provided a link. LOL
One thing he does point out is not to ignore the textures either. You can play around with the textures to get different effects but I really do like this light setup. I thinking you can change the colors of the lights to whatever you want, up or lower the intensity, etc. It's a pretty nice beginning setup.
My pleasure.
And Laticis is right to point out that textures/surfaces play a big part in getting good results, even if you aren't wanting realism you can still bring a scene to life with tweaking the surfaces and with good lighting.
Hope no one thinks what I said was a criticism. I just meant that the two characters do have different types of skin textures originally. I swear each day I lose more of my ability to communicate effectively. :down:
I didn't read it like that. :)
i always set my skin surfaces up in white light then once I get close to what I want I then change the light colour. :)
This looks very nice. I have the tutorial in my wish list. I will probably buy it at some point.
No no, not at all. I knew exactly what you were saying. Toon/Manga skins are very different from textures like Bree, Valerie, etc. I didn't take it as a criticism so don't worry. She could use a little more shine though. LOL
:-)
Thanks, you guys. :) I did buy this and am looking forward to trying it out thanks to this thread. Chalk up a sale for Muon Quark. ;-)
Here's another with Sadie. Same lighting setup except for a higher intensity.
Pictures are great.
I personally would have liked more information about why you were doing certain things, rather than "do this" and then the "oh you'll only really learn if you play". If I had bought it at full price I would have returned it. I'd recommend Blondie's lighting tutorial for those seeking more info.
Hi Muon Clark,
Glad to see you getting good results, well done.
The tutorial is designed for one thing in mind, to give you a strong lighting foundation from which to build off.
Did you find it easy enough to follow ?
I wanted it as simple and clean as possible so as not to over complicate the process.
Cheers Laticis
I found it very easy to follow and was happy that such a simple set up gave great results. I can see that it will be easy to modify to get different results. Thanks for making a great tutorial!
:-)
Your welcome Muon Quark, thank you :)
My opinion, based on my first efforts: the tutorial provides easy-to-follow instructions on putting together a light setup that delivers excellent results, more or less on par with some of the best professionally-made light presets I've used. It's very satisfying to be able to assemble the lights on my own, and I look forward to tinkering with the various settings in order to make lighting appropriate for a variety of different scenes. I did know a lot of the things covered in the tutorial pretty well already, but the new things I learned seem very helpful and important, and well worth the price, given the resulting renders. Overall I'm very satisfied with this tutorial.
One criticism is that some of the "fine print" (for instance, the render settings in step 2) can be very difficult to read.
I hope we'll see a follow-up to this! Either another lighting tut, or something focusing on skin materials settings, perhaps?
Hi Scott,
Thank you very much for your posted images and feedback.
Seeing your rendered results makes me proud.
I know the lighting setup is quite simple but it works and anything that is easy and effective has got to be a good thing ;)
Thank you for your criticism as well, I will learn more from that anything else, any more criticism are quite welcomed.
The fine print was a hurdle, hence the two difference sized PDF in an attempt to combat that.
Trying not to clutter the page and offer a screen shot was tough....but I do have some thoughts on fixing that for the
"possible" next one.
I have even thought of a possible video tutorial...not sure on that one though.
Thanks again for your feedback.
Cheers Laticis
Hello Laticis. I have seen many of your excellent images in Daz forums, that is why
I have bought your tutorial immediately. Please prepare more tutorials and share your knowledge in them.
One possible improvement for the future is to make a printable PDF on the white background,
to save the toner while printing.
Hi Artini,
Thank you very much :)
What a great idea for a eco friendly and cost alternative printable PDF.
Thank you for your feedback.
Cheers Laticis
You continue to crack me up...LOL
Yep still laughing...awesomely funny :D
I was thinking of using a series of clicking noises...something like dot dot dot dash dash dash dot dot dot ;)
I couldn't resist... the oppotunity..I tried to resist the urge, honest.
Glad you didn't...it was so worth it :)
Gotta crash now zzzzz
Very good tutorial, well explained step be step and well illustrated ... in one word : perfect :-)
Nicely done Scott. Love the squirrel. LOL
And I agree it was satisfying to build the lights on my own.
Thanks!
Thank you very much Kalisx :)
Yeah, the squirrel and the matching expressions rock :)
I had thought of supplying the Light Preset with the tutorial but there where fears that the learning might be lost.
" Give a man a fish and he will eat for a day, teach him how to fish and he will eat for the rest of his life. "
Got your tutorial as soon as it was released and have been very happy with the way it was written and the final results. Hope to post something in the next day or two.
Thanks for your comments on the squirrel render. :)
Had another play with this...this time I changed the colors a bit. No postwork on this or my previous ones.
Thank you very much GingerCakes :)
really looking forward to seeing your results.
Hi Scott :)
Great to see David under these lighting conditions, must admit I haven't tried that myself yet.