Hair shader sets. What's possible and what isn't?
 wsgentry
Posts: 572
wsgentry
Posts: 572
I've got virtually every hair shader set available here and elsewhere. Two of the things I've wanted to do are these:
1. Multicolored horizontal bands. Sort of like brown to a darker brown, to purple, then to black. So far, only from brown to violet or black--just two colors. (I know it's possible veritically but horizontally eludes me.)
2. Two colored racoon tail style horizontal stripes, restricted to specific areas of hair--sort of orangy brown to black, then back to orangy brown, etc.
Are either of these possible with tiling, etc.? If so, can some please give me direction on how to do it?
Thanks so much in advance!
Scott
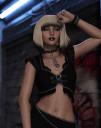
PS. I'm attaching an example of blonde to black horizontally.
Daz 3D is part of 
Connect
DAZ Productions, Inc.
7533 S Center View Ct #4664
West Jordan, UT 84084
Licensing Agreement | Terms of Service | Privacy Policy | EULA
© 2025 Daz Productions Inc. All Rights Reserved.
Comments
Probably not through a shader but if you crerate a UV map, then a material could do it.
Thank you for the suggestion! Sincerely, I've never created a UV map so I'm at a loss regarding that process, too. :)
Scott
#2 is possible using Strand-Based Hair and texture maps. https://www.daz3d.com/forums/discussion/335676/strand-based-hair-mini-tutorial/p4
You can get some of those effects using OOT's hairblending. But to get everything you want you're going to needhair made for it or to edit the maps to create surfaces to do it.
"Through UV mapping"... Translation... "Altering the image that the hair object uses".
Most paint programs can do what you request. However, not all hair is created equally. Some use tiled hair, others use full-length maps for the hair. Meaning, a tiled hair will repeat the pattern along the width and length of the hair, to the ends. Those who use full-length mapping, will use the whole image to cover the full length of the hair, but it may repeat along the width, or be used multiple times across chunks of hair.
The mapping you want, is the one with the full-length arrangement. Often, those images can be identified by the change in color or "tapering", from one end of the image, to the other. (The roots usually being darker, as they are in nature.)
To edit them, I suggest getting a blond hair color, which will edit better. You can convert it to "Grey-scale", or do a "Colorize" with 100% white. (Same thing.) Then, convert it back to full color, and start coloring it on a new layer with an "Addative" or "Colorize" blend-mode. Save it as a new image and load that image into the material, for the base-color.
There is sort-of another option, using the "iRay Decal Node", found in the "Create" menu area. That will project an image onto an object, in various ways. The image can be blended, so it only alters the existing image, instead of fully replacing it. You can project a "color gradient", over just the hair, to tint it. You have choices of UV-matched projection, or the typical "stamp", style procection. (UV matched is good if you want to alter an existing UV-map, without altering the existing UV map. EG, for something like a body tattoo, splattered blood or makeup and eyebrows, which must move with the model. The stamp method is better for things that may not "flex" or "distort" much. Doing a top to bottom coloring gradient is mostly safe, since most hair does not move much from the origin of where it rests. However, this is not good for "colored vertical or contoured strands", where the UV matched projection/decal would be better.)
Actually I think the suggestion was setting up new surface groups. Image edotors can edit images, and a mask or control map could be used for soem of this, but they are not UV editors or geometry editors.
I realize what the original poster was implying about UV map editing, but remapping UV's is not the only way to do things, "through UV mapping".
For what the original poster was asking, remapping UV would be a bit of overkill, and not a possibility for most people to manage. Using the existing UV mapping, like I stated, is possible with any paint program, provided that the UV mapping is similar to the stated layouts/formats. You just alter the images, which are already UV mapped.
If he knew what UV mapping was and how to do it, he wouldn't be asking this question, trying to use shaders. Remapping images to an objects surface, within daz, isn't even possible. Just as his desired edits to hair, are not possible within daz, through "shaders". That is like using an impact-wrench, vice-grips and a generator to power the impact-wrench, just to remove a twist-top off a bottle of soda-pop. Just twist off the top with your paint program and paint the light and dark strands with the sun-faded ends.
I'll check that out! Thanks!
Wow... I didn't know my question would cause such things. Is there a tutorial or something that will point me to do this via a UV map, Decal, or something else?
For the record, I've got a lot of OOT's hair products--they're great, but I don't think they can do what I want, either.
So, I figured I couldn't do this with a shader. :)
Scott
Sloshwerk's latest hair shader set, ColorWerks Extreme, uses a simple black/white mask for blending the colors. There's even an example that creates alternating horizontal bands. It would be limited to 2 alternating colors unless you got creative with your own color maps for the Blend 1 and Blend 2 color channels.
Yep. I know. I've got it. Problem is, the bands cannot be located anywhere in the selected hair segment. It's odd. The ability to move the mask would be a good thing, but I don't know that's possible.
Scott
I wonder if the 4 layer shader that was added to Daz Studio a couple of weeks ago could be used for this.
Are you talking about the MMX Dual Lobe hair shader?
No, I was talking about the 4-Layer Uber PBR MDL shader. If your installation of DAZ Studio is up to date, you will be able to find this in "Shader Presets - IRay - Daz Uber". It has a base layer plus 3 stacked layers that use grayscale masks to determine where each layer is visible.
I tried using this on hair this morning and am still a bit undecided about the results. The shader takes a bit of work to set up, so perhaps someone with a better understanding of IRay shaders could get better results.
Anyway, here's a render using this shader with hair. The hair blends from brown at the roots, through a pink/blond colour to blue and then to purple at the tips of the hair. For this, I used hair texture files that came with ColorWerks Extreme.
Here's another example using the four layer shader. This time with a hair that has strands that are more similar in length in order to show the multicolored horizontal bands that you are looking for.
Same settings as the first image, except that I changed the base (root) colour from brown to red.
I have it. Thanks! I'll play with it and also the Selectable shader.
Scott
I played with it for a bit... based on your results, this is exactly what I'm after for the multicolored hair, but I'm having problems with masking. What masks did you use? (I see bottom, middle, top.)
Thanks again!
Scott
I've attached an image showing the settings I used for the layers. The masks are greyscale images with a narrow horizontal gradiant transition between black and white sections. I just used trial and error. I created a series of masks with the transition at different points, turned on IRay preview mode and loaded different masks until I found the ones that worked. (I think that both of the hairs I used have reversed UV maps, so the positioning of these masks will probably not work with other hairs).
Thank you so much! Last night I looked around and it turns out that you're on the cutting edge, actually producing a very cool effect!
Thank you, again!
Scott
I hope you don't mind if I ask just one more question... what hair did you use for both examples? I've pretty much discovered some incompatible hair.
Thank you in advance,
Scott
I used the Riley and Andria hairs for the examples posted above. I chose these because there are relatively simple with only 2 surfaces, the hair and the cap. In reflection, this was not the best choice as the rotated UV's combined with the fact that the shader loads with the masks set to be inverted made it very difficult to understand how the masks were working.
Today, I tried again using the OOT Classic Bob hair. I turned off the inverted option for the masks (in the image editor in the surface pane) and could finally understand how the masks apply (from bottom to top, white exposes the layer and black hides it with layer 3 at the top of the stack). I find it easy to get reasonable results with bright coloured hair but have been struggling to get good results with more subdued and darker hair shades.
What incompatible hair have you tried and what kind of results are you getting?
Thank you again! Bang Bob hair--it's dForce type hair. Also OOT's Liv hair. Maybe it's the way I'm doing it, but all I get is vertical clumps! :)
I have the Bang Bob hair, so I'll try it when I get the time. I don't have the Liv hair, but I think it should work ok.
Quick (and maybe daft) question: are you putting the transparency map for the hair in the base cutout opacity property?
Actually, no I'm not. I'll try it. Below is what I get when I first activate the 4-Layer shader.
Edit, just did it. That fixed it. :) Thank you, again!
Edit 2: I've attached where I am, now.
Scott
Here are a couple of examples using the Bang Bob hair. You certainly picked one of the more compex hairs to start with.
The first image is the hair plus a single thin hair addon with the 4 layer shader applied to all surfaces. I don't really like the result as the blending on the fringe compresses the blend on the side and back hairs.
The second is an attempt to get something that is visually more appealing with this hair. The main hair has individual surfaces for the fringe, so I have turned off layers 2 and 3 and adjusted the layer 1 (blue) mask on the fringe so that it lines up with the side hair. The thin hair addon doesn't have a surface for the fringe, so all I could do is to mask it to line up with the fringe. This results in streaks down the side of the hair, but I think that this is quite a nice effect.
Looking at the second image, you're making progress. I can see 3 layers with different colours. A tip for working with the shader is that you can turn off layers by setting the layer weight to zero. This allows you to set up each layer on its own.
I think what might work better is to not have all four colors on the bangs--they have surfaces. Maybe use only two and see if they can line up with the base and the layer 3.
I think I have a problem with the glossy bit. I'm gonna play with it a lot over the weekend and go from there. Thank you again!
Scott
I think I'll do just that! Thank you!
Scott
When I looked at the image you posted I wasn't sure about the glossiness, but it's difficult to tell from a screen shot.
When I started with this, the first thing I did was to load two copies of the hair into a scene and arrange them so that I could see both. One had the original hair shader. I applied the 4 layer shader (4LS) to the other and turned off the 3 layers so that only the base layer was showing. I copied and pasted the surface settings from the original to the 4LS. I set the transparency map in the 4LS. I then took screen shots of the shader properties for the original hair and went through them one by one and set the matching values in the 4LS to the values from the original. My goal in this was to set up the base layer with values that would be appropriate for use on hair. This was made simpler by the fact that I was using a hair with only one surface. After I had the base hair looking right, I turned the layers back on and started using diffferent masks and colours. Once I had set up the shader for the first image I posted, I saved the surface settings as a shader preset. For all the other examples, I started by applying this shader preset to all the surfaces on the hair, changed the transparency map and then tweaked the masks and colours.
In the title of this thread you ask "What is possible?". Part of the answer to this is that it depends on the design of the hair. With the Bang Bob hair, you will be able to get the colour in the bangs to line up with the rest of the hair by altering the masks used on each surface. However, this hair is designed to look it's best when used with one or more layers of the thin strands hair. The thin strands hair does not have a separate surface for the bangs, so you won't be able to get this to line up with the underlying hair.
Thanks again. I did what you suggested by shading the bang bob hair directly with stock hair and shader, then got the settings and copied them to the one with the 4-layer shader. It's interesting, but man there is a LOT more settings for the base with the four layer shader than there are with the standard Iray Uber shader. One of the things I've found is the stock Bang Bob hair uses the actual hair shader in the glossy setting. So, I did that. It helps.
At this point, I'm wanting to get clear divisions between the layers as I can't turn off layers. I'm going to redo my masks. I made them 2000 x 2000.
Scott