IES Profiles in Iray.
 aaron575
Posts: 146
aaron575
Posts: 146
I have been doing some experimenting with IES profiles and thought I would share what I have learned so far.
So what are IES profiles, well basically they are maps of how light spreads form the filament or whatever else the lamp is using to generate the light. All types of globes are different and most globe manufacturers provide the profiles for them free of charge so we can visualise them before purchase. There are thousands available on the web and I found this set of 30 files that came with an image of how they will look when rendered. http://www.mrcad.com/download-free-ies-lights/
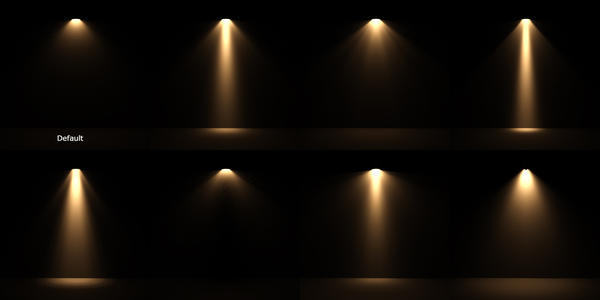
The image bellow has a few examples of the different profiles in the pack. I used a sphere and scaled it down till I thought it was a good size for a globe, added a couple of planes for the floor and wall and a couple more to hide the sphere so the glow from the sphere wouldn't distract placing the sphere as close to the wall as I could.
To the sphere I applied the 100W bulb shader from DZFires Real Lights Collection (in my opinion they are a must have) and plugged one of the ies files into the Emission Profile channel. To get the light pointing in the right direction rotate -90 on the X axis to point down and +90 to point up.
So back to the image bellow, the one marked default is DZFires 100W bulb at its default settings. In the rest of the images the only change that was made is a different ies profile in the Emission Profile channel.
I am really excited about this as it adds a whole new dimension for lighting inside DAZ Studio. I hope that I have made this easy enough to follow as this is still new to me. I wanted to put it out there hoping others will add their thoughts as well.
I haven't been able to get this to work on planar mesh lights within a scene, for some reason the profile shines from theedge of the plane and not the Surface, thets why I used a sphere.
Daz 3D is part of 
Connect
DAZ Productions, Inc.
7533 S Center View Ct #4664
West Jordan, UT 84084
Licensing Agreement | Terms of Service | Privacy Policy | EULA
© 2025 Daz Productions Inc. All Rights Reserved.
Comments
Her are a couple of quick renders using a single 100W bulb above the table. The first without IES the second with.
Very interesting, thanks :)
Those will definitely be useful.
Hi,
your illustration looks interesting.
But where do I have to copy the ".ies" files to, to get the lights available under the lights presets of DAZ?
There aren't any .duf files. How do they work?
Andy
The immense advantage of physical based tools: you don't hack around trying to accomplish an effect, you get the data about the real life items you are dealing with, type them in the program and press the render button. It could not be simpler than that.
Add a light source to scene (or add emission to a surface). With the light source selected, In the surface editor, select "Emission" tab, you will see the light settings, there is an "Emission Profile", LMB on that and select the "Browse" option, you can then browse to select the ies Profile you want to use.
You can then always save that ies/light to the presets if required.
You put the .ies files anywhere...I put them in a folder labeled IES in my Runtime > Textures folder. Then you have to manually attach them to the lights...it's been a while since I used any (a couple of months ago in the beta), but I think it's under the light's parameters. It should be a down arrow, like there would to attach an image file.
And then you can save the light as a preset, after you attach the ies file to it.
Yes Andy Steve and mjc are spot on and sorry for not making it easier to understand, I am not much of a tutorial writer.
What I am doing is getting physically based light to shine out of a physically based globe, what can be more real world than that.
What I am doing is getting physically based light to shine out of a physically based globe, what can be more real world than that.
It is what I meant. Maybe my words where not clear, I was contrasting the easy and intuitive workflow with a PBRs with all the "cunning tricks" you have to resort to with non PBR engines to just approximate reality.
Hi aaron,
sorry, but I'm not that experienced with iRay. So I didn't know, what .ies files are good for.
Now I tried and it is really nice.
I applied it to a little simple plane representing a light emitting device in the ceiling. But surprise - no light.
Positioning the plane lower in the room solved the mystery. Applying emission to a simple plane the direction is upwards. Related to the UALs I was used that emission is downwards.
OK :smirk:
Indeed - your files are very helpfull.
Thank you.
It is what I meant. Maybe my words where not clear, I was contrasting the easy and intuitive workflow with a PBRs with all the "cunning tricks" you have to resort to with non PBR engines to just approximate reality.My bad, I just read it the wrong way, it's 3:30 am here and I haven't had any sleep yet. You are so right though, I am having a ball learning Iray and the quality/realism simply amazes me. :-)
What I have found is that when you load the ies file the light is pointing vertically so you need to rotate the geometry on the X axis to have it horizontal.
Hi again,
now that's crazy. It seems that your ies-profile applyed to a simple plane lets the light emit only to one of its borders. Not perpendicular to the plane as expected.
Attached you see the set. The little white line (in front of the upper part of the door) shows the little plane horizontially oriented, which should work as light element to be integrated in into the ceiling.
In the end it should be placed on the ceiling with 2m distance to the door and emitting downwards to illuminate the floor.
Only for the test I placed it in half hight.
Sorry for that special setup. But how can it work?
No, that will just rotate the profile too. What you do is use the new option to set the main axis when creating the primitive - to Z negative for an IES profile.
Yes so far.
But there are two bad aspects.
1. It only emits in the area from what is in the same hight to the perpendicular, as you see in the picture above,
2. Then it wouldn't be any longer parallel to the ceiling. As a result you have a perpendicular poking out of the ceiling little object.
If you declare the object emitting in both directions (Two Sided Light), you get a dark line between the two light cones.
Hi Richard,
you answered to quick. :)
But yes, thank you. That's it. Additionally I just have to turn the plane -90° in x-Axis.
No, that will just rotate the profile too. What you do is use the new option to set the main axis when creating the primitive - to Z negative for an IES profile. Thank you Richard, that loads the profile on to the surface instead of the edge of the plane. Thats why I was using a sphere. You still have to rotate the plane to get the light to shine where you need it.
Yes,
and here's the result.
Profile used: ies#23
Good luck with your experiments.
The set axis option for primitives is a new feature, so it will take some getting used to...
But using IES profiles will bring the 'realism' factor up a couple of notches. Because some of the things in the profile are falloff, light amount (luminance), shape, angle, number of lobes of the beam and possibly even color temperature (I've seen some profiles that do specify the temp, but not sure if everything will use that info), The primary purpose of them is to provide real world data to lighting designers and engineers, so when used in a program that understands the data, the output is as if the lamp the profile was for is actually being used to light the area/scene. There are many dedicated applications to display the profiles as light sources and most, if not all the dedicated architectural rendering programs are capable of using them. Most buildings designed in the last 20 yrs or so have lighting designs based on using IES profiles to visualize the light in the space...and before that, there were methods of using the data to do it manually. I have a copy of an old IES data handbook...it's got a ton of older lamp data that I've been thinking of manually transcribing into the modern profile format...but that's a project for next fall/winter.
There is one thing to be aware of, though, scale...if the profile is for a 'can' lamp that is 3" in diameter and you put it on something that, in 'scene scale' is much larger than that, the shape and whatnot will be correct, but the overall output won't be. It's not so critical for 'generic' type profiles...but highly shaped/directional ones it is....especially 'cans' or other recessed type fixtures. Turning actual scene geometry into emission sources and attaching profiles tends to eliminate that problem, because what you are attaching the profile to are usually scaled correctly.
And, no, it's not true that IES profiles are just limited to PBR renderers (not all of them can use them). It's more of whether or not the renderer has the needed code to use the data...if the light 'shader' has the necessary controls available and the code to interpret the data, it can use the profile. Unfortunately, Studio/3Delight don't have the needed components to use them outside of Iray or Luxrender (maybe Ocatane...I don't use it, so I'm not sure of what features it does have).
I have posted these links elsewhere on the forum, but will post them again here due to topic.
IES veiwer :- http://www.photometricviewer.com/ To view the IES files.
IES generator:- http://www.vertheim.com/ies-generator.html For the more adventurous who would like to create their own IES profiles.
Both are free.
I do use both programmes and they are clean (no viri etc)
There are some fluorescent profiles here:- http://www.lithonia.com/photometrics.aspx
There are some fluorescent profiles here:- http://www.lithonia.com/photometrics.aspx
Thank you very much Steve, I have to go out now but will look into them when I get back :-)
Thank you very much Steve, I have to go out now but will look into them when I get back :-)
The Vertheim site has a bunch of IES profiles, in addition to the tool...and I believe there are some tubes, there, too.
Lithonia has just about everything, but you do need the viewer to make the most of what they have. Because, they've got more than you'll ever need.
Thank you very much Steve, I have to go out now but will look into them when I get back :-)
The Vertheim site has a bunch of IES profiles, in addition to the tool...and I believe there are some tubes, there, too.
Lithonia has just about everything, but you do need the viewer to make the most of what they have. Because, they've got more than you'll ever need.Just installed the viewer, what a great resource. Thanks for your advice and help.
These are Windows only BTW = booooo